上文介绍了 拖拽添加组件 的简单实现,本文将继续给大家分享如何自定义拖拽组件位置的简单实现,文中通过示例代码介绍,感兴趣的小伙伴们可以了解一下
本文主要介绍了 Vue自定义拖拽组件位置的简单实现,具体如下:
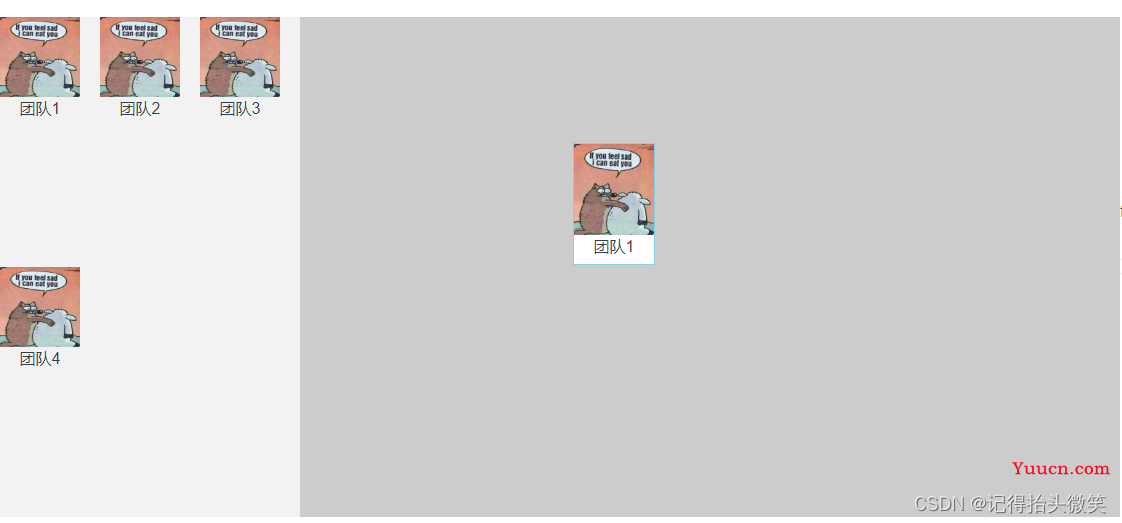
效果图

实现过程
- 给画布中的拖拽元素绑定 onmousedown 事件并把组件身上绑定的属性和在拖拽元素列表的位置传到事件处理函数中
- 在 data 中声明一个 标识位(下面会说到) 和 保存鼠标点击位置的对象(containerMoveObj )
- 在拖拽元素的 mousedown 事件中,从事件对象上面获取到鼠标当前点击的位置 event.pageX 和 event.pageY, 并记录到 containerMoveObj 的变量中,最后把标识位设置为 move (移动)
- 给画布绑定 mousemove 事件,首先判断标识位是否为 move ,在从事件对象上面获取到鼠标移动的位置 event.pageX 和 event.pageY 同时减去对应点击位置的 pageX 和 pageY,就得到了鼠标移动的距离,再加上拖拽元素本身的位置就得到了,元素移动的实际位置并赋值到拖拽元素本身上面。
- 给画布绑定 mouseup 事件,并获取拖拽元素身上的 position的 x 和 y 值,循环拖拽元素的集合匹配唯一标识 identifier 找到当前移动的元素,给这个元素赋值 temp.position 和 position 的 x 和 y 值,并把标识位重置为空,阻止画布持续触发 mousemove 和 mouseup 事件
完整代码
<template>
  <div class="box">
    <!-- 左侧拖拽组件 -->
    <!-- v-if="false" -->
    <div class="drap">
      <!-- <p>元素</p> -->
      <!--
            @dragstart  < -- 是元素开始拖拽的时候触发
            draggable="true"  < -- 为了使元素可拖动,把 draggable 属性设置为 true :
            @dragover.prevent < -- 阻止浏览器默认行为,不然会显示一个叉叉,不好看, 加上会显示一个添加的符号
         -->
      <div
        v-for="(item, index) in drapLeftElList"
        class="drap-item"
        :key="index"
        @dragstart="handleDrapEvList($event, item)"
        @dragover.prevent
        draggable="true"
      >
        <img
          class="drap-item-img"
          draggable="false"
          :src="item.imgUrl"
          :alt="item.name"
        />
        <div class="drap-item-name">{{ item.name }}</div>
      </div>
    </div>
    <!-- 主体部分 -->
    <div
      class="drap-container"
      @dragover.prevent
      @mousedown="laryerMouseDown"
      @mousemove="laryerMouseMove"
      @mouseup="laryerMouseUp"
      @drop="handleDrap"
    >
      <h1>画布</h1>
      <div
        v-for="(item, index) in componentsList"
        class="drap-container-item"
        :class="{
          'drap-container-item-active':
            curControl && item.identifier == curControl.identifier,
        }"
        :key="index"
        :style="{
          top: `${item.position.y}px`,
          left: `${item.position.x}px`,
          width: `${item.position.w}px`,
          height: `${item.position.h}px`,
          'background-color': `${item.position.bg}`,
        }"
        @mousedown.stop="handleMouseDown($event, item, index)"
      >
        <img
          class="drap-item-img"
          :src="item.imgUrl"
          draggable="false"
          :alt="item.name"
        />
        <div class="drap-item-name">{{ item.name }}</div>
      </div>
    </div>
    <!-- 属性配置 -->
    <div class="drap-right" style="width: 300px; height: 100%">
      <h2>属性配置</h2>
      {{ identifier }}
      <br />
      {{ curControl }}
      <br />
      {{ containerMoveObj }}
    </div>
  </div>
</template>
<script>
export default {
  name: "drap",
  data() {
    return {
      // 保存拖拽的元素的列表
      componentsList: [
        {
          id: 11,
          name: "团队1",
          imgUrl:
            "",
          sort: 1,
          identifier: 666,
          position: {
            x: 100,
            y: 100,
            w: 80,
            h: 120,
            bg: "#ffffff",
          },
          style: {},
          temp: {
            position: {
              x: 100,
              y: 100,
            },
          },
        },
      ],
      //   元件库
      drapLeftElList: [
        {
          id: 11,
          name: "团队1",
          imgUrl:
            "",
          sort: 1,
          position: {
            x: 0,
            y: 0,
            w: 80,
            h: 120,
            bg: "#fff",
          },
          temp: {
            position: {
              x: 0,
              y: 0,
            },
          },
        },
        {
          id: 13,
          name: "团队2",
          imgUrl:
            "",
          sort: 2,
          position: {
            x: 0,
            y: 0,
            w: 80,
            h: 120,
            bg: "#fff",
          },
          temp: {
            position: {
              x: 0,
              y: 0,
            },
          },
        },
        {
          id: 14,
          name: "团队3",
          imgUrl:
            "",
          sort: 3,
          position: {
            x: 0,
            y: 0,
            w: 80,
            h: 120,
            bg: "#fff",
          },
          temp: {
            position: {
              x: 0,
              y: 0,
            },
          },
        },
        {
          id: 15,
          name: "团队4",
          imgUrl:
            "",
          sort: 3,
          position: {
            x: 0,
            y: 0,
            w: 80,
            h: 120,
            bg: "#fff",
          },
          temp: {
            position: {
              x: 0,
              y: 0,
            },
          },
        },
      ],
      identifier: "", // 当前项的 唯一标识
      curControl: null, //
      flag: "",
      containerMoveObj: {
        type: "",
        x: "",
        y: "",
      },
    };
  },
  methods: {
    // 点击画布的时候, 取消选择组件
    laryerMouseDown() {
      console.log("laryerMouseDown");
      this.curControl = null;
    },
    // 给画布绑定的mousemove事件
    laryerMouseMove(ev) {
      // 判断是需要移动的类型
      if (this.flag == "move") {
        // 用当前移动的距离减去点击的位置
        let dx = ev.pageX - this.containerMoveObj.x,
          dy = ev.pageY - this.containerMoveObj.y;
        // 上次旧的位置加上 处理完的距离就得到当前位置
        let x = this.curControl.temp.position.x + dx,
          y = this.curControl.temp.position.y + dy;
        // 这里只是让元素跟着鼠标移动, 如果再这里直接赋值
        this.curControl.position.x = x;
        this.curControl.position.y = y;
      }
    },
    // 给画布绑定的mouseup事件
    laryerMouseUp() {
      // 在鼠标抬起的时候判断是否
      if (this.flag == "") {
        return false;
      }
      const x = this.curControl.position.x;
      const y = this.curControl.position.y;
      // 这里才是实际给元素位置赋值的地方!!!!
      // 查询是否有对应的模块然后, 对应的赋值
      this.componentsList.forEach((item) => {
        if (item.identifier == this.identifier) {
          console.log(item, "找到了");
          item.temp.position.x = x;
          item.temp.position.y = y;
          item.position.x = x;
          item.position.y = y;
        }
      });
      this.flag = "";
    },
    // 拖拽元素
    handleDrapEvList(event, value) {
      let { offsetX, offsetY } = event;
      var infoJson = JSON.stringify({
        ...value,
        position: {
          ...value.position,
          x: offsetX,
          y: offsetY,
        },
      });
      //   将数据绑定到dataTransfer身上
      event.dataTransfer.setData("drapData", infoJson);
    },
    // 监听拖拽元素结束
    handleDrap(event) {
      event.preventDefault();
      const value = event.dataTransfer.getData("drapData");
      //   获取绑定到拖拽元素身上的 drapData属性
      if (value) {
        let drapData = JSON.parse(value);
        const { position } = drapData;
        const identifier = Math.floor(Math.random() * 10000);
        this.componentsList.push({
          ...drapData,
          identifier,
          position: {
            ...position,
            x: event.offsetX - position.x,
            y: event.offsetY - position.y,
          },
          temp: {
            position: {
              x: event.offsetX - position.x,
              y: event.offsetY - position.y,
            },
          },
        });
      }
    },
    // 点击元素获取组件配置
    handleClickTarget(row, index) {
      console.log(row);
      this.identifier = row.identifier;
      this.curControl = row;
    },
    // 移动元素
    handleMouseDown(e, row, index) {
      this.flag = "move";
      // 获取组件配置, 为接下来的属性配置做准备
      this.handleClickTarget(row, index);
      e = e || window.event;
      // 记录下当前点击的位置
      this.containerMoveObj.x = e.pageX;
      this.containerMoveObj.y = e.pageY;
    },
  },
};
</script>
<style lang="scss">
.box {
  display: flex;
  flex-direction: row;
  align-items: center;
  position: relative;
  height: 500px;
  .drap {
    width: 300px;
    height: 500px;
    background: #f2f2f2;
    display: flex;
    flex-direction: row;
    flex-wrap: wrap;
    cursor: pointer;
    .drap-item {
      height: 120px;
      margin-right: 20px;
      .drap-item-img {
        display: block;
        width: 80px;
        height: 80px;
      }
      .drap-item-name {
        text-align: center;
      }
    }
  }
  .drap-container {
    flex: 1;
    height: 500px;
    background: #ccc;
    position: relative;
    .drap-container-item {
      -webkit-user-select: none;
      -moz-user-select: none;
      -o-user-select: none;
      user-select: none;
      position: absolute;
      user-select: none;
      cursor: pointer;
      border: 1px solid transparent;
      .drap-item-img {
        display: block;
        width: 100%;
        // height: 80px;
        user-select: none;
      }
      .drap-item-name {
        text-align: center;
      }
    }
    .drap-container-item-active {
      border: 1px solid skyblue;
    }
  }
}
</style>
问题答疑
Q:为什么要分开绑定 mousedown 和 mousemove、mouseup ?
A:在给画布绑定了 drop 事件之后,像传统移动一样给拖拽元素绑定这几个事件的话,会导致元素回到起始位置(左上角),会出现元素不跟鼠标等问题
Q:标识位作用是什么 ?
A:因为 mousemove 和 mouseup 是绑定到画布上面的,鼠标在画布上移动的时候会持续触发这两个事件,所以要用标识位来阻止无用的触发。
Q:为什么要用 pageX 和 pageY 而不用 offset 去获取移动距离 ?
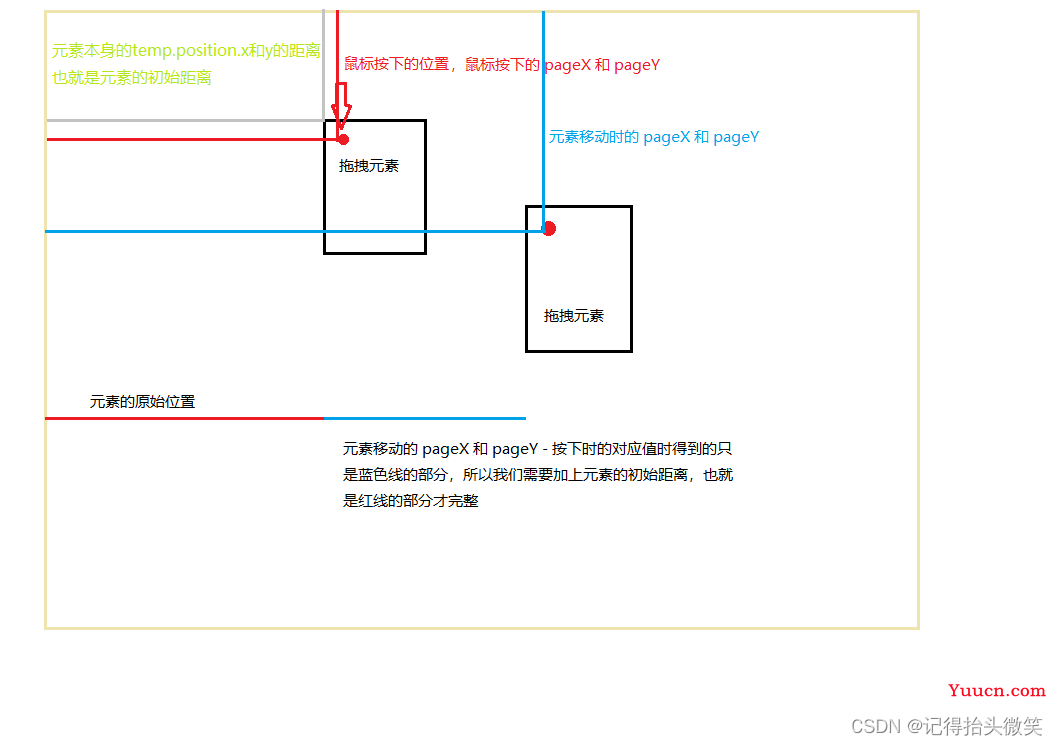
A:因为 mousedown 和 mousemove、mouseup是分开绑定的,所以继续使用 offset 来计算移动位置就会变得不精确而且麻烦,这种情况下需要我们用其他办法去处理并计算移动位置。需要我们
获取鼠标点下时距离页面左边和上边的 pageX 和 pageY 的距离
获取移动时距离页面左边和上边的 pageX 和 pageY 的距离
用移动时的位置减去按下时的位置,就能获取到鼠标从元素原位置移动当前位置的距离,最要还要加上元素原位置的位置才是元素的实际位置
图示如下,有些简单,望见谅。

Q:为什么在最后赋值元素位置的时候要加上元素的初始位置 ?
A:如果不加上元素的初始位置的话,那么元素移动的位置始终是鼠标移动的距离,而不是元素从原位置移动到目标位置的距离
Q:为什么在移动中赋值了元素位置,还要在 mouseup 的时候重新赋值元素位置 ?
A:因为在移动中赋值元素位置的目的是让元素跟着鼠标走,而在 mouseup 事件触发的时候,就代表用户已经确定了移动元素的终点,这个时候不仅要赋值移动位置的距离,还要把当前位置保存到元素的原位置中。
总结
以上就是今天要分享的内容,本文简单介绍了 自定义拖拽组件位置 ( 如您发现本文代码的逻辑异常、或文章表述不清等问题,敬请留言或私信 ♥♥♥ )
接下来我们会逐步去实现针对拖拽组件的设置样式、设置属性、绑定事件等操作