🥇作者 .29. 的✔博客主页✔
🥇记录JavaWeb学习的专栏:Web专栏
🥇拼搏起来吧,未来会给你开出一个无法拒绝的条件…您的
点赞,收藏以及关注是对作者最大的鼓励喔 ~~

客户端展示库存数据
- 前言
- 一、Thymeleaf - 视图模板技术
-
- 1.导入 jar 包
- 2.创建Servlet类,设置相关属性与方法。
- 3.添加web.xml文件配置
- 4.使用Thymeleaf技术相关的HTML标签属性
- 二、浏览器页面实现
-
- 1.获取数据库数据
- 2.使用Servlet组件渲染页面
-
- ①`Servlet组件`
- ②`HTML页面`
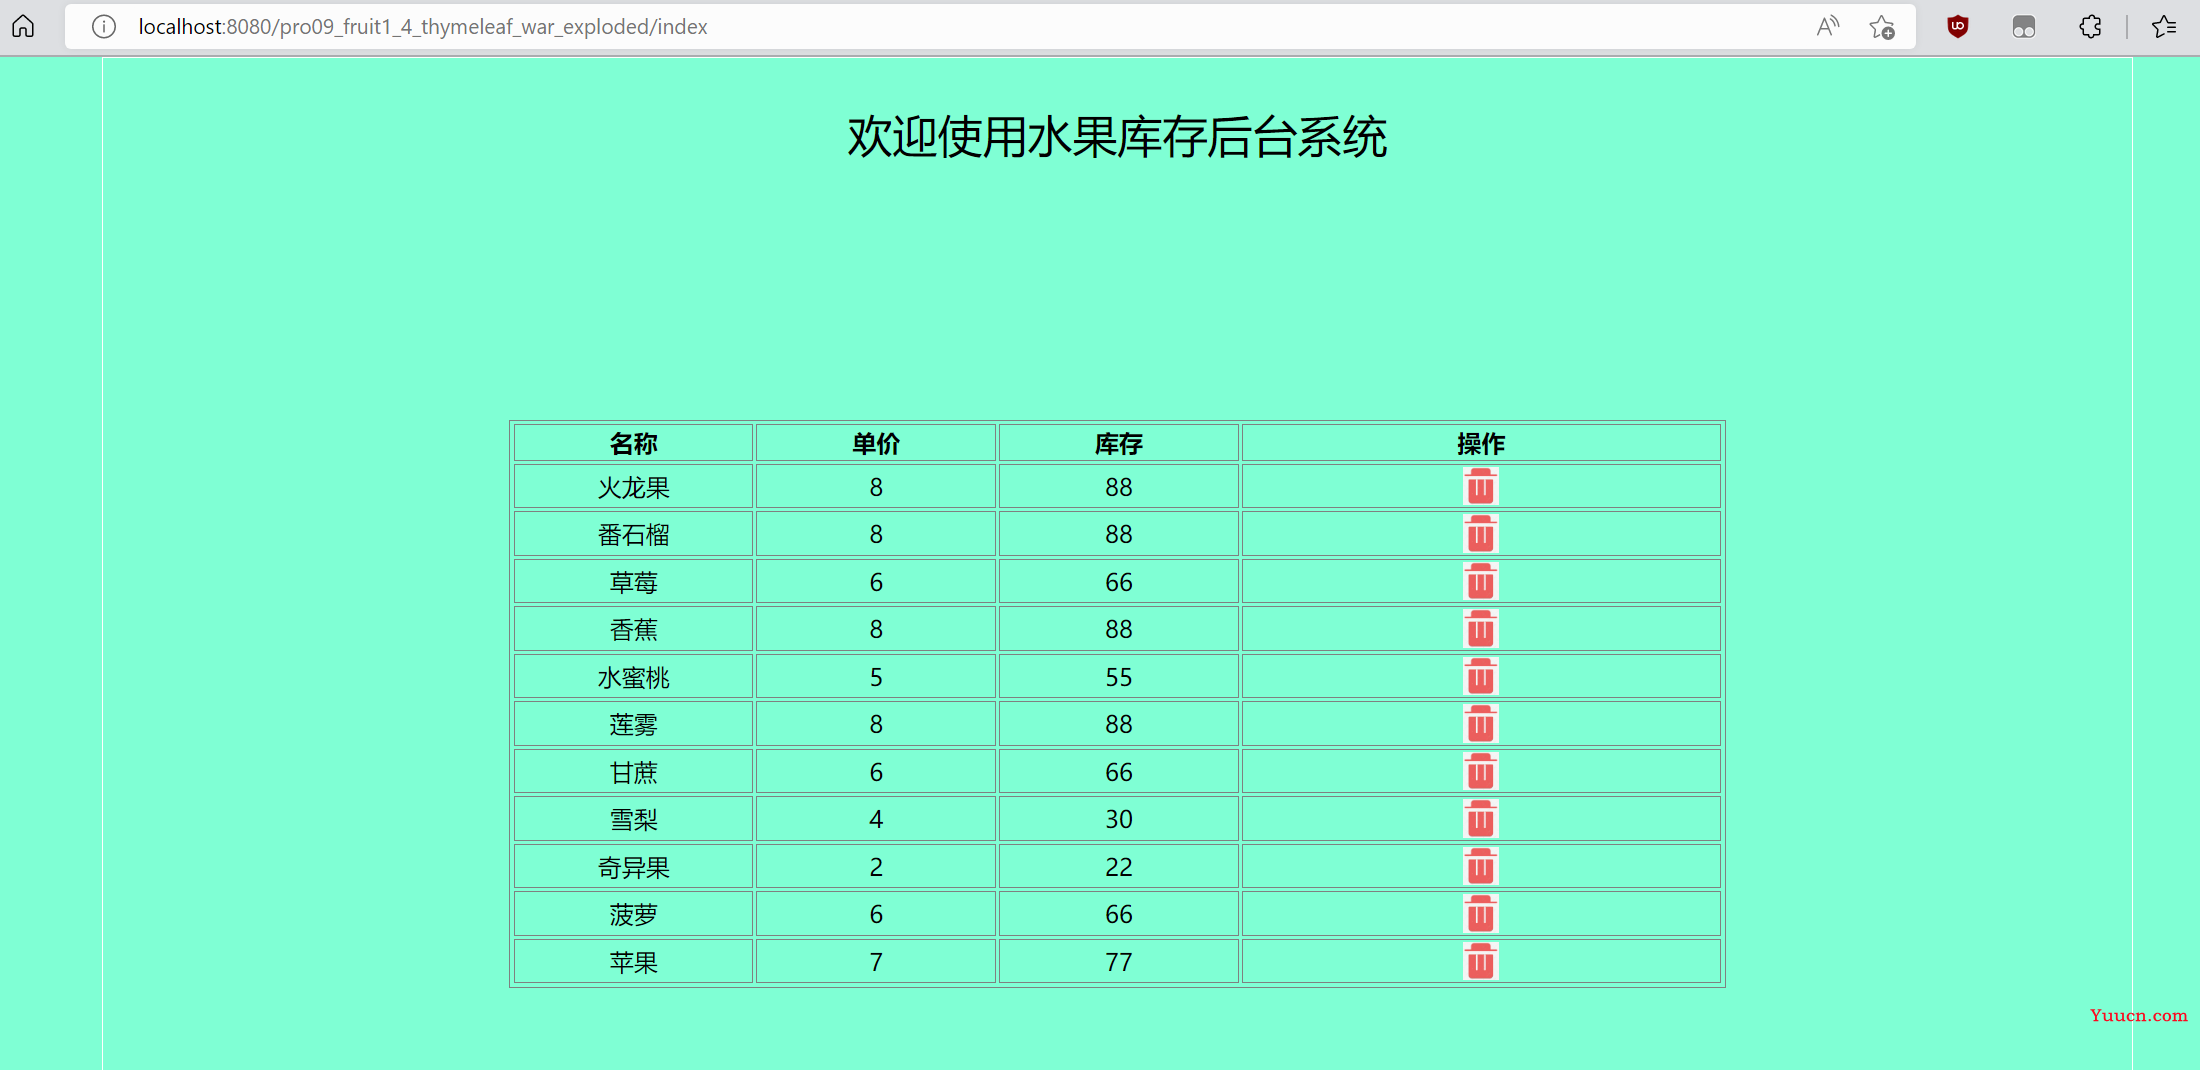
- 三、效果
- 总结
前言
在JDBC专栏中,我们完成了水果库存系统功能的设计,实现以及优化,但总得来看,整个项目都是后端的代码,系统的页面也不过是通过控制台模拟而来的,而非真正的前端页面。
而在这篇文章开始,我们会对水果库存系统的客户端页面功能进行设计与实现,让库存系统可以在网页中使用。
项目中我们主要依赖Tomcat部署,使用Servlet组件,过程中通过JDBC连接MySQL数据库获取数据,将数据在浏览器页面中展现出来。
一、Thymeleaf - 视图模板技术
在开始,我们需要先了解一下Thymeleaf - 视图模板技术的使用,这是我们在使用Servlet时需要用到的技术。
接下来,我们通过 Thymeleaf 的使用来了解视图模板技术到底是什么。
1.导入 jar 包
需要使用Thymeleaf - 视图模板技术,第一步就是导入相关的 jar 包了,具体的步骤大家应该都了解,不了解的可以按照这篇文章的思路来尝试导入jar包:druid数据库连接池的使用。
Thymeleaf - 视图模板技术 jar包资源:
链接:https://pan.baidu.com/s/1NOucl2A8nEAIzg-rT4GqGg
提取码:leaf
2.创建Servlet类,设置相关属性与方法。
我们需要创建一个Servlet类,我将这个类命名为ViewBaseServlet,说其是Servlet类是因为它需要继承HttpServlet类。
ViewBaseServlet类中设置的是与使用Thymeleaf 技术相关的属性以及方法,我们可以通过代码来了解其功能:
import org.thymeleaf.TemplateEngine;
import org.thymeleaf.context.WebContext;
import org.thymeleaf.templatemode.TemplateMode;
import org.thymeleaf.templateresolver.ServletContextTemplateResolver;
import javax.servlet.ServletContext;
import javax.servlet.ServletException;
import javax.servlet.http.HttpServlet;
import javax.servlet.http.HttpServletRequest;
import javax.servlet.http.HttpServletResponse;
import java.io.IOException;
public class ViewBaseServlet extends HttpServlet {
    private TemplateEngine templateEngine;
    @Override
    public void init() throws ServletException {
        // 1.获取ServletContext对象
        ServletContext servletContext = this.getServletContext();
        // 2.创建Thymeleaf解析器对象
        ServletContextTemplateResolver templateResolver = new ServletContextTemplateResolver(servletContext);
        // 3.给解析器对象设置参数
        // ①HTML是默认模式,明确设置是为了代码更容易理解
        templateResolver.setTemplateMode(TemplateMode.HTML);
        // ②设置前缀
        String viewPrefix = servletContext.getInitParameter("view-prefix");
        templateResolver.setPrefix(viewPrefix);
        // ③设置后缀
        String viewSuffix = servletContext.getInitParameter("view-suffix");
        templateResolver.setSuffix(viewSuffix);
        // ④设置缓存过期时间(毫秒)
        templateResolver.setCacheTTLMs(60000L);
        // ⑤设置是否缓存
        templateResolver.setCacheable(true);
        // ⑥设置服务器端编码方式
        templateResolver.setCharacterEncoding("utf-8");
        // 4.创建模板引擎对象
        templateEngine = new TemplateEngine();
        // 5.给模板引擎对象设置模板解析器
        templateEngine.setTemplateResolver(templateResolver);
    }
    protected void processTemplate(String templateName, HttpServletRequest req, HttpServletResponse resp) throws IOException {
        // 1.设置响应体内容类型和字符集
        resp.setContentType("text/html;charset=UTF-8");
        // 2.创建WebContext对象
        WebContext webContext = new WebContext(req, resp, getServletContext());
        // 3.处理模板数据
        templateEngine.process(templateName, webContext, resp.getWriter());
    }
}
3.添加web.xml文件配置
web.xml文件是一个Web项目的配置文件.
上文提到的ViewBaseServlet类代码中,有两个重要的部分:
- 添加前缀 view-prefix
- 添加后缀 view-suffix
除了ViewBaseServlet类,我们还需要在web.xml文件中添加前缀与后缀相关的参数配置,参数配置代码如下:
    <context-param>
        <param-name>view-prefix</param-name>
        <param-value>/</param-value>
    </context-param>
    <context-param>
        <param-name>view-suffix</param-name>
        <param-value>.html</param-value>
    </context-param>
参数配置中,我们将前缀设置为/;同时后缀设置为.html。
这样的用意在于我们可以使用Thymeleaf - 视图模板技术,通过逻辑视图名称获取到对应的物理视图名称,例如:
//假设此时的视图名称是index
//那么Thymeleaf会将这个 逻辑视图名称 对应到 物理视图名称上去
//逻辑视图名称 : index
//物理视图名称 : view-prefix + 逻辑视图名称 + view-suffix
//所以真实的视图名称是 / + index + .html
我们先了解一下使用的效果即可,至于为什么这样,我们会在后续代码的实现中体现出来。
4.使用Thymeleaf技术相关的HTML标签属性
在HTML中,需要使用Thymeleaf技术,我们需要在html标签中添加相关属性:
<html xmlns:th="http://www.thymeleaf.org">
</html>
而后,当我们使用Thymeleaf技术的属性时,都需要在属性前添加th:的标志。
二、浏览器页面实现
1.获取数据库数据
我们需要在浏览器页面中显示数据库中存放的数据,那么我们就首先要连接数据库来获取数据,这时候正好就需要连接数据库执行更新或查询操作的功能。
相关功能的通用方法,已经在我们的JDBC专栏:JDBC实战系列文章中完成,直接拿过来使用即可:
BaseDAO类代码:
import java.lang.reflect.Field;
import java.lang.reflect.ParameterizedType;
import java.lang.reflect.Type;
import java.sql.*;
import java.util.ArrayList;
import java.util.List;
/**
 * @author .29.
 * @create 2022-09-25 19:30
 */
public abstract class BaseDAO<T> {
    public final String DRIVER = "com.mysql.cj.jdbc.Driver";
    public final String URL = "jdbc:mysql://localhost:3306/fruitdb?useSSL=false&useUnicode=true&CharacterEncoding=utf-8";
    public final String USER = "root" ;
    public final String PSW = "" ;
    protected Connection connection;
    protected PreparedStatement pstm;
    protected ResultSet rs;
    //获取T的对象
    private Class entityClass;
    //构造方法
    public BaseDAO(){
        //getClass() 获取Class对象,我们当前创建的是FruitDAOImpl对象,new FruitDAOImpl();
        //那么子类的构造方法内部首先调用父类(BaseDAO)的空参构造器,
        //因此此处的getCalss()会被执行,但是获取的是子类FruitDAOImpl的Class
        //所以getGenericSuperclass()获取的是BaeDAO的class
        Type genericType = getClass().getGenericSuperclass();//获取泛型父类类型
        //强转成 ParameterizedType 参数化类型
        //getActualTypeArguments 获取实际的类型参数
        Type[] actualTypeArguments = ((ParameterizedType) genericType).getActualTypeArguments();
        //只传入了一个参数,数组首位就是我们需要获取的<T>的真实类型
        Type actualType = actualTypeArguments[0];
        //actualType.getTypeName();获取类型名
        try {
            entityClass = Class.forName(actualType.getTypeName());
        } catch (ClassNotFoundException e) {
            e.printStackTrace();
        }
    }
    //将加载驱动,连接数据库的操作包装成方法,减少代码复用率
    protected Connection conn(){
        try {
            //加载驱动
            Class.forName(DRIVER);
            //数据库管理器,连接数据库
            connection = DriverManager.getConnection(URL, USER, PSW);
            return connection;
        } catch (ClassNotFoundException e) {
            e.printStackTrace();
        } catch (SQLException e) {
            e.printStackTrace();
        }
        return null;
    }
    //将关闭资源的操作包装成方法
    protected  void close(ResultSet rs,PreparedStatement pstm,Connection connection){
        try {
            if(rs != null)
                rs.close();
            if(pstm != null)
                pstm.close();
            if(connection != null)
                connection.close();
        } catch (SQLException e) {
            e.printStackTrace();
        }
    }
    //执行更新,返回影响行数的方法(如果是插入操作,返回自增列主键值)
    protected int executeUpdate(String sql,Object... params){//... params不确定数量的参数
        boolean insertFlag = false;
        insertFlag = sql.trim().toUpperCase().startsWith("INSERT");
        try {
            connection = conn();
            //(sql语句不通用,靠参数传递进来)
            //sql语句
            //String sql = "update t_fruit set fcount = ? where fname like ?";
            //预处理对象
            if(insertFlag){
                pstm = connection.prepareStatement(sql,Statement.RETURN_GENERATED_KEYS);
            }else{
                pstm = connection.prepareStatement(sql);
            }
            setParams(pstm,params);
            int count = pstm.executeUpdate();
            rs = pstm.getGeneratedKeys();
            if(rs.next()){
                return ((Long)rs.getLong(1)).intValue();
            }
            //参数填充也不通用,也靠参数传递进来
            if(params != null && params.length > 0){
                for(int i = 0;i < params.length;++i){
                    pstm.setObject(i+1,params[i]);
                }
            }
            return count;//执行更新,返回影响行数
        } catch (SQLException e) {
            e.printStackTrace();
        }finally{
            close( rs, pstm, connection);
        }
        return 0;//影响行数为0
    }
    //通过反射技术,给obj对象的property属性赋propertyValue值
    protected void setValue(Object obj, String property,Object propertyValue){
        Class clazz = obj.getClass();
        try {
            //获取property这个字符串对应的属性名,比如fid去找obj对象中对应的fid属性值
            Field field = clazz.getDeclaredField(property);
            if(field != null){
                field.setAccessible(true);//强制访问(即使private属性也能访问),防止属性为private
                field.set(obj,propertyValue);
            }
        } catch (NoSuchFieldException e) {
            e.printStackTrace();
        } catch (IllegalAccessException e) {
            e.printStackTrace();
        }
    }
    //执行复杂查询,返回... 例如统计结果
    protected Object[] executeComplexQuery(String sql,Object... params){
        try {
            //加载驱动,连接数据库的方法
            connection = conn();
            //预处理对象
            pstm = connection.prepareStatement(sql);
            //执行查询,返回结果集
            rs = pstm.executeQuery();
            //通过rs可以获取结果集的元数据
            //元数据:描述结果集信息的数据(有哪些列,什么类型。。。)
            ResultSetMetaData rsmd = rs.getMetaData();
            //获取元数据列数
            int columnCount = rsmd.getColumnCount();
            Object[] columnValueArr = new Object[columnCount];
            if(rs.next()){
                for(int i = 0;i < columnCount;++i){
                    Object columValue = rs.getObject(i + 1);
                    columnValueArr[i] = columValue;
                }
                return columnValueArr;
            }
        } catch (SQLException e) {
            e.printStackTrace();
        }finally{
            close( rs, pstm, connection);
        }
        return null;
    }
    //执行查询,返回单个实体对象
    protected T load(String sql,Object... params){
        try {
            //加载驱动,连接数据库的方法
            connection = conn();
            //预处理对象
            pstm = connection.prepareStatement(sql);
            setParams(pstm,params);
            //执行查询,返回结果集
            rs = pstm.executeQuery();
            //通过rs可以获取结果集的元数据
            //元数据:描述结果集信息的数据(有哪些列,什么类型。。。)
            ResultSetMetaData rsmd = rs.getMetaData();
            //获取元数据列数
            int columnCount = rsmd.getColumnCount();
            if(rs.next()){
                T entity = (T) entityClass.newInstance();
                for(int i = 0;i < columnCount;++i){
                    String columnName = rsmd.getColumnName(i + 1);
                    Object columValue = rs.getObject(i + 1);
                    setValue(entity,columnName,columValue);
                }
                return entity;
            }
        } catch (SQLException e) {
            e.printStackTrace();
        } catch (InstantiationException e) {
            e.printStackTrace();
        } catch (IllegalAccessException e) {
            e.printStackTrace();
        } finally{
            close( rs, pstm, connection);
        }
        return null;
    }
    //给预处理参数设置参数
    protected void setParams(PreparedStatement psmt,Object... params) throws SQLException {
        if(params != null && params.length > 0 ){
            for(int i = 0;i < params.length;++i){
                psmt.setObject(i+1,params[i]);
            }
        }
    }
    // 执行查询,返回结果集并输出
    protected List<T> executeQuery(String sql,Object... params){
        List<T> list = new ArrayList<>();
        try {
            //加载驱动,连接数据库的方法
            connection = conn();
            //预处理对象
            pstm = connection.prepareStatement(sql);
            setParams(pstm,params);
            //执行查询,返回结果集
            rs = pstm.executeQuery();
            //通过rs可以获取结果集的元数据
            //元数据:描述结果集信息的数据(有哪些列,什么类型。。。)
            ResultSetMetaData rsmd = rs.getMetaData();
            //获取元数据列数
            int columnCount = rsmd.getColumnCount();
            while(rs.next()){
                T entity = (T) entityClass.newInstance();
                for(int i = 0;i < columnCount;++i){
                    String columnName = rsmd.getColumnName(i + 1);
                    Object columValue = rs.getObject(i + 1);
                    setValue(entity,columnName,columValue);
                }
                list.add(entity);
            }
        } catch (SQLException e) {
            e.printStackTrace();
        } catch (InstantiationException e) {
            e.printStackTrace();
        } catch (IllegalAccessException e) {
            e.printStackTrace();
        } finally{
            close( rs, pstm, connection);
        }
        return list;
    }
}
这时候,我们还需要有一个方法来调用
BaseDAO类中的通用方法,从而完成查询数据的需求,在这里我们依旧创建一个FruitDAO接口,并创建其实现类FruitDAOImpl类来重写方法,完成功能。
FruitDAO接口:
我们需要在浏览器页面中显示数据库的数据,就需要一个获取数据库所有信息的方法。
import com.haojin.fruit.pojo.Fruit;
import java.util.List;
/**
 * @author .29.
 * @create 2022-10-04 16:39
 */
public interface FruitDAO {
    //获取所有的库存信息
    List<Fruit> getFruitList();
}
FruitDAOImpl类:
实现类中调用了BaseDAO类中查询数据的通用方法,将SQL语句传入,将获取到的数据存入集合中返回。
import com.haojin.fruit.pojo.Fruit;
import com.haojin.myssm.basedao.BaseDAO;
import java.util.List;
/**
 * @author .29.
 * @create 2022-10-04 16:39
 */
public class FruitDAOImpl extends BaseDAO<Fruit> implements FruitDAO{
    @Override
    public List<Fruit> getFruitList() {
        return super.executeQuery("SELECT * FROM t_fruit");
    }
}
2.使用Servlet组件渲染页面
当我们打开对应的浏览器页面,就会向客户端中的Servlet组件发起一次请求,我们这时候将获取到的数据库数据保存到session保存作用域中,然后在HTML文件中进行渲染,之后将页面响应给客户端的浏览器中,如此一来就在浏览器中显示出数据库数据。
①Servlet组件
import com.haojin.fruit.pojo.Fruit;
import com.haojin.fruit.pojo.dao.FruitDAO;
import com.haojin.fruit.pojo.dao.FruitDAOImpl;
import com.haojin.myssm.basedao.myspringmvc.ViewBaseServlet;
import javax.servlet.ServletException;
import javax.servlet.annotation.WebServlet;
import javax.servlet.http.HttpServletRequest;
import javax.servlet.http.HttpServletResponse;
import javax.servlet.http.HttpSession;
import java.io.IOException;
import java.util.List;
/**
 * @author .29.
 * @create 2022-10-04 16:42
 */
//Servlet从3.0版本开始,支持注解方式的注册
@WebServlet("/index")
public class IndexServlet extends ViewBaseServlet {
    @Override
    protected void service(HttpServletRequest request, HttpServletResponse response) throws ServletException, IOException {
        FruitDAO fruitDAO = new FruitDAOImpl();
        List<Fruit> fruitList = fruitDAO.getFruitList();
        //保存到session作用域
        HttpSession session = request.getSession();
        session.setAttribute("fruitList",fruitList);
        //此处的视图名称是index
        //那么Thymeleaf会将这个 逻辑视图名称 对应到 物理视图名称上去
        //逻辑视图名称 : index
        //物理视图名称 : view-prefix   +    逻辑视图名称    +    view-suffix
        //所以真实的视图名称是  /        +       index      +      .html
          super.processTemplate("index",request,response);
    }
}
②HTML页面
这是我们水果库存系统的浏览器页面代码,在页面中我们会设置一个标题以及一个表格,表格中展示的就是我们数据库中保存的水果库存数据。
因为我们获取到的数据是一个集合,所以在HTML文件中需要用到 Thymeleaf 技术的标签属性:
- th:if
- th:unless
- th:each
- th:text
循环遍历上文保存在session保存作用域中的数据,如果数据为空,显示库存危机为空:
<tr th:if="${#lists.isEmpty(session.fruitList)}">
		<td colspan = 4>对不起,库存为空!</td>
</tr>
…
如果保存的数据不为空,获取数据中每一行数据的信息(水果,价格,库存),第四列的删除标志后续功能完善后可以通过点击实现删除操作。
	<tr th:unless="${#lists.isEmpty(session.fruitList)}" th:each="fruit:${session.fruitList}">
		<td th:text="${fruit.fname}"></td>
		<td th:text="${fruit.price}"></td>
		<td th:text="${fruit.fcount}"></td>
		<td><img src="del.jpg" width="24px"/></td>
    </tr>
完整html代码:
<html xmlns:th="http://www.thymeleaf.org">
 <head>
  <meta charset="UTF-8">
  <style type = "text/css"></style>
<link rel = "stylesheet" href = "index.css">
 </head>
 <body>
  <div id = "div_container">
	<div id = "list">
		<p class="center f30">欢迎使用水果库存后台系统</p>
	<table id = "tbl">
	<tr>
		<th class = "w20">名称</th>
		<th class = "w20">单价</th>
		<th class = "w20">库存</th>
		<th>操作</th>
    </tr><br/>
	<tr th:if="${#lists.isEmpty(session.fruitList)}">
		<td colspan = 4>对不起,库存为空!</td>
	</tr>
	<tr th:unless="${#lists.isEmpty(session.fruitList)}" th:each="fruit:${session.fruitList}">
		<td th:text="${fruit.fname}"></td>
		<td th:text="${fruit.price}"></td>
		<td th:text="${fruit.fcount}"></td>
		<td><img src="del.jpg" width="24px"/></td>
    </tr>
	</table>
	</div>
  </div>
 </body>
</html>
css效果代码:
#div_container{
               width:80%;
			   height:100%;
               border:1px solid white;
			   margin-left:10%;
			   float:left;
			   }
#list{
      width:100%;
      border:0px solid white;
			   }
#tbl , #tbl tr,#tbl th,#tbl td{
	border:1px solid gray;
	text-align:center;
}
#tbl{
	margin-top:120px;
	margin-left:20%;
	width:60%;
}
.w20{
	width:20%;
}
.center{
	text-align: center;
}
.f30{
	font-size: 30px;
}
body{
	padding:0;
	margin:0;
	background-color:aquamarine;
}
div{
	position:relative;
	float:left;
}
.input{
       border:1px solid lightgray;
	   width:90%;
}
三、效果
总结
这篇文章中,我们将获取到的数据库数据渲染到了浏览器页面上,当然这只不过是开始,我们的水果库存系统还有许多功能没有渲染到页面中,比如新增库存的功能、修改库存的内容、删除指定水果信息的功能、页面的分页功能等。
我将在后续的文章中为客户端页面增添上述提到的内容,逐步完善系统,在完善系统项目的同时,掌握好相关的知识。


