前言:
在经历过前面在HTML下的VUE相关基础的洗礼后,我们可以动手去做一些事了,此时发现直接通过直接VUE组件方式与之前在HTML不同,首先要“静一静”,细看之下只是对之前的很多写法做了封装。
本文旨在直接上手Vue项目下做测试而非前面的那种方式。
预期目标:VUE项目开发的基本理解
使用工具:HBuilder
学习前技术储备:VUE 在HTML下的使用
零、准备
下载与配置Vue CLI
注意事项:
创建项目时如果提示:无法加载文件 vue.ps1.......
解决方案:
1.以管理员身份打开windows PowerShell
2.输入:set-ExecutionPolicy RemoteSigned
3.选择y或者a
4.回车 就可以了
一、Vue 项目走步
1.1.项目创建
1.在对应的目录上支行CMD或终端
2.输入 vue create XXX [xxx 是项目名称]
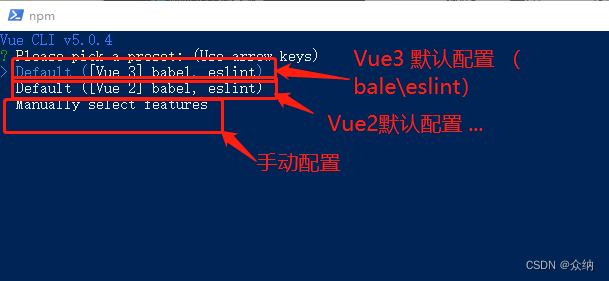
3.选择配置(如下图)通常情况下需要手动配置

4.手动配置 选项说明
4.1Babel (默认选中)(选中)
4.2 TypeScript --TS库
4.3 Progressive Web App...
4.4 Router --路由组件(建议选中)
4.5 Vuex --状态组件(建议选中)
4.6 CSS Pre-processors --样式管理(建议选中)
4.7 Linter / Formatter(默认选中)(个人不推荐 稍有错误就会提示错误,影响开发速度)
4.8 Unit Testing --测试
4.9 E2E Testing --测试
5.创建就慢慢等
6.创建后可以使用WebStrom 、VScode 、Hbuilder以项目的打开(导入)就可以了
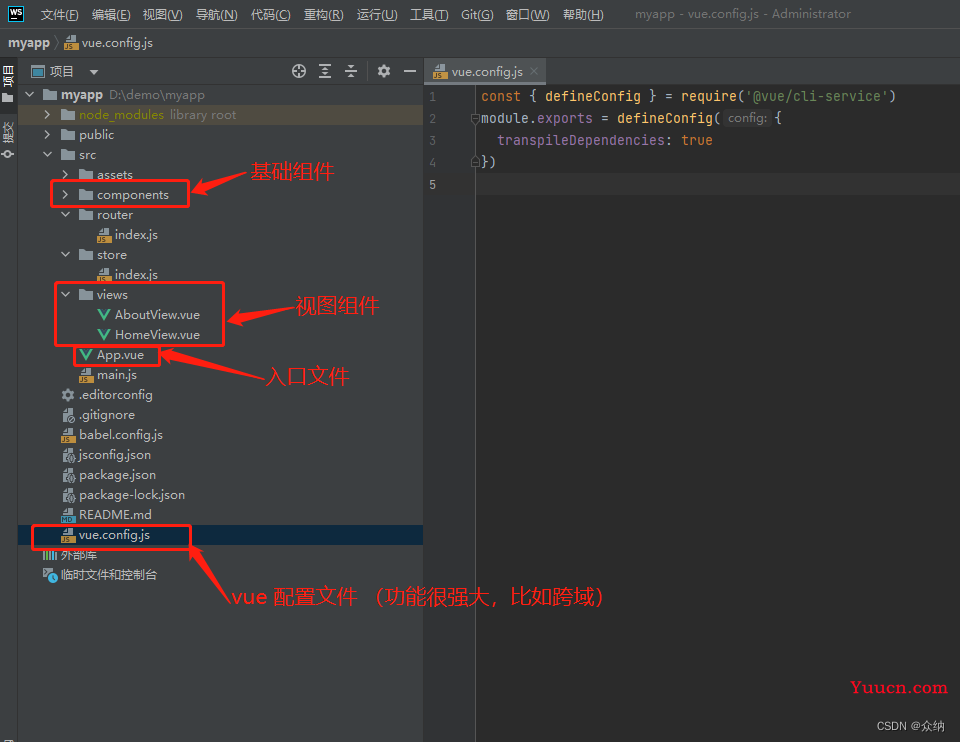
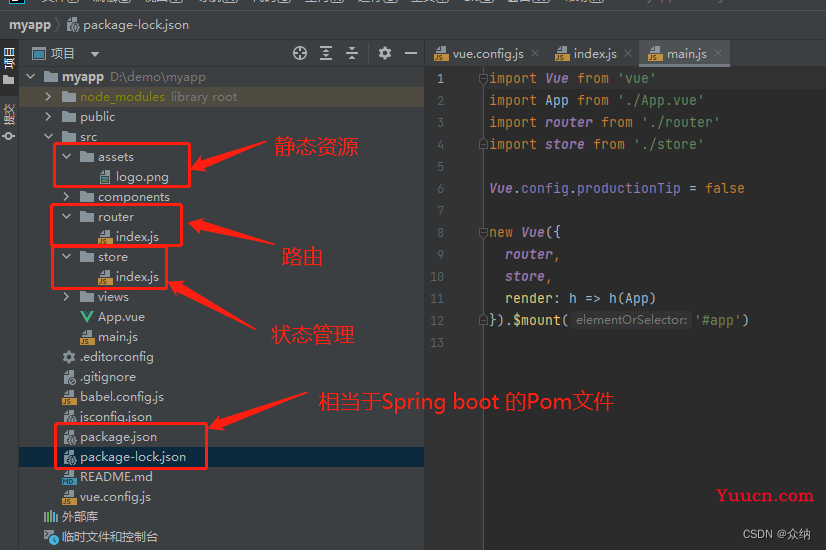
1.2.项目结构


1.3.项目文件

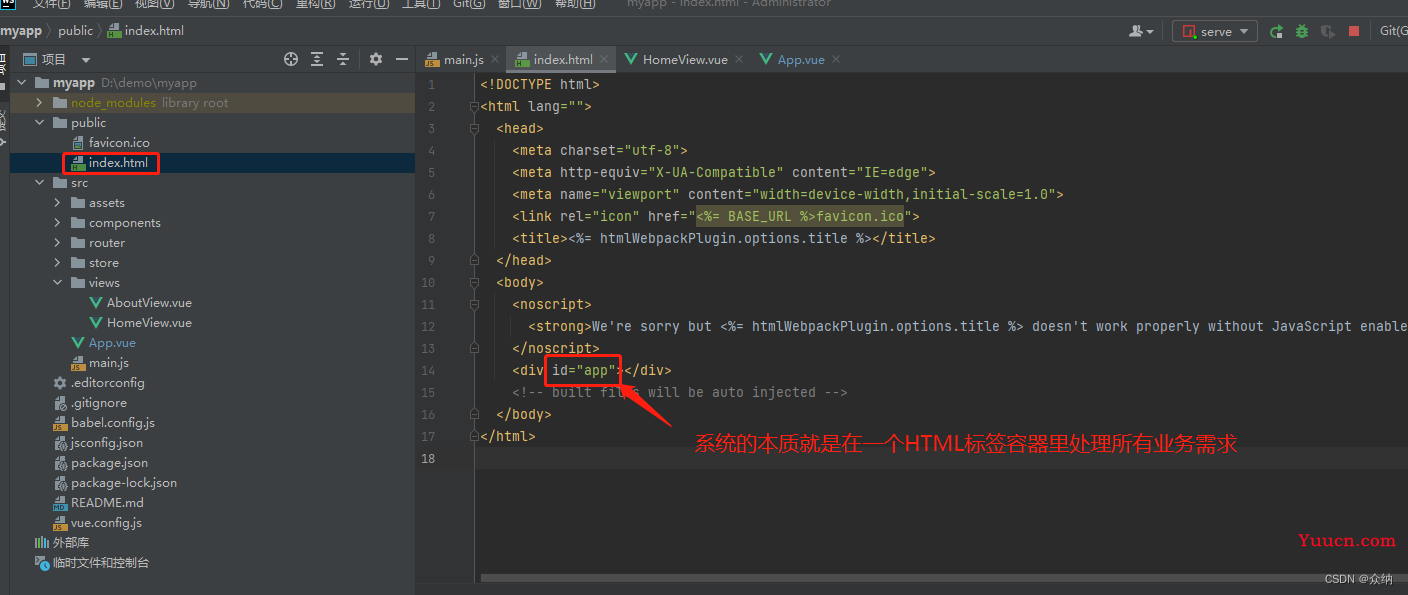
系统处理顺序个人理解是:public/index.html -> main.js->App.vue(如果不对请留言指正)
1.4.项目示例
HomeView.vue 文件调用模组Demo.vue
<template>
  <div class="home">
    <img alt="Vue logo" src="../assets/logo.png">
<!--    <HelloWorld msg="Welcome to Your Vue.js App"/>-->
    <demo></demo>
  </div>
</template>
<script>
// @ is an alias to /src
// import HelloWorld from '@/components/HelloWorld.vue'
import Demo from '@/components/Demo'
export default {
  name: 'HomeView',
  components: {
    // HelloWorld,
    Demo
  }
}
</script>
<template>
<div>
{{msg}}
<input type="text" ref="mytest">
<button @click="test()">测试</button>
<ul>
<li v-for="data in inputData" :key="data">{{data}}</li>
</ul>
</div>
</template>
<script>
// 接口
export default {
// eslint-disable-next-line vue/multi-word-component-names
name: 'Demo',
// 数据层
data () {
return {
msg: '这是一个Demo',
inputData: []
}
},
// 事件
methods: {
test () {
// eslint-disable-next-line no-sequences,no-unused-expressions
console.log(this.$refs.mytest.value),
this.inputData.push(this.$refs.mytest.value)
}
}
}
</script>
二、反向代理概念
它存在的意义在于解决跨域问题,主要是通过修改vue.config.js 处理。
(ps:修改后要重新启动一下才生效)
const { defineConfig } = require('@vue/cli-service')
// 示例解决 http://t.163.move/getMove/getById?10
module.exports = defineConfig({
  transpileDependencies: true,
  devServer: {
    proxy: {
      '/getMove': { // API标识
        target: 'http://t.163.move', // 代理标识
        // wss: true,
        changeOrigin: true
      }
    }
  }
})
// 调用 axios.get("/getMove/getById?10").then(res=>{res.data})
三、路由
路由顾名思意就是负责转发或跳转的,与我们生活中的路由器的工作方式相同;在下载的文件中包含了一个示例(router\index.js),所有接受路由的地方需要用<router-view></router-view>容器接收。
一级路由
其实VUE在创建时就给示出一个一级路由实例;
App.vue
<template>
  <div id="app">
    <nav>
      <router-link to="/">Home</router-link> |
      <router-link to="/about">About</router-link> |
    </nav>
    <router-view/>
  </div>
</template>
<style lang="scss">
#app {
  font-family: Avenir, Helvetica, Arial, sans-serif;
  -webkit-font-smoothing: antialiased;
  -moz-osx-font-smoothing: grayscale;
  text-align: center;
  color: #2c3e50;
}
nav {
  padding: 30px;
  a {
    font-weight: bold;
    color: #2c3e50;
    &.router-link-exact-active {
      color: #42b983;
    }
  }
}
</style>
router\index.js
import Vue from 'vue'
import VueRouter from 'vue-router'
import HomeView from '../views/HomeView.vue'
Vue.use(VueRouter)
const routes = [
  {
    path: '/',//访问路径
    name: 'home',//命名
    component: HomeView //外部注册 这里直接使用
  },
  {
    path: '/about',
    name: 'about',
    component: () => import(/* webpackChunkName: "about" */ '../views/AboutView.vue')//内部引用
  }
]
const router = new VueRouter({
  mode: 'history',//路由模式  展示方式
  base: process.env.BASE_URL,
  routes
})
export default router
多级路由
作用:用于访问子路径 通常使用在二级目录配置
Demo.vue 模拟父(注意定义对应接收标签)
<template>
  <div>
    这是一个Demo 为的是展示二级(多级)路由
    <!--    设置好容器-->
    <router-view></router-view>
  </div>
</template>
定义两个子组件 A.vue 与B.vue
<template>
  <div> A </div>
</template>
<template>
<div>B</div>
</template>
配置路由新增
{
path: '/demo',
name: 'demo',
component: Demo,
children:[
{
path:'a',
name:'a',
component:A
},
{
path:'b',
name:'b',
component:B
}
]
}动态路由
用途:主要用于路径是变化,但格式固定,通常使用在列表中的详情页
ProductDetail.vue 模拟产品详情
<template>
<div>
这是一个组件
<div> {{id}}</div>
</div>
</template>
<script>
export default {
data(){
return{
id:""
}
},
mounted(){
this.id=this.$route.params.id
}
}
</script>AboutView.vue 模拟数据(产品)列表页,用于发出明细请求
<template>
<div class="about">
<h1>This is an about page</h1>
<ul>
<li v-for="data in list" :key="data.id" @click="theProduct(data.id)">
{{data}}
</li>
</ul>
</div>
</template>
<script>
export default {
data(){
return{
list:[{id:1,code:"aa"},{id:2,code:"bb"},{id:3,code:"cc"}]
}
},
methods:{
theProduct(id){
this.$router.push(`/detail/${id}`)//指向router这个目录下的配置实现跳转 动态路由方式1
//this.$router.push({name:"detail",params:{id:id}})//动态路由方式2 通过命名路由方式跳转
}
}
}
</script>
路由配置
import Vue from 'vue'
import VueRouter from 'vue-router'
import HomeView from '../views/HomeView.vue'
import ProductDetail from '../components/ProductDetail'
Vue.use(VueRouter)
const routes = [
{
path: '/',//访问路径
name: 'home',//命名
component: HomeView //外部注册 这里直接使用
},
{
path: '/about',
name: 'about',
component: () => import(/* webpackChunkName: "about" */ '../views/AboutView.vue')//内部引用
},
{
path:'/detail/:id',
name:'detail',
component: ProductDetail
}
]
const router = new VueRouter({
mode: 'history',//路由模式 展示方式
base: process.env.BASE_URL,
routes
})
export default router
路由拦截
作用:路由前的校验,一般用于登陆等
如下代码在路由js中添加进去代表当不是demo路径的访问就放行
//路由拦截配置
router.beforeEach((to,from,next) =>{
if (to.name !=='demo'){
next()
}
})路由定向
作用:当访问未在路由内部配置的路径时要自动指向指定的路径
如下配置当访问 .../demo/c的时候自动转向.../demo这个路径上
{
path: '/demo',
name: 'demo',
component: Demo,
children:[
{
path:'a',
name:'a',
component:A
},
{
path:'b',
name:'b',
component:B
},
{
//重定向
path: '*',
redirect:'/demo'
}
]
}全部示例代码
components\productDetail.vue
<template>
<div>
这是一个组件
<div> {{id}}</div>
</div>
</template>
<script>
export default {
data(){
return{
id:""
}
},
mounted(){
this.id=this.$route.params.id
}
}
</script>
router\index.js
import Vue from 'vue'
import VueRouter from 'vue-router'
import HomeView from '../views/HomeView.vue'
import ProductDetail from '../components/ProductDetail'
import Demo from '../views/Demo'
import A from '../views/Demo/A'
import B from '../views/Demo/B'
Vue.use(VueRouter)
const routes = [
{
path: '/',//访问路径
name: 'home',//命名
component: HomeView //外部注册 这里直接使用
},
{
path: '/about',
name: 'about',
component: () => import(/* webpackChunkName: "about" */ '../views/AboutView.vue')//内部引用
},
{
path:'/detail/:id',
name:'detail',
component: ProductDetail
},
{
path: '/demo',
name: 'demo',
component: Demo,
children:[
{
path:'a',
name:'a',
component:A
},
{
path:'b',
name:'b',
component:B
},
{
//重定向
path: '*',
redirect:'/demo'
}
]
},
//重定向:在顶级目录中不存在的数据自动指向首页
{
path: '*',
redirect:'/'
}
]
const router = new VueRouter({
mode: 'history',//路由模式 展示方式
base: process.env.BASE_URL,
routes
})
//路由拦截配置
// router.beforeEach((to,from,next) =>{
// if (to.name !=='demo'){
// next()
// }
// })
export default router
views\AboutView.vue
<template>
<div class="about">
<h1>This is an about page</h1>
<ul>
<li v-for="data in list" :key="data.id" @click="theProduct(data.id)">
{{data}}
</li>
</ul>
</div>
</template>
<script>
export default {
data(){
return{
list:[{id:1,code:"aa"},{id:2,code:"bb"},{id:3,code:"cc"}]
}
},
methods:{
theProduct(id){
this.$router.push(`/detail/${id}`)//指向router这个目录下的配置实现跳转 动态路由方式1
//this.$router.push({name:"detail",params:{id:id}})//动态路由方式2 通过命名路由方式跳转
}
}
}
</script>
views\Demo.vue
<template>
<div>
这是一个Demo 为的是展示二级(多级)路由
<!-- 设置好容器-->
<router-view></router-view>
</div>
</template>
views\Demo\A.vue
<template>
<div> A </div>
</template>
views\Demo\B.vue
<template>
  <div>B</div>
</template>
App.vue
<template>
  <div id="app">
    <nav>
      <router-link to="/">Home</router-link> |
      <router-link to="/about">About</router-link> |
      <router-link to="/detail">detail</router-link>
    </nav>
    <router-view/>
  </div>
</template>
<style lang="scss">
#app {
  font-family: Avenir, Helvetica, Arial, sans-serif;
  -webkit-font-smoothing: antialiased;
  -moz-osx-font-smoothing: grayscale;
  text-align: center;
  color: #2c3e50;
}
nav {
  padding: 30px;
  a {
    font-weight: bold;
    color: #2c3e50;
    &.router-link-exact-active {
      color: #42b983;
    }
  }
}
</style>
四、Vuex
vuex 是Vue家族中的状态管理工具。PC端常用于权限管理,移动端则多数用于懒加载。其配置文件前文已介绍就是store目录下的index.js文件。请大家看我针对这个文件的注释
import Vue from 'vue'//引用vue
import Vuex from 'vuex'//引用状态管理
import axios from 'axios'
Vue.use(Vuex) //加载
//导出
export default new Vuex.Store({
  state: {
    //---------------作用:共享数据    第三个加载
    productList:[]
  },
  getters: {
    //---------------作用:数据二次加工方法
    getProductListTop3(state){
      return state.productList.filter((item,index)=>index<4)
    }
  },
  mutations: {
    //---------------作用:配置系统常量比如登陆的账户信息、权限信息等  第二个加载
    setProductList(state,data){
      state.productList=data
    }
  },
  actions: {
    //---------------作用:异步加载 条件执行,常用于懒加载  第一个加载
    getProductList(store){
      axios({
        url:"http://127.0.0.1:2022/company-work-time/findByCompanyId?companyId=74"
      }).then(res=>{
        //state.productList=res.data;
        store.commit("setProductList",res.data.data)
        console.log(res.data.data)
      })
    }
  },
  modules: {
    //---------------状态树,暂时用不到,一般较大项目使用,相当于声明一个子对象一样包含state\getters...
  }
})
1.先加载actions,它主要用于做数据请求。
2.请求过来的数据通过mutations的方法把数据存入state中的变量中去。
3.如果前端需要二次处理,则把方法写在getters中去。
示例
App.vue
<template>
  <div id="app">
    <nav>
      <router-link to="/">Home</router-link> |
      <router-link to="/about">About</router-link> |
      <router-link to="/storeDemo">storeDemo</router-link>
    </nav>
    <router-view/>
  </div>
</template>
<style lang="scss">
#app {
  font-family: Avenir, Helvetica, Arial, sans-serif;
  -webkit-font-smoothing: antialiased;
  -moz-osx-font-smoothing: grayscale;
  text-align: center;
  color: #2c3e50;
}
nav {
  padding: 30px;
  a {
    font-weight: bold;
    color: #2c3e50;
    &.router-link-exact-active {
      color: #42b983;
    }
  }
}
</style>
StoreDemo.vue
<template>
  <div>
    <h3>演示状态管理</h3>
    <h5>1:懒加载</h5>
    <ul>
      <li v-for="data in $store.state.productList" :key="data.id">
        {{data}}
      </li>
    </ul>
  </div>
</template>
<script>
  export default {
    data(){
      return{
        pList:[]
      }
    },
    mounted() {
      if (this.$store.state.productList.length===0){
        this.$store.dispatch("getProductList")
      }else {
        console.log("启用缓存数据")
        this.pList=this.$store.state.productList
      }
    }
  }
</script>
五、elementUI 、MintUI
其实这方面的教程非常多,而且官方相当详尽,在这里只是给大家提醒有这么一个东西,首先它是界面优化的(可以理解为基于VUE的皮肤),Element 是针对PC端的,Mint是针对移动端的。以下是官方连接方便大家查用
Element UI
Mint UI
总结
个人觉得VUE最大的亮点:
1.组件化开发【像是乐高积木,越细分越灵活】
2.数据双向绑定
结论:
作为一名开发人员不应该抱着固有的思想看问题,一项技术出来并且有生命力指定有它的先进性,我们要主动拥抱它!我遇到很多技术人员总在讲:“XXXX已经足够用了”、“用XXX也能实现这个需求(除了麻烦点)”,更有过者讲:“XXX不好用(其实用都没有用过就发表看法)”............遇到这些人我们尽量远离切不可与之争论,因为这些负能量会影响到你!
文未提醒大家这是我学习近两周后的一些个人心得与技术总结,难免有一些差错,届时希望大家批评指正,同时原创不易,欢迎收藏转发。