Canvas
var canvas = document.querySelector('.myCanvas');
var width = canvas.width = window.innerWidth;
var height = canvas.height = window.innerHeight;
滚动条还是可见的,原因是我们的“全窗尺寸画布”包含 元素的外边距(margin),使得文档比窗口略宽。为使滚动条消失,需要删除 元素的 margin 并将 overflow 设置为 hidden。
<style>
  body {
    margin: 0;
    overflow: hidden;
  }
</style>
添加2D画布
var ctx = canvas.getContext('2d');
ctx.fillStyle = 'rgb(0, 0, 0)';
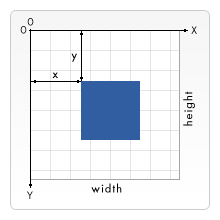
ctx.fillRect(0, 0, width, height);
使用fillstyle来填充颜色(其有第四个参数可设置透明度),然后使用fillrect方法绘制一个覆盖整个区域的矩形(前两个参数是矩形左上顶点的坐标,后两个参数是矩形的长宽)

ctx.beginPath();
ctx.moveTo(50, 50);
绘制路径
beginPath 在钢笔当前所在位置开始绘制一条路径。
moveTo 将钢笔移动至另一个坐标点,不记录、不留痕迹,只将钢笔“跳”至新位置。
lineTo 将钢笔绘画至另一个坐标点,留下直线痕迹。
fill 通过为当前所绘制路径的区域填充颜色来绘制一个新的填充形状。
stroke 通过为当前绘制路径的区域描边,来绘制一个只有边框的形状。
绘制图片
image.onload = function() {
  ctx.drawImage(image, 50, 50);
}
用 drawImage() 函数来嵌入图片,应确保图片先载入完毕,否则运行会出错。
translate 移动画布左上角顶点。
ctx.translate(width/2, height/2);
**requestAnimationFrame **实现动画效果。
客户端存储
基本语法
web storage据都包含在浏览器内两个类似于对象的结构中: sessionStorage 和 localStorage 第一种方法,只要浏览器开着,数据就会一直保存 (关闭浏览器时数据会丢失) ,而第二种会一直保存数据,甚至到浏览器关闭又开启后也是这样。一般而言,第二种更有用。
Storage.setItem()方法允许您在存储中保存一个数据项——它接受两个参数:数据项的名字及其值。试着把它输入到你的 JavaScript 控制台
Storage.getItem() 方法接受一个参数——你想要检索的数据项的名称——并返回数据项的值。
Storage.removeItem() 方法接受一个参数——你想要删除的数据项的名称——并从 web storage 中删除该数据项。
localStorage.setItem('name','Chris');
web storage会为每个域提供一个单独的数据存储区 (每个单独的网址都在浏览器中加载)
储存复杂数据IndexedDB
可以在浏览器中访问的一个完整的数据库系统,在这里,你可以存储复杂的关系数据。其种类不限于像字符串和数字这样的简单值。你可以在一个 IndexedDB 中存储视频,图像和许多其他的内容。但是,这确实是有代价的:使用 IndexedDB 要比 Web Storage API 复杂得多。
// Open our database; it is created if it doesn't already exist
// (see onupgradeneeded below)
let request = window.indexedDB.open('notes', 1);
// onerror handler signifies that the database didn't open successfully
request.onerror = function() {
  console.log('Database failed to open');
};
// onsuccess handler signifies that the database opened successfully
request.onsuccess = function() {
  console.log('Database opened successfully');
  // Store the opened database object in the db variable. This is used a lot below
  db = request.result;
  // Run the displayData() function to display the notes already in the IDB
  displayData();
};
Web表单
lable标签
label中的for属性规定了与哪个表单元素绑定。for属性的值和表单元素的id值一样,即可完成该label标签与该表单元素的绑定。
<label for="test">label标签</label>
<input type="text"  id="test" name="name">
如上所示,该label便签和input便签完成了绑定,当鼠标点击label标签时,input元素会被触发,用户即可完成输入。
label标签加上for属性绑定了表单元素后,可以提高用户体验。
当点击label标签内的文本后,就会触发绑定的表单元素。也就是说,当用户渲染该标签时,浏览器就会自动将焦点转到绑定的表单控件上。使标签可以点击。
隐藏内容
<input type="hidden" id="timestamp" name="timestamp" value="1286705410">
另一个原生的文本框控件是 hidden input 类型。它被用于创建对用户不可见的表单部件,但在发送表单时,会与其它的表单数据一起被发送到服务器——例如,你可能希望向服务器提交一个时间戳,说明订单是何时产生的。因为它是隐藏的,所以用户看不到也不能简单地修改该值,它将永远不会获得焦点,屏幕阅读器也不会注意到它。
如果创建了这样一个元素,就需要设置它的 name 和 value 属性。元素的值可以通过 JavaScript 动态设置。hidden input 类型不应有关联的标签(label 元素)。
复选框和单选框
checkbox
<fieldset>
  <legend>Choose all the vegetables you like to eat</legend>
  <ul>
    <li>
      <label for="carrots">Carrots</label>
      <input type="checkbox" id="carrots" name="vegetable" value="carrots" checked>
    </li>
    <li>
      <label for="peas">Peas</label>
      <input type="checkbox" id="peas" name="vegetable" value="peas">
    </li>
    <li>
      <label for="cabbage">Cabbage</label>
      <input type="checkbox" id="cabbage" name="vegetable" value="cabbage">
    </li>
  </ul>
</fieldset>
相关的复选框元素应该使用具有相同值的 name 属性。包含 checked 属性使复选框在页面加载时自动被选中。
radio
<fieldset>
  <legend>What is your favorite meal?</legend>
  <ul>
    <li>
      <label for="soup">Soup</label>
      <input type="radio" id="soup" name="meal" value="soup" checked>
    </li>
    <li>
      <label for="curry">Curry</label>
      <input type="radio" id="curry" name="meal" value="curry">
    </li>
    <li>
      <label for="pizza">Pizza</label>
      <input type="radio" id="pizza" name="meal" value="pizza">
    </li>
  </ul>
</fieldset>
几个单选按钮可以连接在一起。如果它们的 name属性共享相同的值,那么它们将被认为属于同一组的按钮。同一组中只有一个按钮可以同时被选;这意味着当其中一个被选中时,所有其他的都将自动未选中。如果没有选中任何一个,那么整个单选按钮池就被认为处于未知状态,并且没有以表单的形式发送任何值。
图像按钮
图像按钮(image button)控件渲染的方式与几乎完全相同。只是在用户点击它时,图像按钮的行为与提交(submit)按钮相同。
图像按钮是使用 type 属性值设置为 image 的元素创建的。这个元素支持与元素相同的属性,和其他表单按钮支持的所有属性。
<input type="image" alt="Click me!" src="https://www.cnblogs.com/ggonekim/archive/2023/03/05/my-img.png" width="80" height="30">
文件选择器
HTML 表单能够将文件发送到服务器;要创建一个文件选择器小部件,您可以使用元素,将它的 type 属性设置为 file。被接受的文件类型可以使用 accept 属性来约束。此外,如果您想让用户选择多个文件,那么可以通过添加 multiple 属性来实现。
<input type="file" name="file" id="file" accept="image/*" multiple>
在一些移动终端上,文件选择器可以访问由设备相机和麦克风直接获取的图片、视频、音频。我们只需要这样设置 accept 属性即可(分别对应相机捕获的图片、视频和麦克风获取的音频):
<input type="file" accept="image/*;capture=camera">
<input type="file" accept="video/*;capture=camcorder">
<input type="file" accept="audio/*;capture=microphone">
滑块控件
在元素中使用 range 作为属性 type 的值,就可以创建一个滑块,滑块可以通过鼠标、触摸,或用键盘的方向键移动。
<label for="price">Choose a maximum house price: </label>
<input type="range" name="price" id="price" min="50000" max="500000" step="100" value="250000">
<output class="price-output" for="price"></output>
使用滑块的一个问题是,它们不提供任何种类的视觉反馈来说明当前的值是什么。这是我们附加了一个包含当前值输出的元素的原因。你可以在任何元素内显示一个输入值或一个计算的输出值,但是 <output> 是特殊的,就像 <label> 那样,它可以指定 for 属性,允许你将它与输出值来自的一个或多个元素联系起来。
const price = document.querySelector('#price');
const output = document.querySelector('.price-output');
output.textContent = price.value;
price.addEventListener('input', () => {
  output.textContent = price.value;
});
这里我们将 range 输入元素和 output 元素存为了两个变量。然后我们马上将 output 的 textContent 属性设置为 input 的 value 。设置了一个事件监听器,确保每次范围滑块移动时,output 的 textContent 总是可以及时更新为新值。
日期和时间选择器
<input type="datetime-local" name="datetime" id="datetime">
创建了显示和选择一个没有特定时区信息的日期和时间的控件。
颜色选择器
<input type="color" name="color" id="color">
在支持的情况下,点击一个颜色控件将倾向于显示操作系统的默认颜色选择功能,以便真正做出选择。
其他控件
多行文本域使用元素