2023-01-19
一、SpringMVC简介
1、SpringMVC是Spring子框架
2、SpringMVC是Spring为“控制层”提供的基于MVC设计理念的优秀的Web框架,是目前最主流的MVC框架。
3、SpringMVC是非侵入式:可以使用注解让普通java对象,作为请求处理器(Controller)
4、即SpringMVC就是来代替Javaweb中的Servlet(处理请求、做出响应)
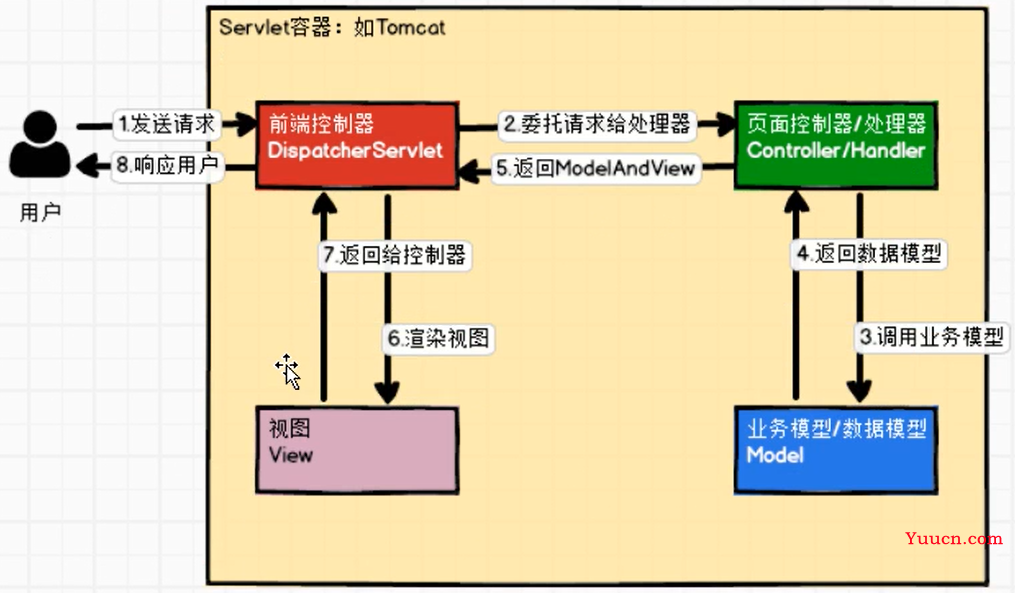
二、SpringMVC处理请求原理简图

三、SpringMVC搭建框架
1、创建工程(web工程)
2、导入jar包
    <dependencies>
        <!-- https://mvnrepository.com/artifact/org.springframework/spring-webmvc -->
        <dependency>
            <groupId>org.springframework</groupId>
            <artifactId>spring-webmvc</artifactId>
            <version>5.3.1</version>
        </dependency>
        <!-- https://mvnrepository.com/artifact/org.thymeleaf/thymeleaf-spring5 -->
        <dependency>
            <groupId>org.thymeleaf</groupId>
            <artifactId>thymeleaf-spring5</artifactId>
            <version>3.0.12.RELEASE</version>
        </dependency>
        <!-- https://mvnrepository.com/artifact/javax.servlet/javax.servlet-api -->
        <dependency>
            <groupId>javax.servlet</groupId>
            <artifactId>javax.servlet-api</artifactId>
            <version>4.0.1</version>
            <scope>provided</scope>
        </dependency>
    </dependencies>
3、编写配置文件
(1)web.xml注册DispatcherSerrvlet
①url配置:/
②init-param:contextConfigLocation,设置springmvc.xml配置文件路径(管理容器对象)
③<load-on-startup>:设置DispatcherServlet优先级(启动服务器时,创建当前Servlet对象)
<?xml version="1.0" encoding="UTF-8"?>
<web-app xmlns="http://xmlns.jcp.org/xml/ns/javaee"
         xmlns:xsi="http://www.w3.org/2001/XMLSchema-instance"
         xsi:schemaLocation="http://xmlns.jcp.org/xml/ns/javaee http://xmlns.jcp.org/xml/ns/javaee/web-app_4_0.xsd"
         version="4.0">
<!--    注册DispatcherSerrvlet【前端控制器】-->
        <servlet>
            <servlet-name>DispatcherServlet</servlet-name>
            <servlet-class>org.springframework.web.servlet.DispatcherServlet</servlet-class>
<!--            设置springmvc,xml配置文件路径【管理容器对象】-->
            <init-param>
                <param-name>contextConfigLocation</param-name>
                <param-value>classpath:springmvc.xml</param-value>
            </init-param>
<!--            设置DispatcherServlet优先级(启动服务器时,创建当前Servlet对象)-->
            <load-on-startup>1</load-on-startup>
        </servlet>
        <servlet-mapping>
            <servlet-name>DispatcherServlet</servlet-name>
            <url-pattern>/</url-pattern>
        </servlet-mapping>
</web-app>
(2)springmvc.xml
①开启组件扫描
②配置视图解析器(解析视图(设置视图前缀&后缀))
<?xml version="1.0" encoding="UTF-8"?>
<beans xmlns="http://www.springframework.org/schema/beans"
       xmlns:xsi="http://www.w3.org/2001/XMLSchema-instance"
       xmlns:context="http://www.springframework.org/schema/context"
       xsi:schemaLocation="http://www.springframework.org/schema/beans http://www.springframework.org/schema/beans/spring-beans.xsd http://www.springframework.org/schema/context https://www.springframework.org/schema/context/spring-context.xsd">
    <!--①开启组件扫描-->
    <context:component-scan base-package="com.hh"></context:component-scan>
    <!--②配置视图解析器(解析视图(设置视图前缀&后缀))-->
    <bean class="org.thymeleaf.spring5.view.ThymeleafViewResolver" id="viewResolver">
        <!--配置字符集属性-->
        <property name="characterEncoding" value="UTF-8"></property>
        <!--配置模板引擎属性-->
        <property name="templateEngine">
            <!-- 配置内部bean-->
            <bean class="org.thymeleaf.spring5.SpringTemplateEngine">
                <!--配置模块解析器属性-->
                <property name="templateResolver">
                    <!--配置内部bean-->
                    <bean class="org.thymeleaf.spring5.templateresolver.SpringResourceTemplateResolver">
                        <!--配置前缀-->
                        <property name="prefix" value="/WEB-INF/pages/"></property>
                        <!--配置后缀-->
                        <property name="suffix" value=".html"></property>
                        <!--配置字符集-->
                        <property name="characterEncoding" value="UTF-8"></property>
                    </bean>
                </property>
            </bean>
        </property>
    </bean>
</beans>
4、编写请求处理器(Controller|Handler)
(1)使用@Controller注解标识请求处理器
@Controller  //标识当前类是一个请求处理器类
public class HelloController {
    /**
     * 配置url(/),映射到WEB-INF/index.html
     * @return
     */
    @RequestMapping("/")
    public String toIndex(){
        //     /WEB-INF/pages/index.html
        //物理视图名 = 视图前缀 + 逻辑视图名 + 视图后缀
        return "index";
    }
    @RequestMapping("/HelloControllerMethod")
    public String HelloWorld(){
        System.out.println("==>HelloController->HelloWorld()!!!");
        //返回的是一个逻辑视图名
        return "success";
    }
}
(2)使用@RequestMapping注解处理方法(URL)
5、测试