1.注意
函数组件无生命周期,生命周期只有类组件才拥有。
2. 图解
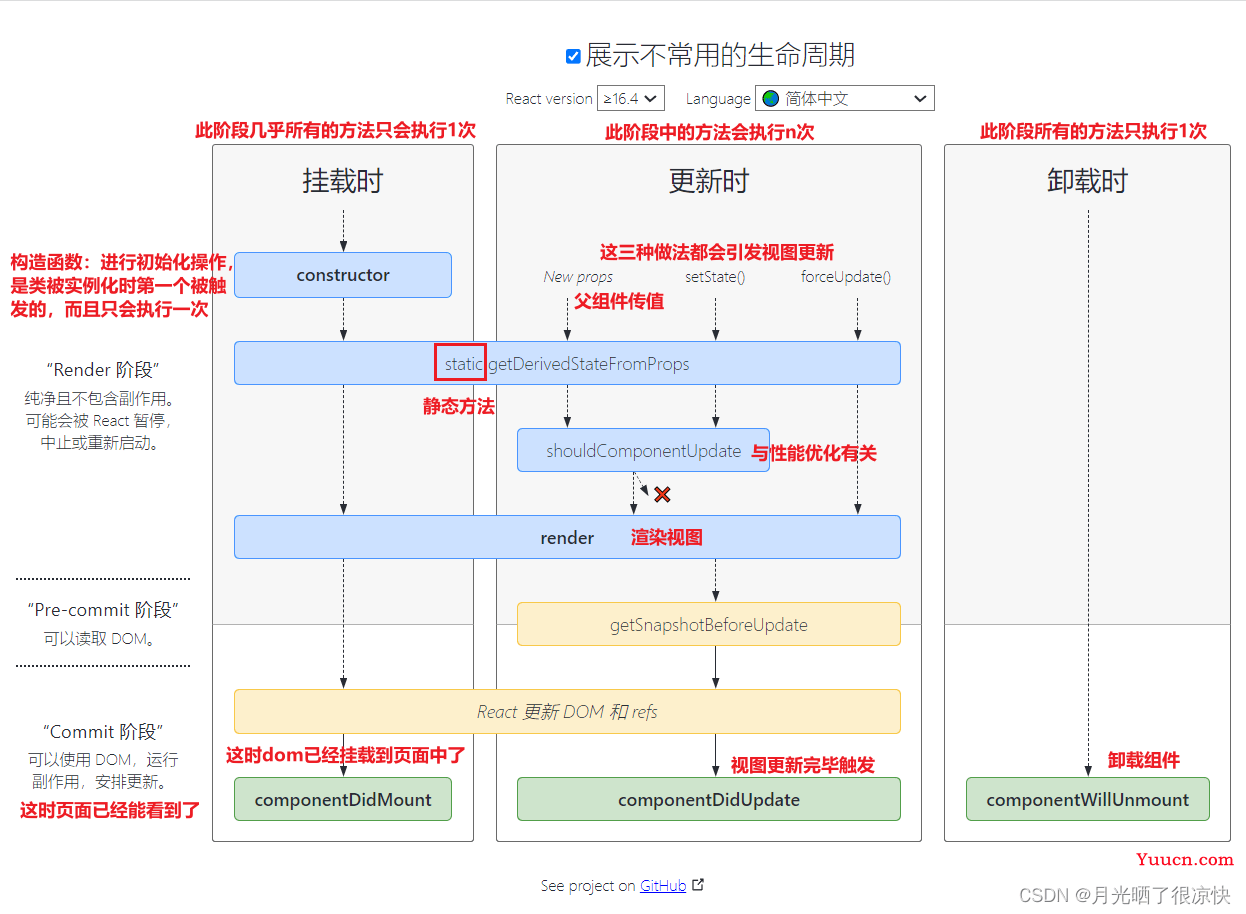
完整的生命周期主要为三个部分,分别为挂载时、更新时和卸载时,如下图所示:
3. 生命周期函数
3.1 constructor构造函数
描述:
React 组件的构造函数在挂载之前被调用。在实现 React.Component 构造函数时,需要先在添加其它内容前,调用 super(props),用来将父组件传来的 props 绑定到继承类中。
构造函数它只执行1次,可以进行数据初始化操作,因为它是所有的生命周期中第1个被执行的方法,但是不太建议在此方法中进行网络请求。
父组件的构造方法先执行,子组件的构造方法后执行。
语法:
constructor(props) {
// 如果你在定义组件中有定义构造函数,则一定要调用super方法来调用父类的构造函数
super(props)
// todo …
}
3.2 static getDerivedStateFromProps(nextProps, prevState)方法
描述:
此方法在构造函数方法之后,Render 方法之前被调用,并且在初始挂载及后续更新时都会被调用。它应返回一个对象来更新 state,如果返回 null 则不更新任何内容。
此方法适用于罕见的用例,即当前组件的 state 的值在任何时候都取决于 props 传入。
语法:
state = {
num: 0
};
render() {
return <div>当前的num是{this.state.num}</div>;
}
// 从props中获取数据,绑定到当前的这个组件中的state
// nextProps 父组件传递过来的整个props对象,即当前最新的props数据
// prevState 当前组件中的状态对象state,即当前最新的state数据,但暂时不包含返回值中要对state修改的值
static getDerivedStateFromProps(nextProps, prevState) {
// 不需要更新当前state
return null
}
注意:
- 此方法会执行 n 次
- 此方法它是一个静态方法,静态方法中不能使用 this
- 使用此方法一定要先定义好 state,否则报错
- 此方法必须要有返回值,
{}|null,如果返回为对象,则会对 state 中数据进行操作,返回的对象属性如果在 state 中没有则添加,有则修改;如果返回为 null,则不会对 state 进行任何操作
getDerivedStateFromProps 在父子组件中执行的先后顺序,及 nextProps, prevState 的使用:
import React, { Component } from 'react'
class Child extends Component {
constructor(props) {
super(props)
this.state = { num: 100 }
console.log('child --- constructor')
}
// 快捷输入 gdsfp
static getDerivedStateFromProps(nextProps, nextState) {
console.log('child --- getDerivedStateFromProps')
// nextState: 当前最新的state数据,暂时不包含你返回值中要对state修改的值
console.log(nextProps, nextState)
return { name: '张三' }
}
render() {
return (
<div>
<h3>Child组件</h3>
</div>
)
}
}
class App extends Component {
constructor(props) {
super(props)
this.state = { age: 1 }
// 父组件先执行后子组件执行此方法  app -> child
console.log('App --- constructor')
}
static getDerivedStateFromProps(nextProps, nextState) {
console.log('App --- getDerivedStateFromProps')
return null
}
render() {
return (
<div>
<Child name='李四' />
</div>
)
}
}
export default App
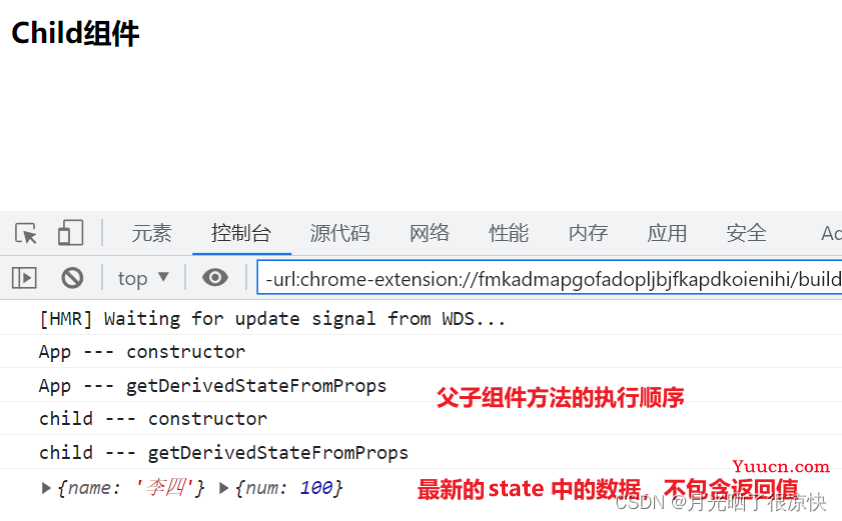
注意:由于这个方法会执行 n 次,所以不建议在这个方法中发送网络请求,容易造成死循环。如果想要在这个方法中发送网络请求,则一定要确保不要触发这个方法再次执行(即父组件不发送新的 props 或修改 props ,不修改 state ,不强制更新视图)
小案例:
描述:
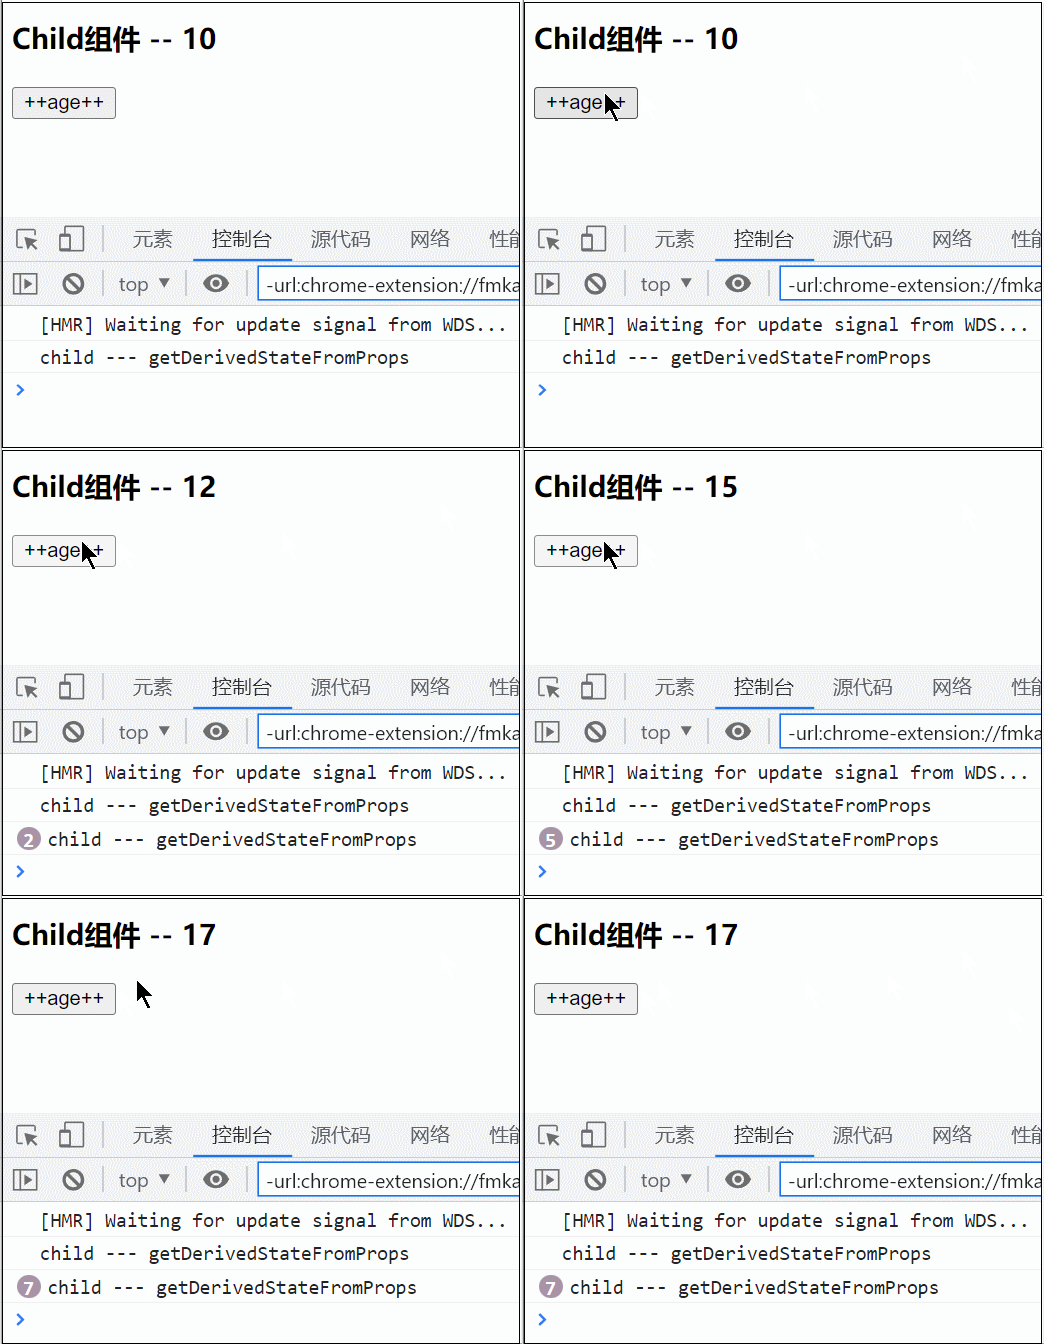
子组件将 state 中的数据修改为 nextProps 中的值,并且点击增加按钮能够触发后续对值的修改。
实现:
import React, { Component } from 'react'
class Child extends Component {
constructor(props) {
super(props)
this.state = { name: '张三' }
}
// 快捷输入 gdsfp
static getDerivedStateFromProps(nextProps, nextState) {
console.log('child --- getDerivedStateFromProps')
// 如果你想用此方法,把props中的属性数据,追加到state中,后续能修改,则这样的操作,你要确保只执行1次
// 这种方式只能接收到父组件第一次值过来的值(10),点击按钮子组件age并不会增加
// 这是因为每次点击增加按钮都会触发当前函数,将state中的age修改为nextProps
// return nextProps // 这种方式不会触发点击按钮增加age值
if (nextState.flag != 1) {
return { ...nextProps, flag: 1 }
}
return null
}
render() {
let { age } = this.state
return (
<div>
<h3>Child组件 -- {age}</h3>
<button
onClick={() => {
this.setState(state => ({ age: state.age + 1 }))
}}
>
++age++
</button>
</div>
)
}
}
class App extends Component {
constructor(props) {
super(props)
this.state = { age: 1 }
}
render() {
return (
<div>
<Child age={10} />
</div>
)
}
}
export default App
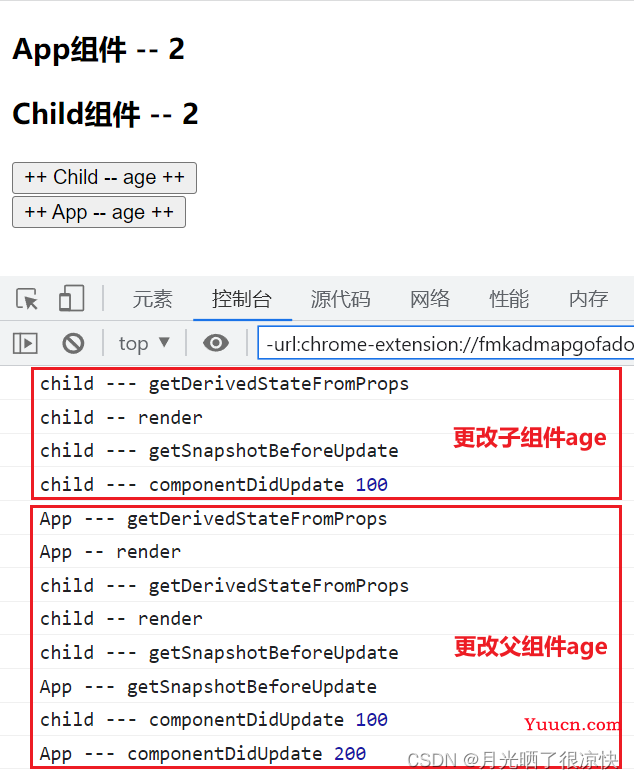
3.3 挂载时和更新时的生命周期函数执行顺序
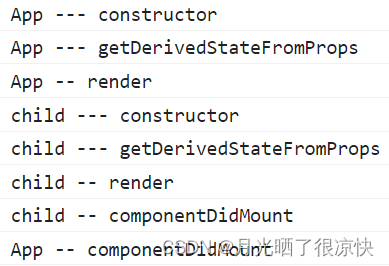
挂载时生命周期函数介绍:
- constructor(props)
React组件的构造函数在挂载之前被调用。在实现React.Component构造函数时,需要先在添加其它内容前,调用super(props),用来将父组件传来的props绑定到继承类中。只调用一次。
- static getDerivedStateFromProps(nextProps, prevState)
此方法是react16.3之后新增,会在调用 render 方法之前调用,并且在初始挂载及后续更新时都会被调用。它应返回一个对象来更新 state,如果返回 null 则不更新任何内容。
此方法适用于罕见的用例,即当前组件的 state 的值在任何时候都取决于 props传入。
- render()
render()方法是必需的,它主要负责组件的渲染,会被重复调用若干次
- componentDidMount
它会在组件挂载后(插入 DOM 树中)立即调用。依赖于 DOM 节点的初始化应该放在这里。如需通过网络请求获取数据,此处是实例化请求的好地方。
- shouldComponentUpdate(nextProps, nextState)
此函数将放在下文单独讲解。
- getSnapshotBeforeUpdate(prevProps, prevState)
在最近一次渲染输出(提交到 DOM 节点)之前调用。它使得组件能在发生更改之前从 DOM 中捕获一些信息,此生命周期的任何返回值将作为参数传递给 componentDidUpdate()
- componentDidUpdate(prevProps, prevState, snapshot)
会在数据更新后被立即调用。首次渲染不会执行此方法。
import React, { Component } from 'react'
class Child extends Component {
constructor(props) {
super(props)
this.state = { name: '张三' }
console.log('child --- constructor')
}
// 快捷输入 gdsfp
static getDerivedStateFromProps(nextProps, nextState) {
console.log('child --- getDerivedStateFromProps')
if (nextState.flag != 1) {
return { ...nextProps, flag: 1 }
}
return null
}
// 它只执行1次
// 虚拟dom挂载到真实的页面点中完成,在此进行dom操作
// 在此可以进行网络请求
componentDidMount() {
console.log('child -- componentDidMount')
}
// ------------- 更新时
// prevProps 修改之前的props数据
// prevState 修改之前的state数据
// 此方法要有一个返回值,且如果有此方法,则必须要有componentDidUpdate
// 此方法的返回值,会在componentDidUpdate参数3中接受
getSnapshotBeforeUpdate(prevProps, prevState) {
console.log('child --- getSnapshotBeforeUpdate')
return 100
}
// 数据更新完毕后执行
componentDidUpdate(prevProps, prevState, snapshot) {
console.log('child --- componentDidUpdate', snapshot)
}
render() {
console.log('child -- render')
let { age } = this.state
return (
<div>
<h3>Child组件 -- {age}</h3>
<button
onClick={() => {
this.setState(state => ({ age: state.age + 1 }))
}}
>
++ Child -- age ++
</button>
</div>
)
}
}
class App extends Component {
constructor(props) {
super(props)
this.state = { age: 1 }
console.log('App --- constructor')
}
static getDerivedStateFromProps(nextProps, nextState) {
console.log('App --- getDerivedStateFromProps')
return null
}
componentDidMount() {
console.log('App -- componentDidMount')
}
getSnapshotBeforeUpdate(prevProps, prevState) {
console.log('App --- getSnapshotBeforeUpdate')
return 200
}
// 数据更新完毕后执行
componentDidUpdate(prevProps, prevState, snapshot) {
console.log('App --- componentDidUpdate', snapshot)
}
render() {
let { age } = this.state
console.log('App -- render')
return (
<div>
<h3>App组件 -- {age}</h3>
<Child age={age} />
<button
onClick={() => {
this.setState(state => ({ age: state.age + 1 }))
}}
>
++ App -- age ++
</button>
</div>
)
}
}
export default App
挂载时:
更新时:
3.4 componentWillUnmount函数的使用
描述:
componentWillUnmount() 会在组件卸载及销毁之前直接调用。在此方法中执行必要的清理操作。
使用:
import React, { Component } from 'react'
class Child extends Component {
constructor(props) {
super(props)
this.state = { name: '张三' }
}
// 快捷输入 gdsfp
static getDerivedStateFromProps(nextProps, nextState) {
if (nextState.flag != 1) {
return { ...nextProps, flag: 1 }
}
return null
}
// 销毁组件时执行
componentWillUnmount() {
console.log('child --- componentWillUnmount')
}
render() {
let { age } = this.state
return (
<div>
<h3>Child组件 -- {age}</h3>
<button
onClick={() => {
this.setState(state => ({ age: state.age + 1 }))
}}
>
++ Child -- age ++
</button>
</div>
)
}
}
class App extends Component {
constructor(props) {
super(props)
this.state = { age: 1 }
}
getSnapshotBeforeUpdate(prevProps, prevState) {
console.log('App --- getSnapshotBeforeUpdate')
return 200
}
// 数据更新完毕后执行
componentDidUpdate(prevProps, prevState, snapshot) {
console.log('App --- componentDidUpdate', snapshot)
}
render() {
let { age } = this.state
return (
<div>
<h3>App组件 -- {age}</h3>
{/* age大于1时销毁子组件 */}
{age > 1 ? null : <Child age={age} />}
<button
onClick={() => {
this.setState(state => ({ age: state.age + 1 }))
}}
>
++ App -- age ++
</button>
</div>
)
}
}
export default App

3.5 shouldComponentUpdate优化渲染方案
描述:
React 的更新机制导致,即使子组件未发生更新,只要父组件中的 state 改变,当前父组件及其所有子组件都会重新渲染,这样做虽然很高效,但会造成不少性能损耗,那么该如何避免呢?
当 props 或 state 发生变化时,shouldComponentUpdate() 会在渲染执行之前被调用。返回值默认为 true 则组件继续渲染,为 false 则当前组件不会渲染。首次渲染或使用 forceUpdate() 时不会调用该方法。此方法仅作为性能优化的方式而存在。你也可以考虑使用内置的 PureComponent 组件,而不是手动编写 shouldComponentUpdate()。
PureComponent 会对 props 和 state 进行浅层比较,并减少了跳过必要更新的可能性。 PureComponent 它可以对于组件无效渲染起到一定的优化,但是它只能针对于props中值为基本类型。
所以我们还可以使用生命周期中提供的优化方案,使用 shouldComponentUpdate 减少无效渲染次数。
语法:
shouldComponentUpdate(nextProps, nextState) {
// 判断是否需要被渲染,如果需要则返回true,否则返回false
if (nextProps.b === this.props.b) {
return false;
} else {
return true;
}
}
// 简化方法:只需要将类组件的继承关系改成继承`PureComponent`即可,这样一来,框架会自动判断值是否有变化进一步决定组件是否需要被渲染。
import React, { PureComponent } from "react";
class Cmp extends PureComponent {
render() {
console.log("Cmp被渲染了");
return <div>父亲传递过来的值b为:{this.props.b}</div>;
}
}
export default Cmp
使用:
import React, { Component, PureComponent } from 'react'
// PureComponent 它可以对于组件无效渲染起到一定的优化,但是它只能针对于props中值为基本类型
// 可以使用生命周期中提供的优化方案,提升无效渲染次数
// class Child extends PureComponent {
class Child extends Component {
// 此方法,用于组件重复渲染的优化方法,它不是必须要用的
// 此方法必须要有一个boolean返回值
// 此方法只有在更新时才会触发
// true 则继续向下渲染  render
// false 表示当前不会继续渲染,从而减少无用渲染,提升性能
// nextProps 最新的props数据   this.props 之前的props数据
// nextState 最新的state数据   this.state 之前的state数据
shouldComponentUpdate(nextProps, nextState) {
// 针对于要比较的字段进行判断
if (this.props.num.data === nextProps.num.data) {
return false
}
return true
}
render() {
console.log('child -- render')
return (
<div>
<h3>{this.props.num.data}</h3>
</div>
)
}
}
class App extends Component {
state = {
num: { data: 1 },
name: '张三'
}
render() {
console.log('app -- render')
return (
<div>
<h3>{this.state.num.data}</h3>
<Child num={this.state.num} />
{/* 这时子组件会更新 */}
{/* <button onClick={() => this.setState({ num: { data: Date.now() } })}>++num++</button> */}
<button onClick={() => this.setState({ num: { data: 1 } })}>++num++</button>
</div>
)
}
}
export default App

扩展:使用lodash库减小无效渲染
import React, { Component, PureComponent } from 'react'
import _ from 'lodash'
class Child extends Component {
// 此方法,用于组件重复渲染的优化方法,它不是必须要用的
// 此方法必须要有一个boolean返回值
// 此方法只有在更新时才会触发
// true 则继续向下渲染  render
// false 表示当前不会继续渲染,从而减少无用渲染,提升性能
shouldComponentUpdate(nextProps, nextState) {
// 深层比对,它比对的是对象中属性的值,如果全局的值一样则为true,否则为false
return !_.isEqual(this.props, nextProps)
}
render() {
console.log('child -- render')
return (
<div>
<h3>{this.props.num.data}</h3>
</div>
)
}
}
class App extends Component {
state = {
num: { data: 1 },
name: '张三'
}
render() {
console.log('app -- render')
return (
<div>
<h3>{this.state.num.data}</h3>
<Child num={this.state.num} />
{/* 这时子组件会更新 */}
{/* <button onClick={() => this.setState({ num: { data: Date.now() } })}>++num++</button> */}
<button onClick={() => this.setState({ num: { data: 1 } })}>++num++</button>
</div>
)
}
}
export default App

到此这篇关于React生命周期函数深入全面介绍的文章就介绍到这了,更多相关React生命周期函数内容请搜索本站以前的文章或继续浏览下面的相关文章希望大家以后多多支持本站!