文章目录
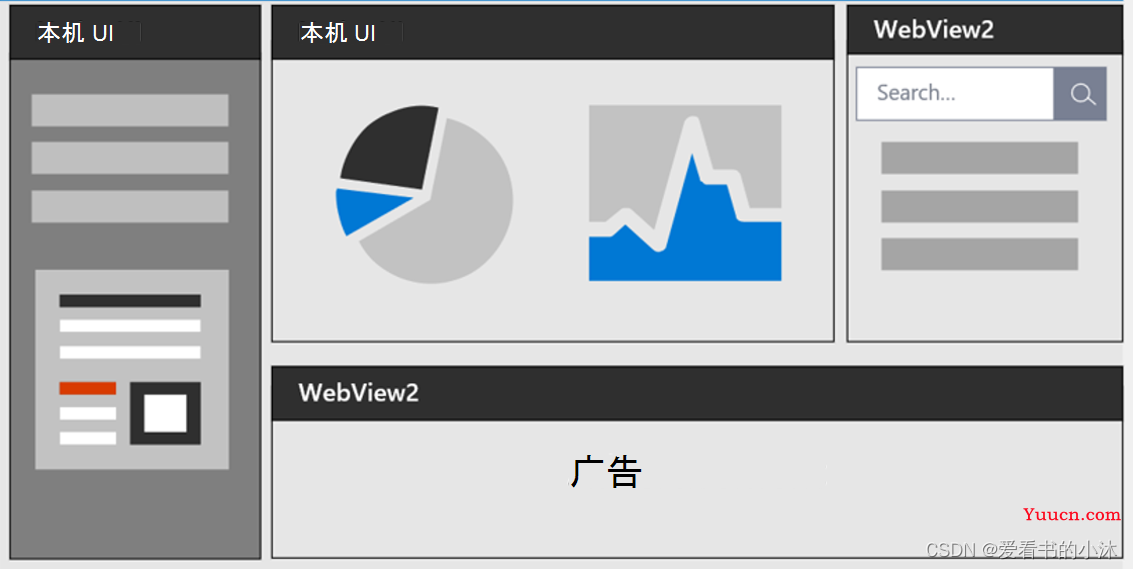
- 1、简介
- 2、WebBrowser
-
- 2.1 新建测试项目
- 2.2 添加web控件类文件
- 2.3 添加web控件变量
- 2.4 添加窗口事件
- 2.5 添加web控件实例创建代码
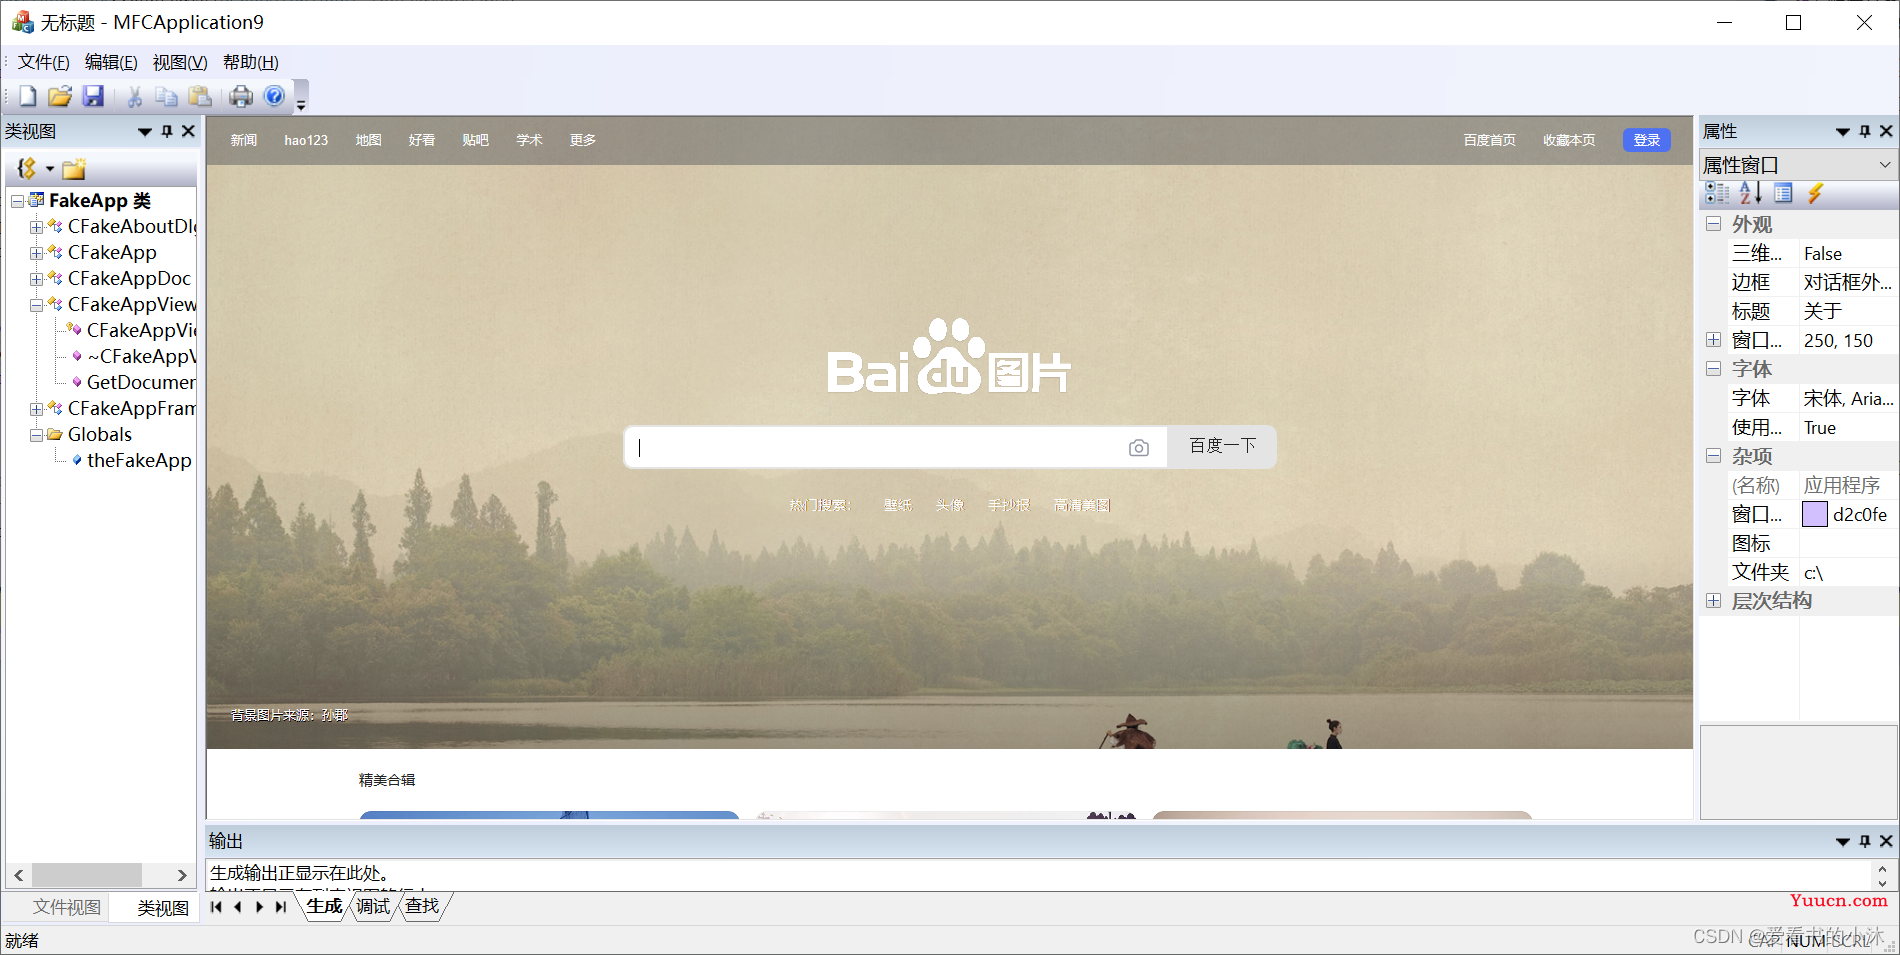
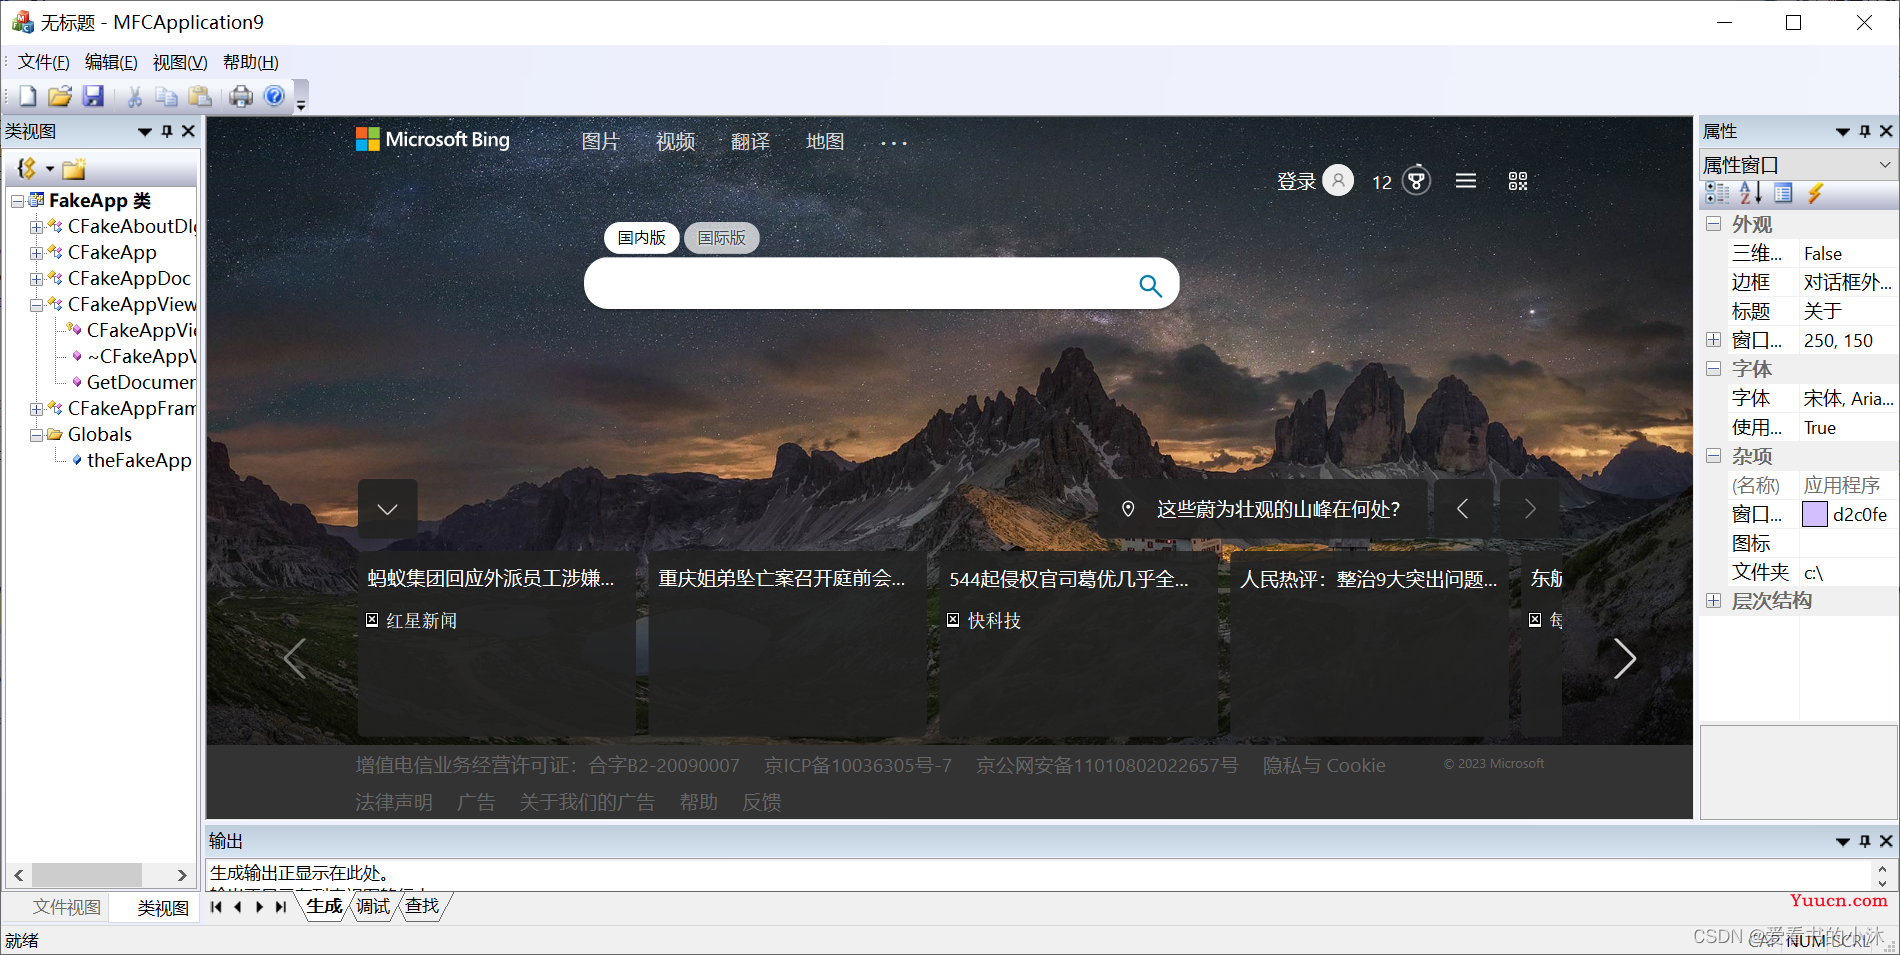
- 2.6 编译和运行
- 3、WebView2
-
- 3.1 新建测试项目
- 3.2 下载和安装WebView2包
- 3.3 添加web控件代码
- 3.4 编译和运行
- 4、CEF3
-
- 4.1 下载cef3
- 4.2 编译和运行cef3
- 结语
1、简介
WebBrowser控件最常见的用途之一是向应用程序添加 Internet 浏览功能。使用 IWebBrowser2 接口,可以浏览到本地文件系统、网络或万维网上的任何位置。可以使用IWebBrowser2::Navigate 方法告知控件要浏览到哪个位置。第一个参数是包含位置名称的字符串。要浏览到本地文件系统或网络上的某个位置,请指定文件系统位置的完整路径或网络上该位置的 UNC 名称。若要浏览到万维网上的某个站点,请指定该站点的 URL。
2、WebBrowser
To add the WebBrowser control to a basic Microsoft Foundation Classes (MFC) application, perform the following steps.
- Right-click the Project name, and point to Add, the select Class… from the context menu.
- Select “MFC Class From ActiveX Control” and click Add.
- Select “Microsoft Web Browser” from among the classes listed in the registry. Highlight the IWebBrowser2 interface, and click the right arrow to generate a new CWebBrowser2 class.
- Click Finish.
2.1 新建测试项目
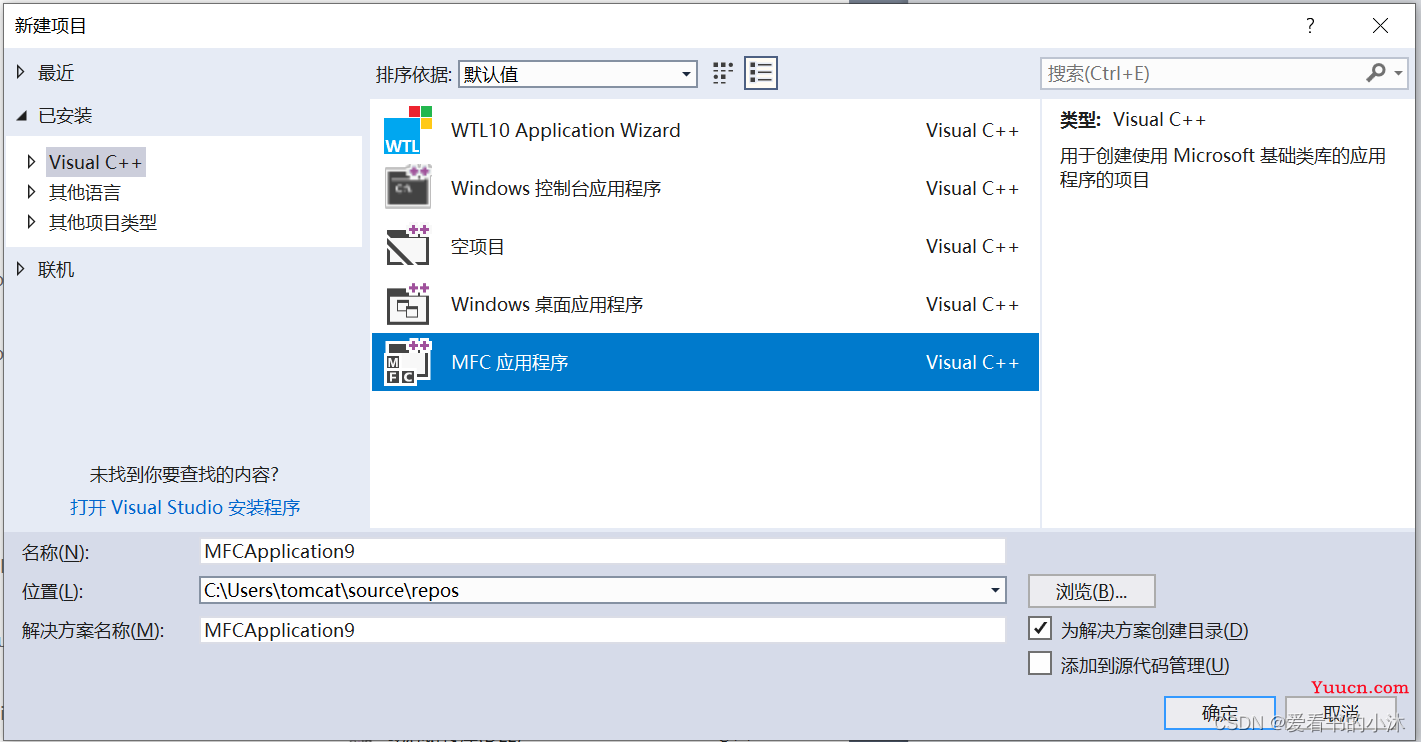
选择模板:Visual C++ -> MFC应用程序,如下:
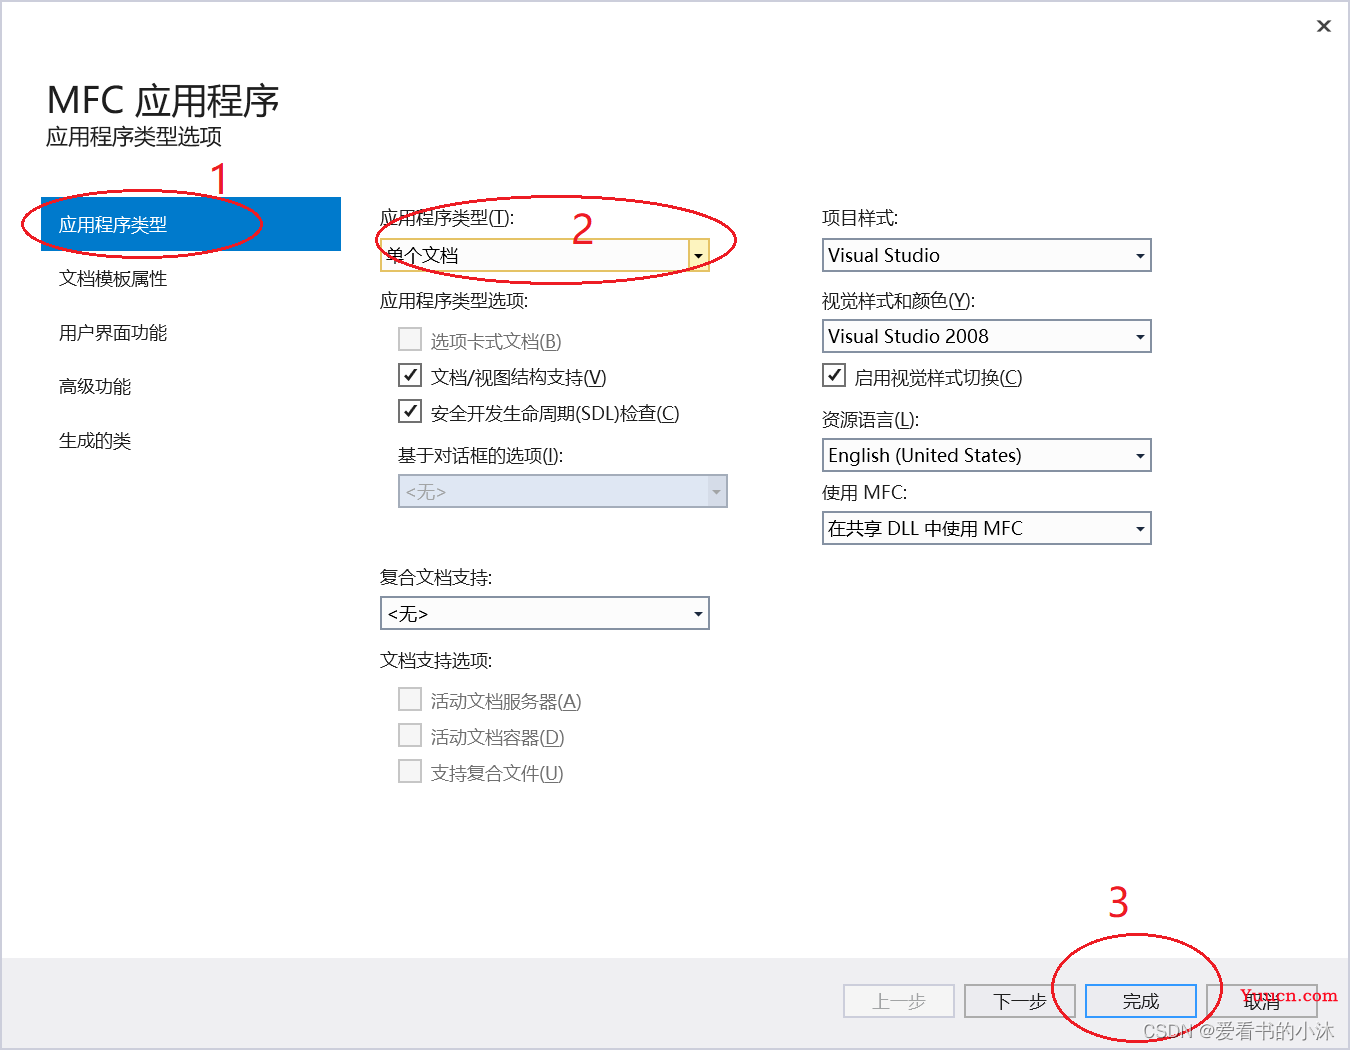
选择:单个文档
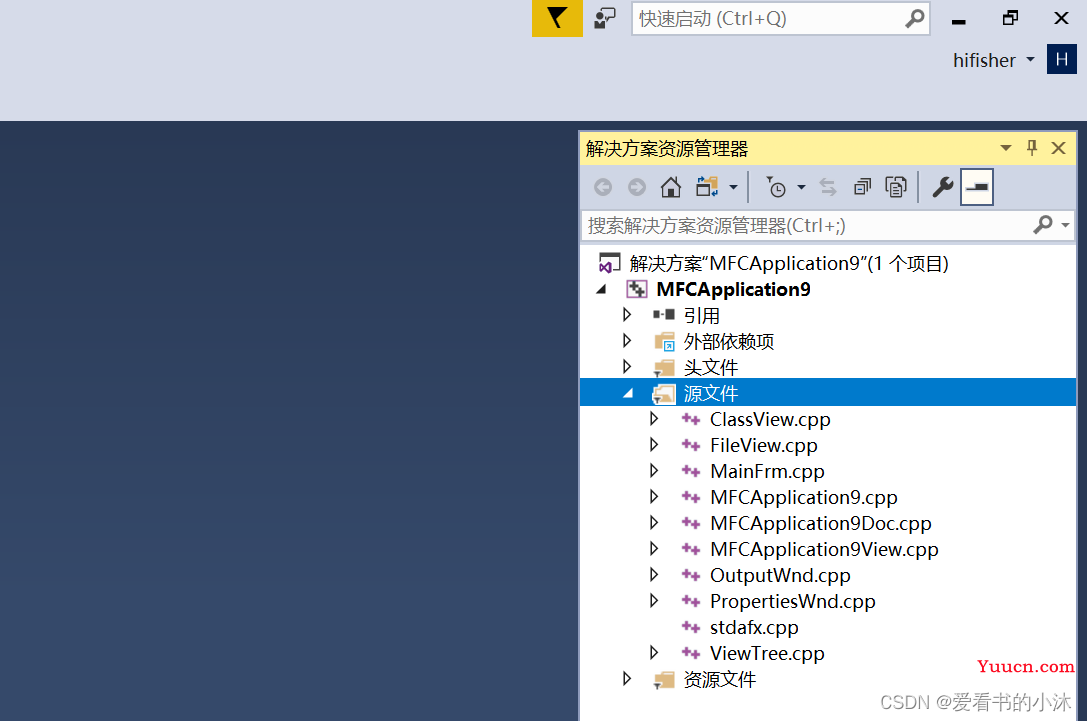
创建的项目文件如下:
2.2 添加web控件类文件
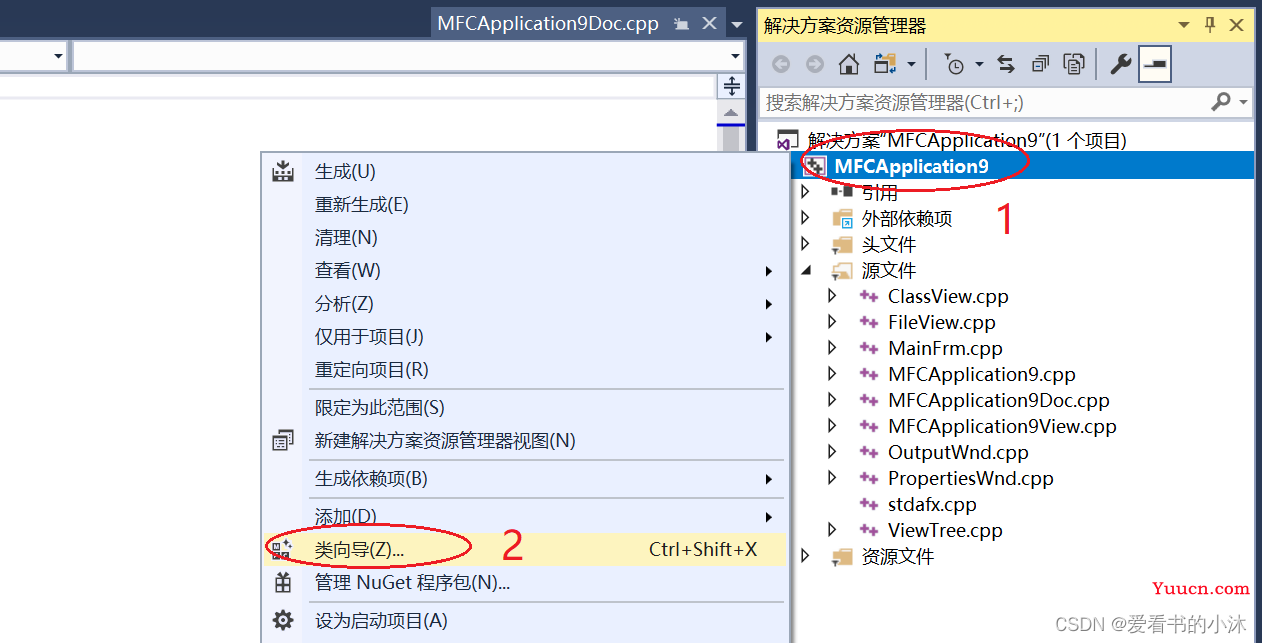
在项目“MFCApplication9”上鼠标右键,在菜单里选择“类向导。。。”
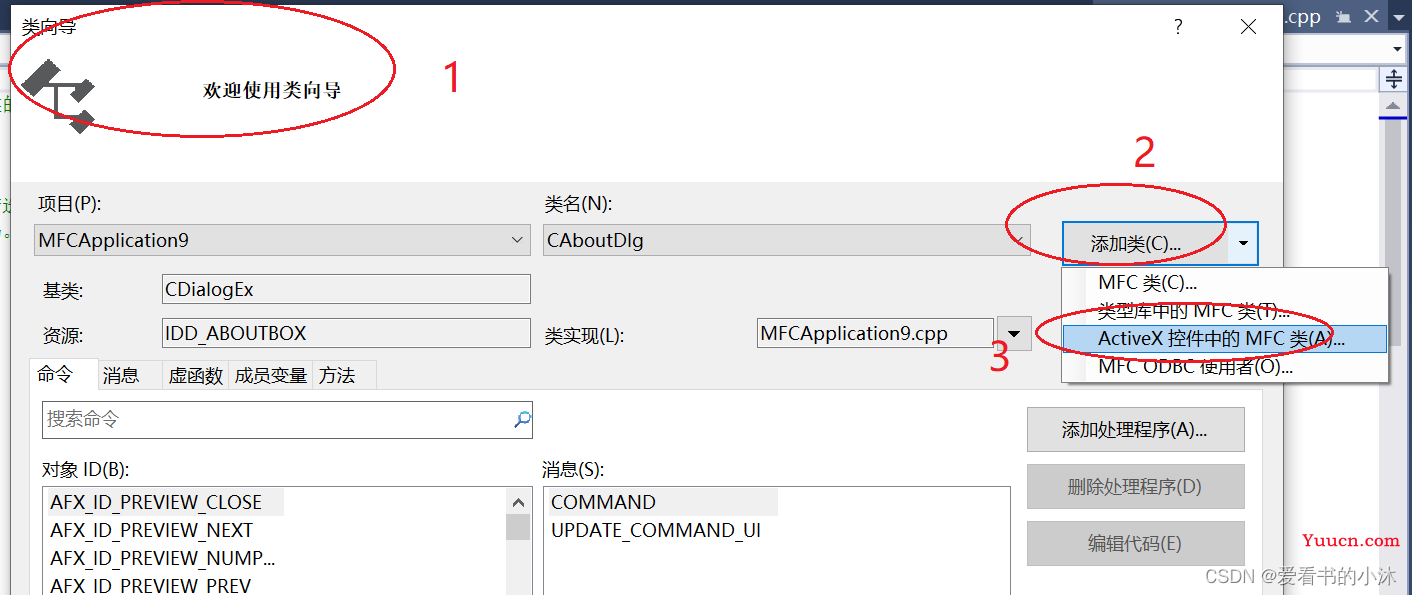
在弹窗“类向导”中选择ActiveX控件中的MFC类。
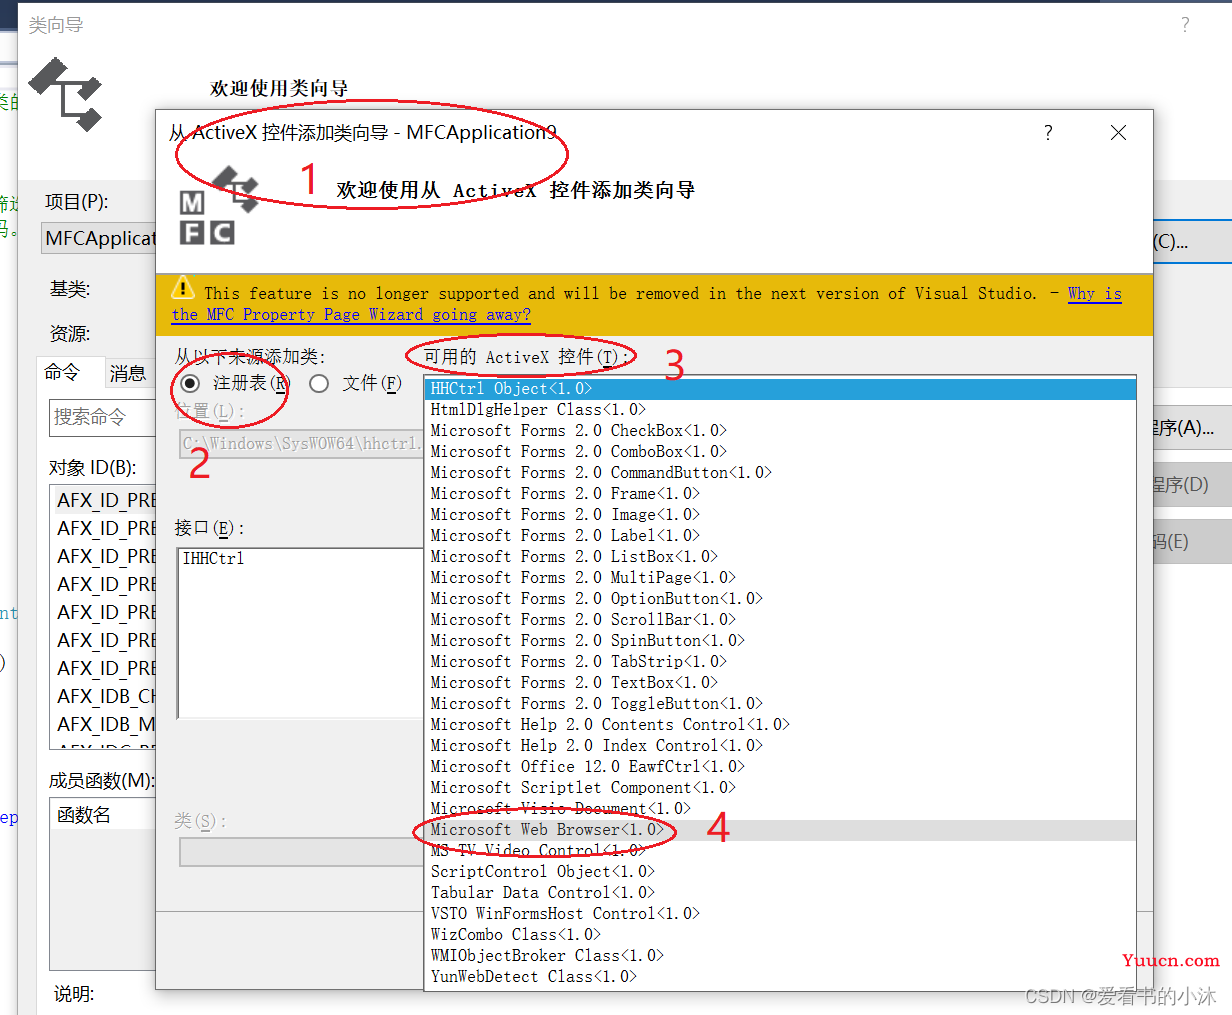
安装如下的提示,选择Microsoft Web Browser<1.0>.
按照如下提示,选择IWebBrowser2。然后点击按钮完成。
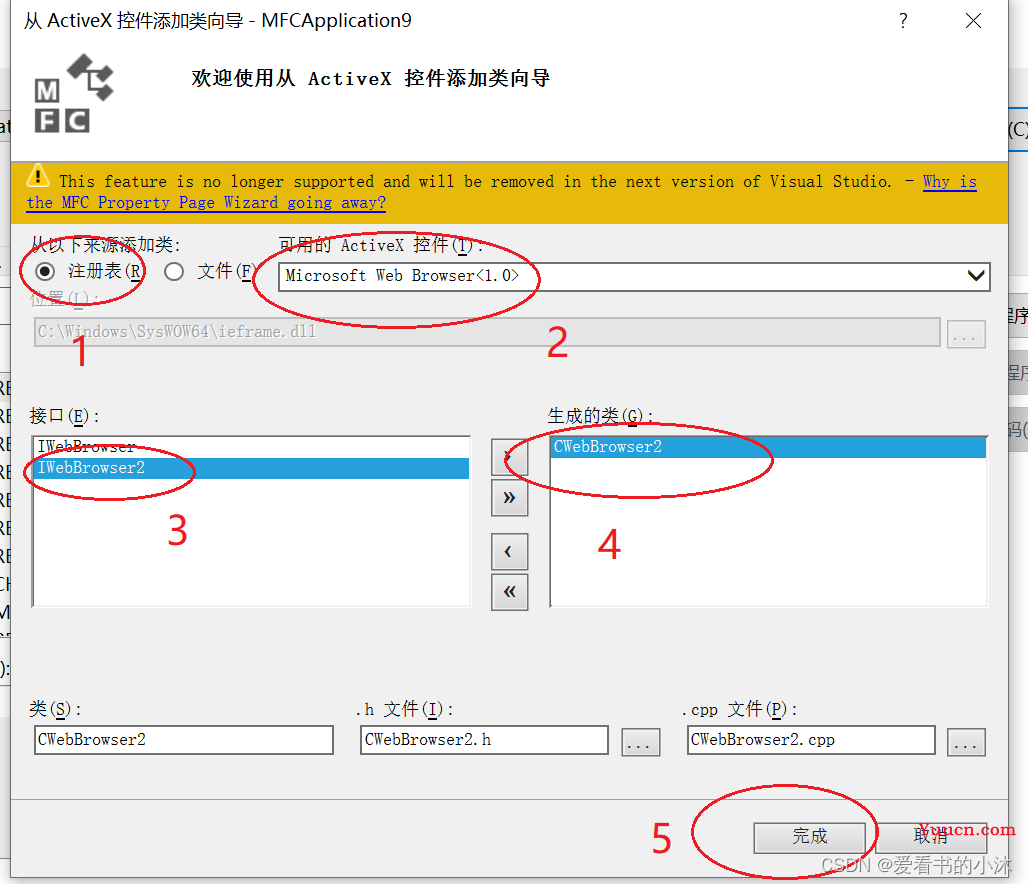
然后自动在项目中生成控件的类文件如下:
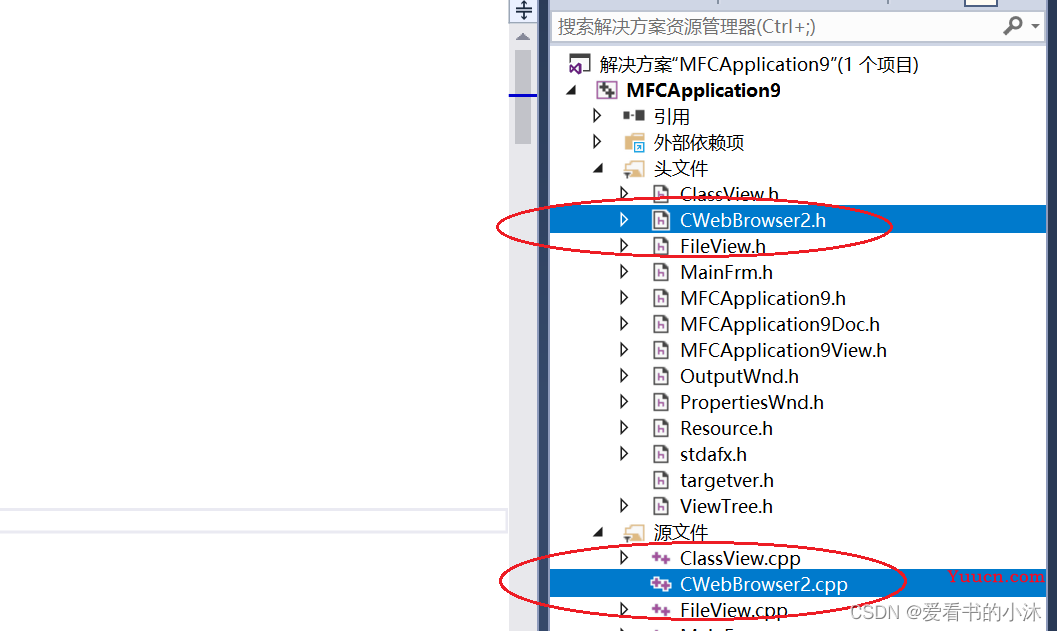
2.3 添加web控件变量
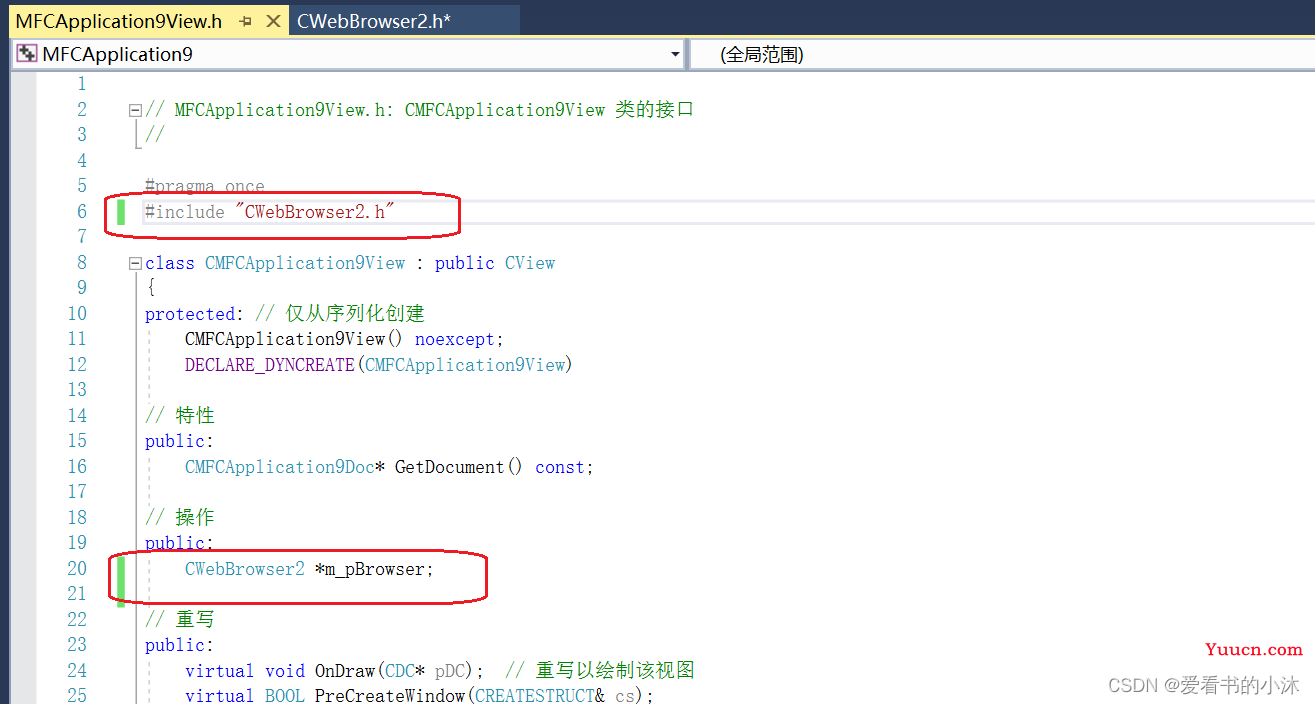
在文件MFCApplication9View.h中添加代码如下:
#include "CWebBrowser2.h"
CWebBrowser2 *m_pBrowser;
2.4 添加窗口事件
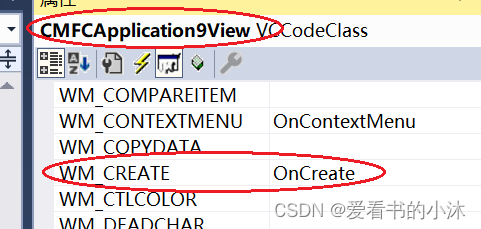
对CMFCApplication9View视图类添加窗口事件:WM_CREATE,WM_SIZE
int CMFCApplication9View::OnCreate(LPCREATESTRUCT lpCreateStruct)
{
	if (CView::OnCreate(lpCreateStruct) == -1)
		return -1;
	// TODO:  在此添加您专用的创建代码
	return 0;
}
void CMFCApplication9View::OnSize(UINT nType, int cx, int cy)
{
	CView::OnSize(nType, cx, cy);
	// TODO: 在此处添加消息处理程序代码
}
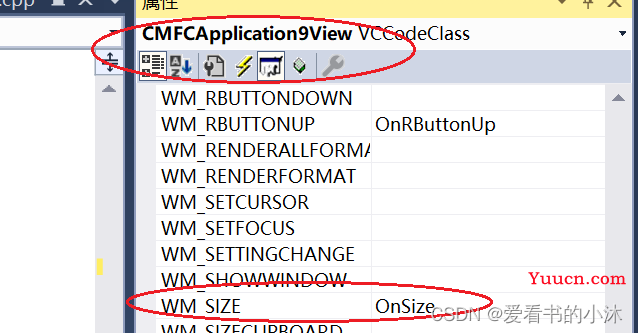
2.5 添加web控件实例创建代码
在上面的两个事件函数里添加对应的代码:
void CMFCApplication9View::OnSize(UINT nType, int cx, int cy)
{
	CView::OnSize(nType, cx, cy);
	if (m_pBrowser) {
		m_pBrowser->MoveWindow(0, 0, cx, cy);
	}
	// TODO: 在此处添加消息处理程序代码
}
int CMFCApplication9View::OnCreate(LPCREATESTRUCT lpCreateStruct)
{
	if (CView::OnCreate(lpCreateStruct) == -1)
		return -1;
	// TODO:  在此添加您专用的创建代码
	// Create the control.
	m_pBrowser = new CWebBrowser2;
	ASSERT(m_pBrowser);
	if (!m_pBrowser->Create(NULL, NULL, WS_VISIBLE, CRect(0, 0, 0, 0), this, NULL))
	{
		TRACE("failed to create browser/n");
		delete m_pBrowser;
		m_pBrowser = NULL;
		return 0;
	}
	// Initialize the first URL.
	COleVariant noArg;
	CString strURL("https://image.baidu.com/");
	//CString strURL("https://cn.bing.com/");
	m_pBrowser->Navigate(strURL, &noArg, &noArg, &noArg, &noArg);
	return 0;
}
2.6 编译和运行
3、WebView2
Microsoft Edge WebView2 控件允许在本机应用中嵌入 web 技术(HTML、CSS 以及 JavaScript)。 WebView2 控件使用 Microsoft Edge 作为绘制引擎,以在本机应用中显示 web 内容。
支持以下编程环境:
- Win32 C/C++
- .NET Framework 4.5 或更高版本
- .NET Core 3.1 或更高版本
- .NET 5
- .NET 6
- WinUI 2.0
- WinUI 3.0
3.1 新建测试项目
新建一个MFC的项目如上。
3.2 下载和安装WebView2包
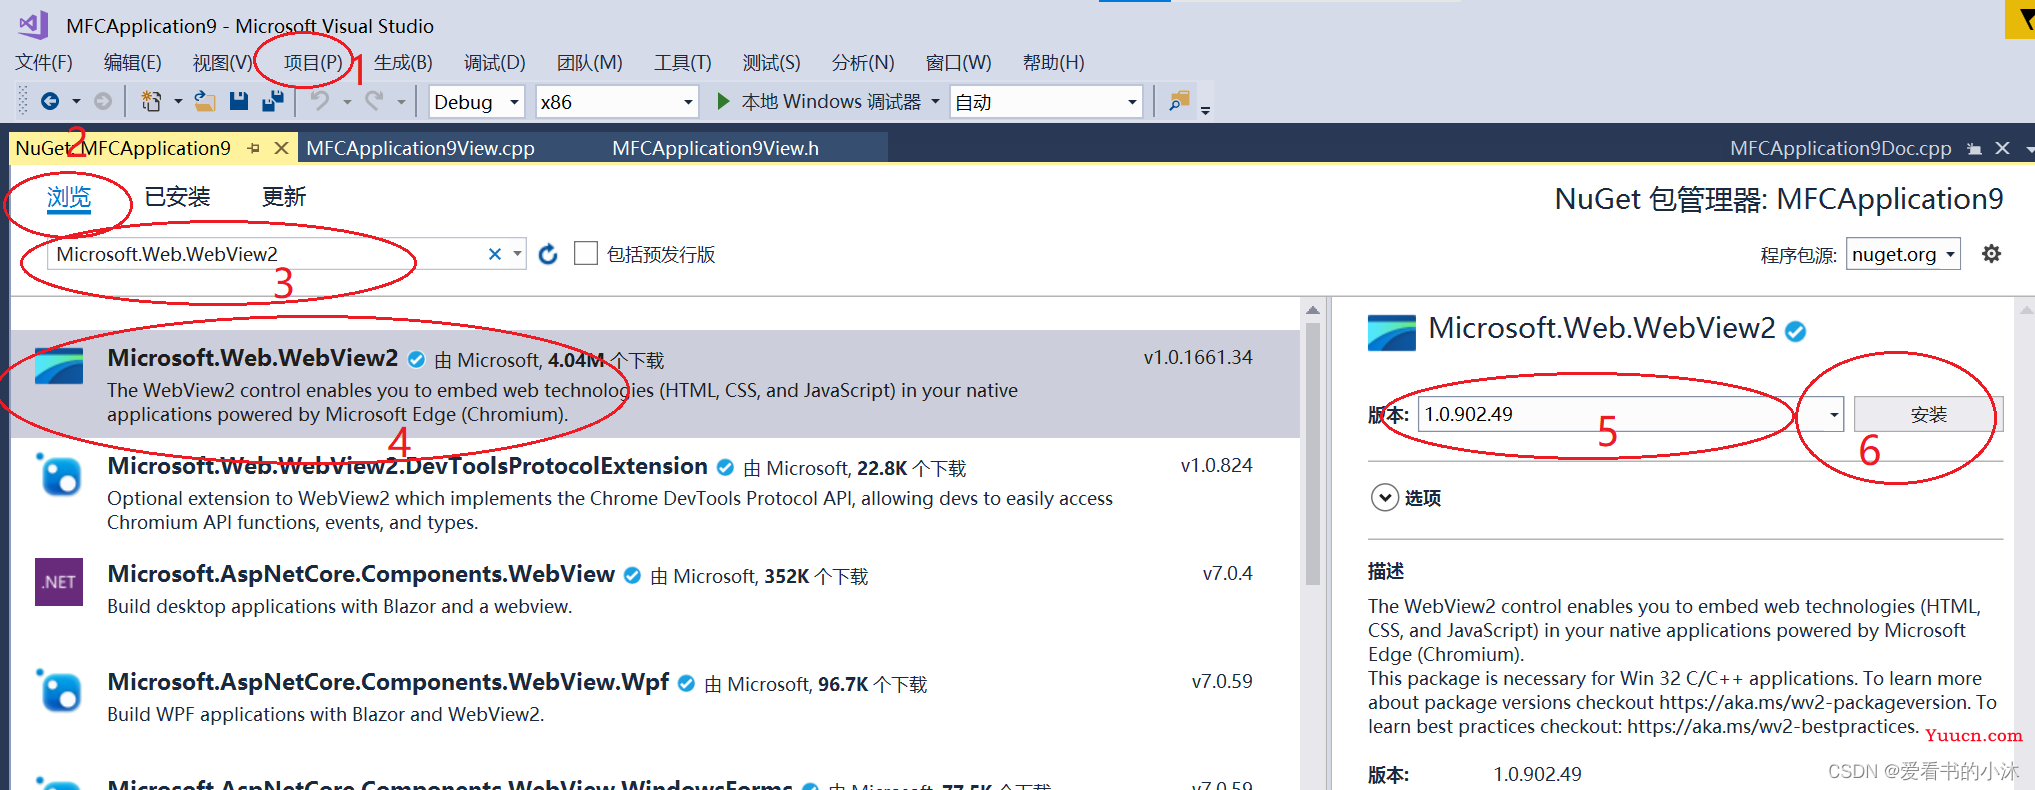
通过菜单“项目”-“管理NuGet程序包”,下载相关包。
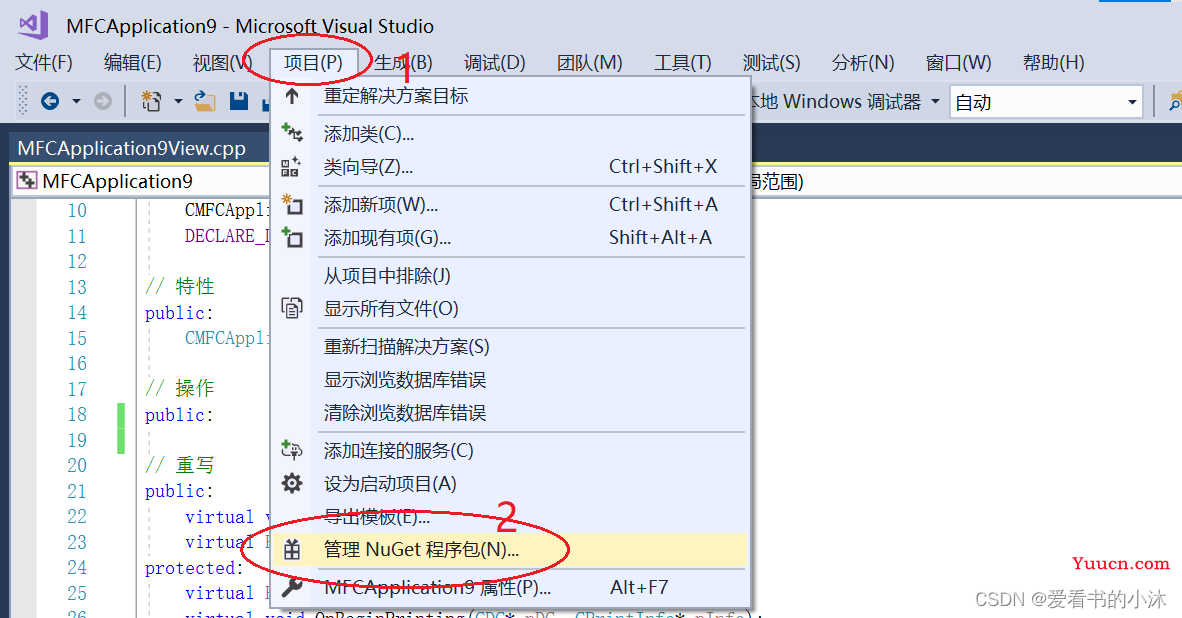
在“浏览”分页的左上角的搜索栏中,键入 Microsoft.Web.WebView2。 或者,复制并粘贴下面的单行代码块。 然后选择“ Microsoft.Web.WebView2”。以及在右侧选择对应的版本,然后点击按钮安装。
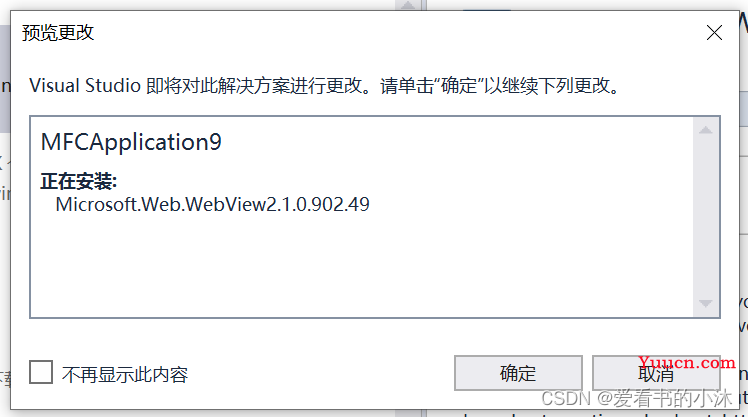
自动弹窗下载提示框,点击确定按钮。
输出下载的日志信息。

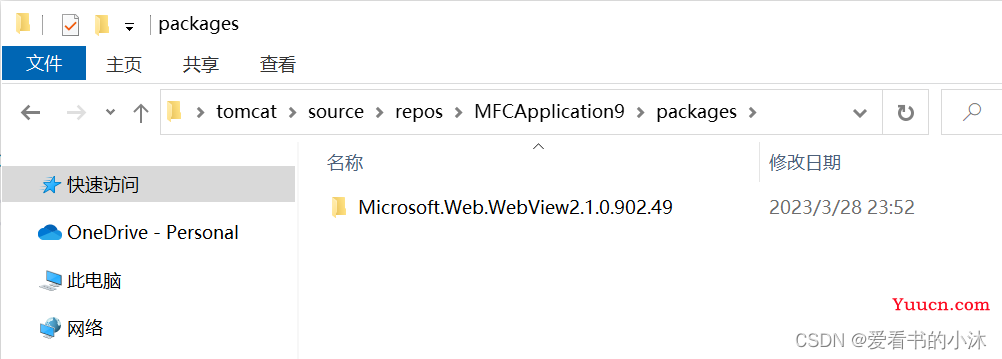
在项目的代码文件夹里会自动创建子文件夹packages,里面保存了下载的相关包文件夹:Microsoft.Web.WebView2.1.0.902.49
再下另一个包:Microsoft.Windows.ImplementationLibrary。
稍后,你将安装 Windows 实现库 (WIL) - 仅限标头的 C++ 库,通过适用于 Windows COM 编码模式的可读、类型安全的 C++ 接口,使 Windows 上的开发人员的生活更加轻松。 可通过 Visual Studio 中的 解决方案资源管理器 为项目安装此 Microsoft.Windows.ImplementationLibrary 包。
在 “NuGet” 窗口中,单击“ 浏览 ”选项卡。在左上角的搜索栏中,键入 Microsoft.Windows.ImplementationLibrary。 或者,复制并粘贴下面的单行代码块。 然后选择 “Microsoft.Windows.ImplementationLibrary”。

同样在项目文件夹里会下载子文件夹:Microsoft.Windows.ImplementationLibrary.1.0.191107.2

项目文件夹的文件packages.config:
<?xml version="1.0" encoding="utf-8"?>
<packages>
  <package id="Microsoft.Web.WebView2" version="1.0.902.49" targetFramework="native" />
  <package id="Microsoft.Windows.ImplementationLibrary" version="1.0.191107.2" targetFramework="native" />
</packages>
3.3 添加web控件代码
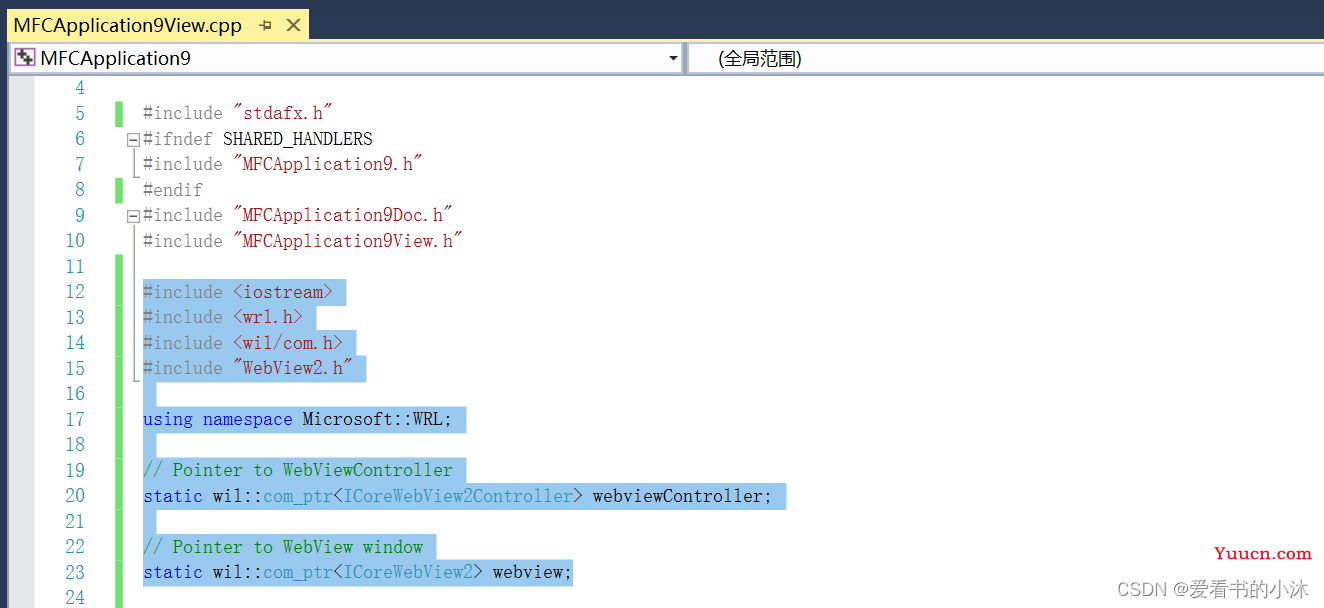
(1)添加变量和头文件
#include <iostream>
#include <wrl.h>
#include <wil/com.h>
#include "WebView2.h"
using namespace Microsoft::WRL;
// Pointer to WebViewController
static wil::com_ptr<ICoreWebView2Controller> webviewController;
// Pointer to WebView window
static wil::com_ptr<ICoreWebView2> webview;
(2)在OnCreate事件函数中添加代码:
int CMFCApplication9View::OnCreate(LPCREATESTRUCT lpCreateStruct)
{
	if (CView::OnCreate(lpCreateStruct) == -1)
		return -1;
	HWND hWnd = this->m_hWnd;
	// TODO:  在此添加您专用的创建代码
	// <-- WebView2 sample code starts here -->
	// Step 3 - Create a single WebView within the parent window
	// Locate the browser and set up the environment for WebView
	CreateCoreWebView2EnvironmentWithOptions(nullptr, nullptr, nullptr,
		Callback<ICoreWebView2CreateCoreWebView2EnvironmentCompletedHandler>(
			[hWnd](HRESULT result, ICoreWebView2Environment* env) -> HRESULT {
		// Create a CoreWebView2Controller and get the associated CoreWebView2 whose parent is the main window hWnd
		env->CreateCoreWebView2Controller(hWnd, Callback<ICoreWebView2CreateCoreWebView2ControllerCompletedHandler>(
			[hWnd](HRESULT result, ICoreWebView2Controller* controller) -> HRESULT {
			if (controller != nullptr) {
				webviewController = controller;
				webviewController->get_CoreWebView2(&webview);
			}
			// Add a few settings for the webview
			// The demo step is redundant since the values are the default settings
			wil::com_ptr<ICoreWebView2Settings> settings;
			webview->get_Settings(&settings);
			settings->put_IsScriptEnabled(TRUE);
			settings->put_AreDefaultScriptDialogsEnabled(TRUE);
			settings->put_IsWebMessageEnabled(TRUE);
			// Resize WebView to fit the bounds of the parent window
			RECT bounds;
			::GetClientRect(hWnd, &bounds);
			webviewController->put_Bounds(bounds);
			// Schedule an async task to navigate to Bing
			webview->Navigate(L"https://www.bing.com/");
			// <NavigationEvents>
			// Step 4 - Navigation events
			// register an ICoreWebView2NavigationStartingEventHandler to cancel any non-https navigation
			EventRegistrationToken token;
			webview->add_NavigationStarting(Callback<ICoreWebView2NavigationStartingEventHandler>(
				[](ICoreWebView2* webview, ICoreWebView2NavigationStartingEventArgs* args) -> HRESULT {
				wil::unique_cotaskmem_string uri;
				args->get_Uri(&uri);
				std::wstring source(uri.get());
				if (source.substr(0, 5) != L"https") {
					args->put_Cancel(true);
				}
				return S_OK;
			}).Get(), &token);
			// </NavigationEvents>
			// <Scripting>
			// Step 5 - Scripting
			// Schedule an async task to add initialization script that freezes the Object object
			webview->AddScriptToExecuteOnDocumentCreated(L"Object.freeze(Object);", nullptr);
			// Schedule an async task to get the document URL
			webview->ExecuteScript(L"window.document.URL;", Callback<ICoreWebView2ExecuteScriptCompletedHandler>(
				[](HRESULT errorCode, LPCWSTR resultObjectAsJson) -> HRESULT {
				LPCWSTR URL = resultObjectAsJson;
				//doSomethingWithURL(URL);
				return S_OK;
			}).Get());
			// </Scripting>
			// <CommunicationHostWeb>
			// Step 6 - Communication between host and web content
			// Set an event handler for the host to return received message back to the web content
			webview->add_WebMessageReceived(Callback<ICoreWebView2WebMessageReceivedEventHandler>(
				[](ICoreWebView2* webview, ICoreWebView2WebMessageReceivedEventArgs* args) -> HRESULT {
				wil::unique_cotaskmem_string message;
				args->TryGetWebMessageAsString(&message);
				// processMessage(&message);
				webview->PostWebMessageAsString(message.get());
				return S_OK;
			}).Get(), &token);
			// Schedule an async task to add initialization script that
			// 1) Add an listener to print message from the host
			// 2) Post document URL to the host
			webview->AddScriptToExecuteOnDocumentCreated(
				L"window.chrome.webview.addEventListener(\'message\', event => alert(event.data));" \
				L"window.chrome.webview.postMessage(window.document.URL);",
				nullptr);
			// </CommunicationHostWeb>
			return S_OK;
		}).Get());
		return S_OK;
	}).Get());
	// <-- WebView2 sample code ends here -->
	return 0;
}
(3)在OnSize事件函数中添加代码:
void CMFCApplication9View::OnSize(UINT nType, int cx, int cy)
{
	CView::OnSize(nType, cx, cy);
	// TODO: 在此处添加消息处理程序代码
	if (webviewController != nullptr) {
		RECT bounds;
		GetClientRect(&bounds);
		webviewController->put_Bounds(bounds);
	};
}
3.4 编译和运行
最后运行的测试程序的界面如下:
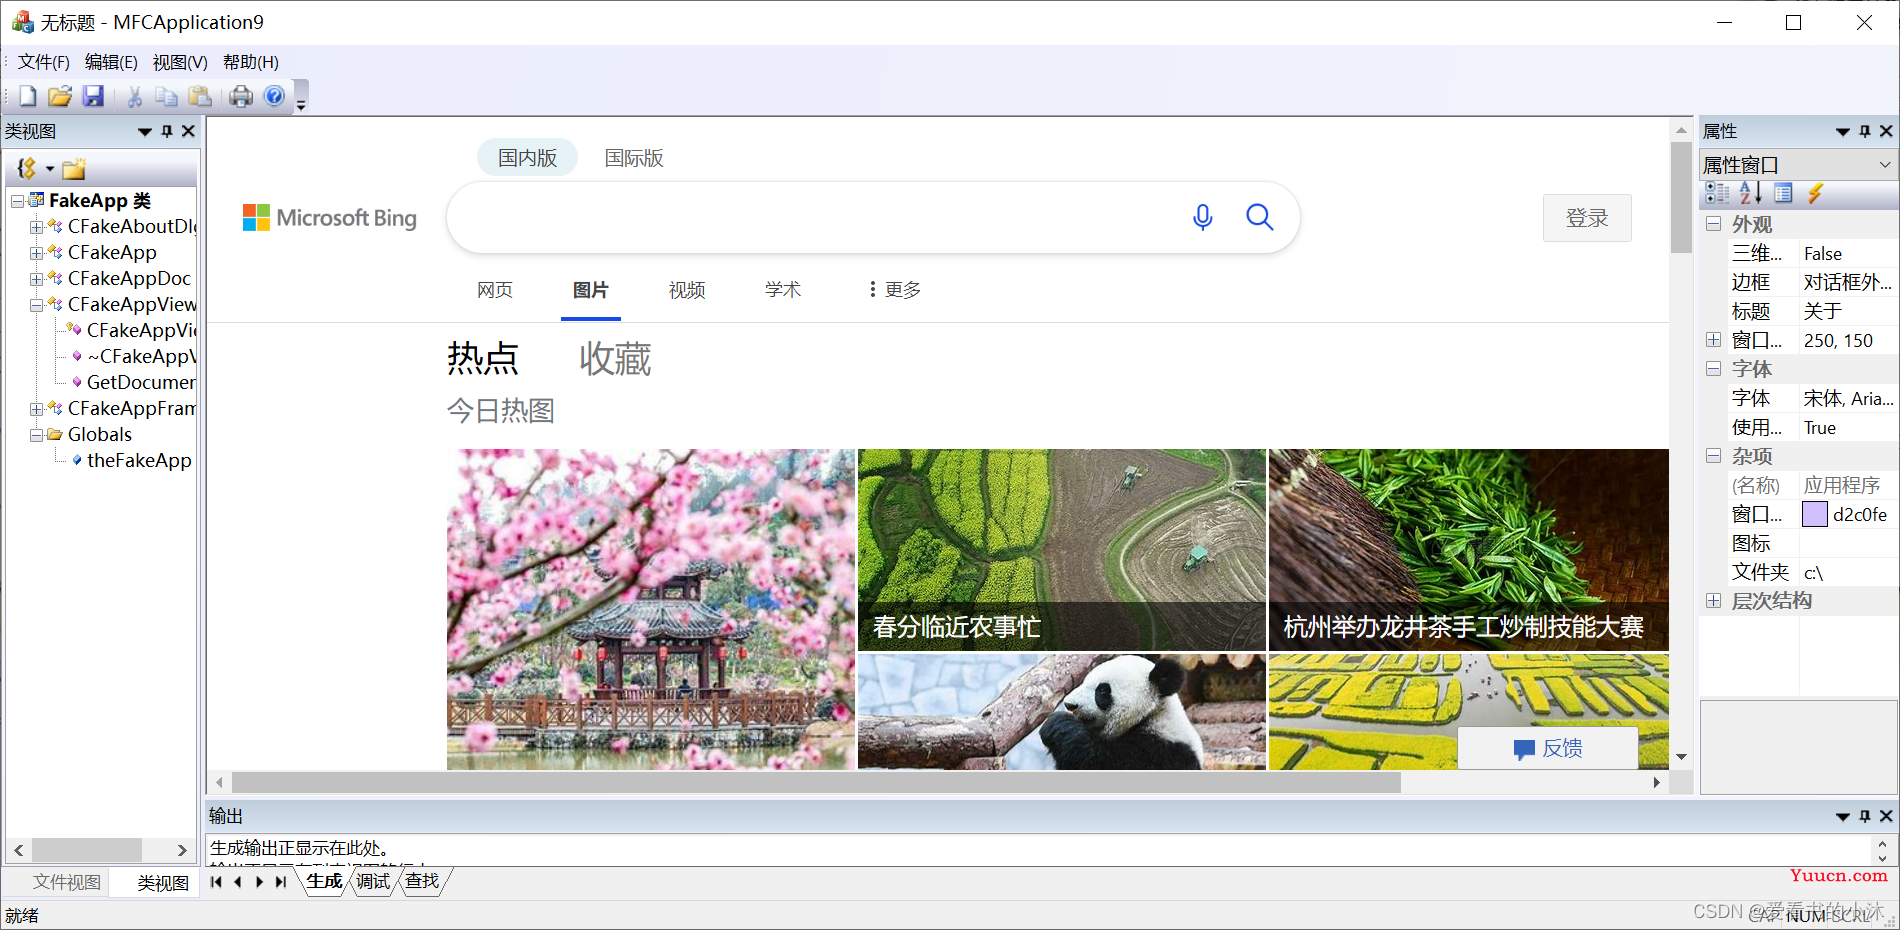
4、CEF3
CEF全称Chromium Embedded Framework,是一个基于Google Chromium 的开源项目。Google Chromium项目主要是为Google Chrome应用开发的,而CEF的目标则是为第三方应用提供可嵌入浏览器支持。CEF隔离底层Chromium和Blink的复杂代码,并提供一套产品级稳定的API,发布跟踪具体Chromium版本的分支,以及二进制包。CEF的大部分特性都提供了丰富的默认实现,让使用者做尽量少的定制即可满足需求。

4.1 下载cef3
https://cef-builds.spotifycdn.com/index.html
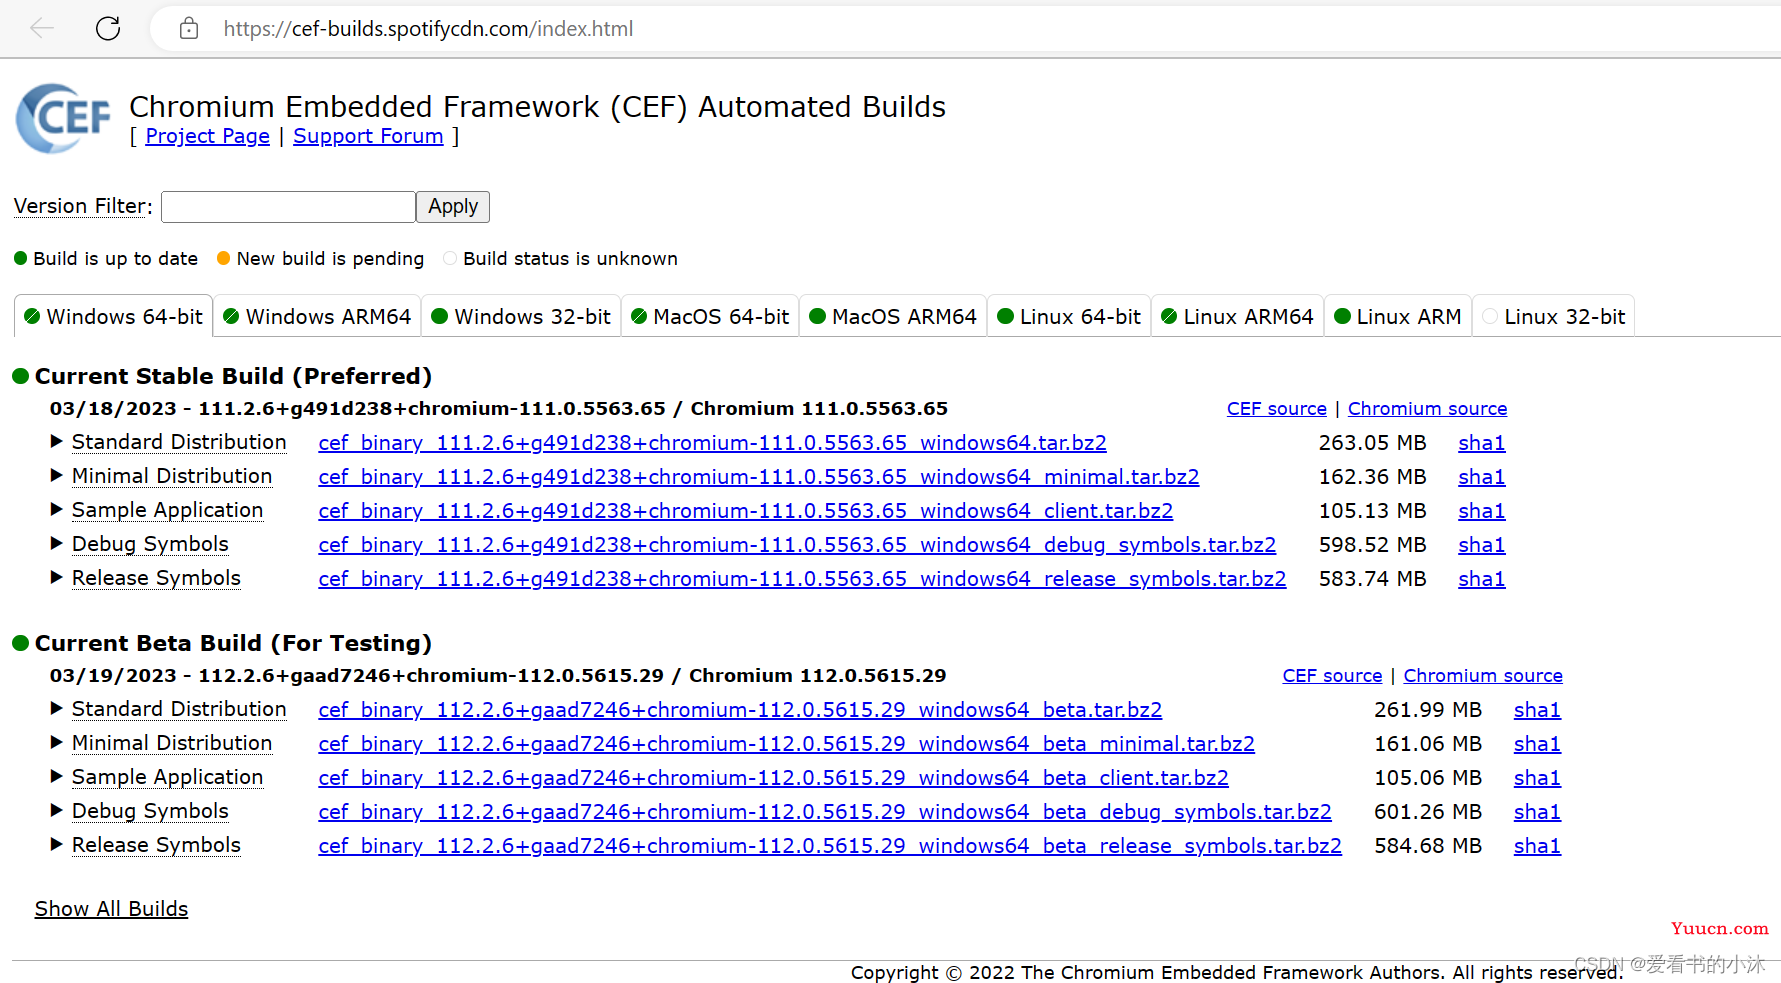
浏览器直接搜索关键词「CEF Automated Builds」找到新的下载站点。
4.2 编译和运行cef3
对于cef来说,只需要把编译出来的libcef_dll_wrapper.lib拿来使用即可,其他文件直接包里的即可。
cef_binary_3.3578.1860.g36610bd_windows32
或
cef_binary_88.2.9+g5c8711a+chromium-88.0.4324.182_windows32_minimal
VisualStudio2017、2019编译非常快速,使用CMake对相关代码为例,使用CMake-gui转换,默认是64位版本(如果需要使用32位版本,转换的时候注意选择Win32),转换后的vs工程默认就是Unicode字符集MTd(MT)的,直接编译libcef_dll_wrapper即可,生成的lib拷走,其他的lib直接使用现成的。
创建成功后只编译libcef_dll_wrapper即可,其他lib和资源使用编译好的即可。
尽量链接release版本的,要链接:libcef.lib、cef_sandbox.lib、libcef_dll_wrapper
字符串要传递的时候,需转换为Unicode,可使用std::wstring转换。
cefinitialize崩溃:说明exe执行路径下缺少相关文件导致初始化失败,可以把Resources目录下的locales文件夹、icudtl.dat、cef*.pak等文件复制过来。
- 通过cmake构建cef的vs工程。
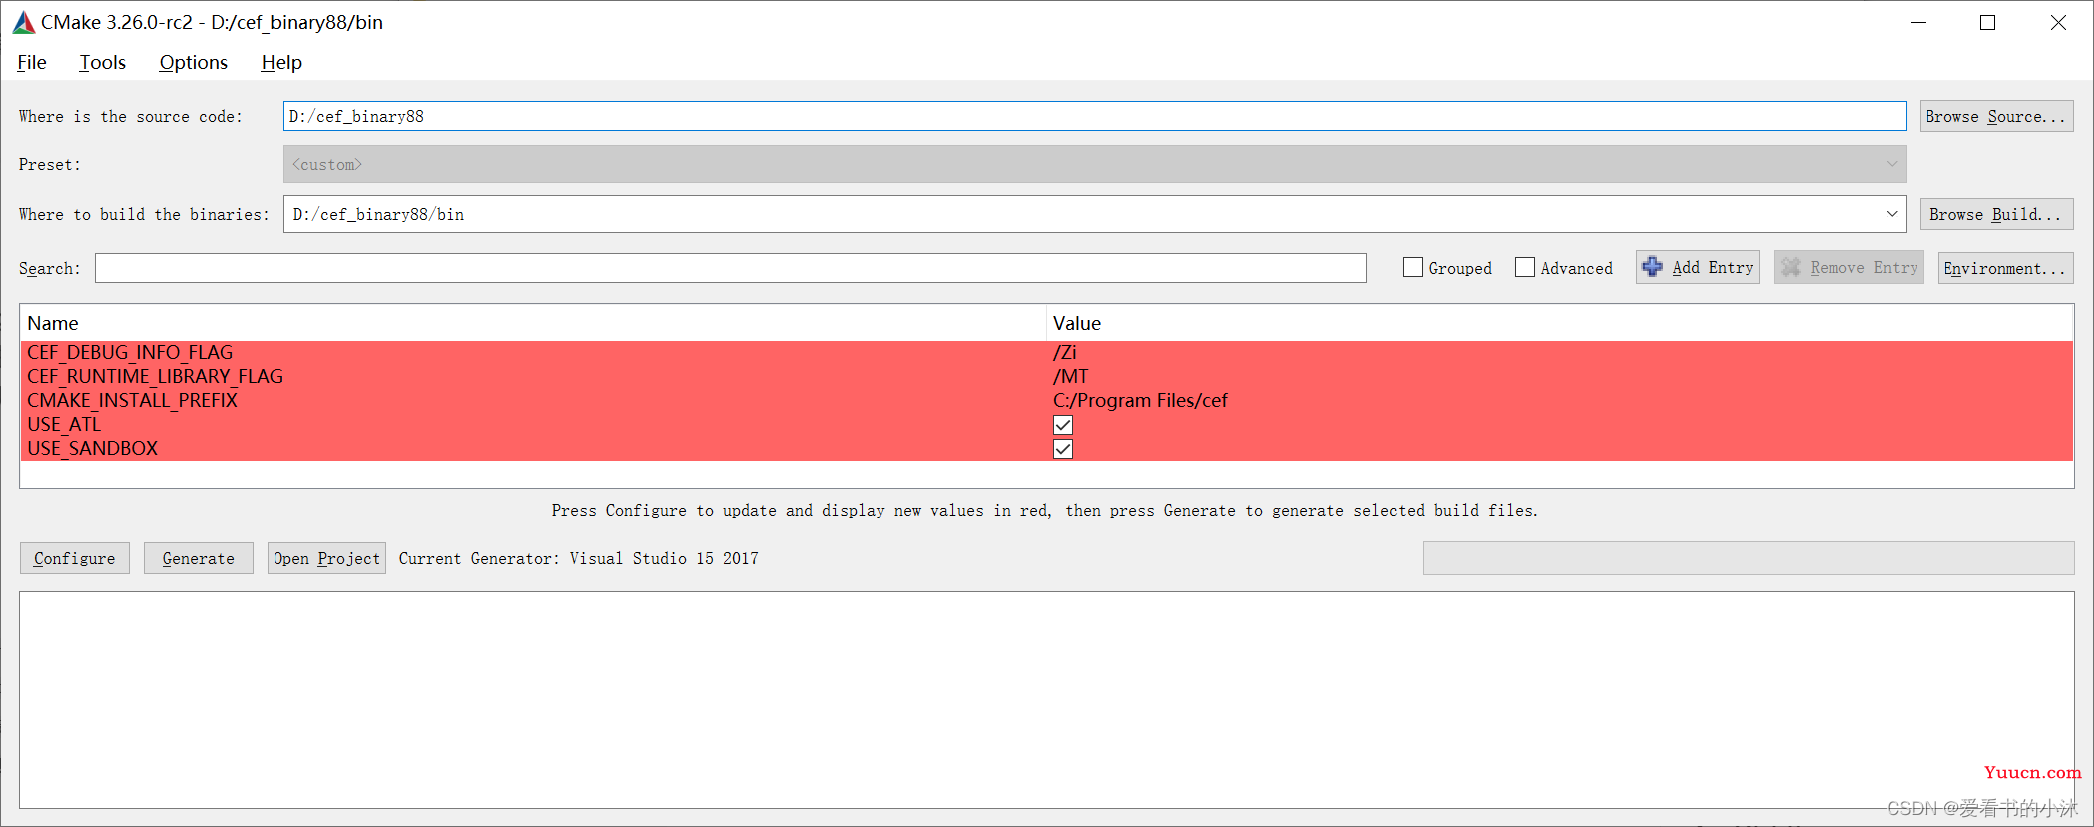
- 依次点击按钮:“Configure” -> “Generate” -> “Open Project”
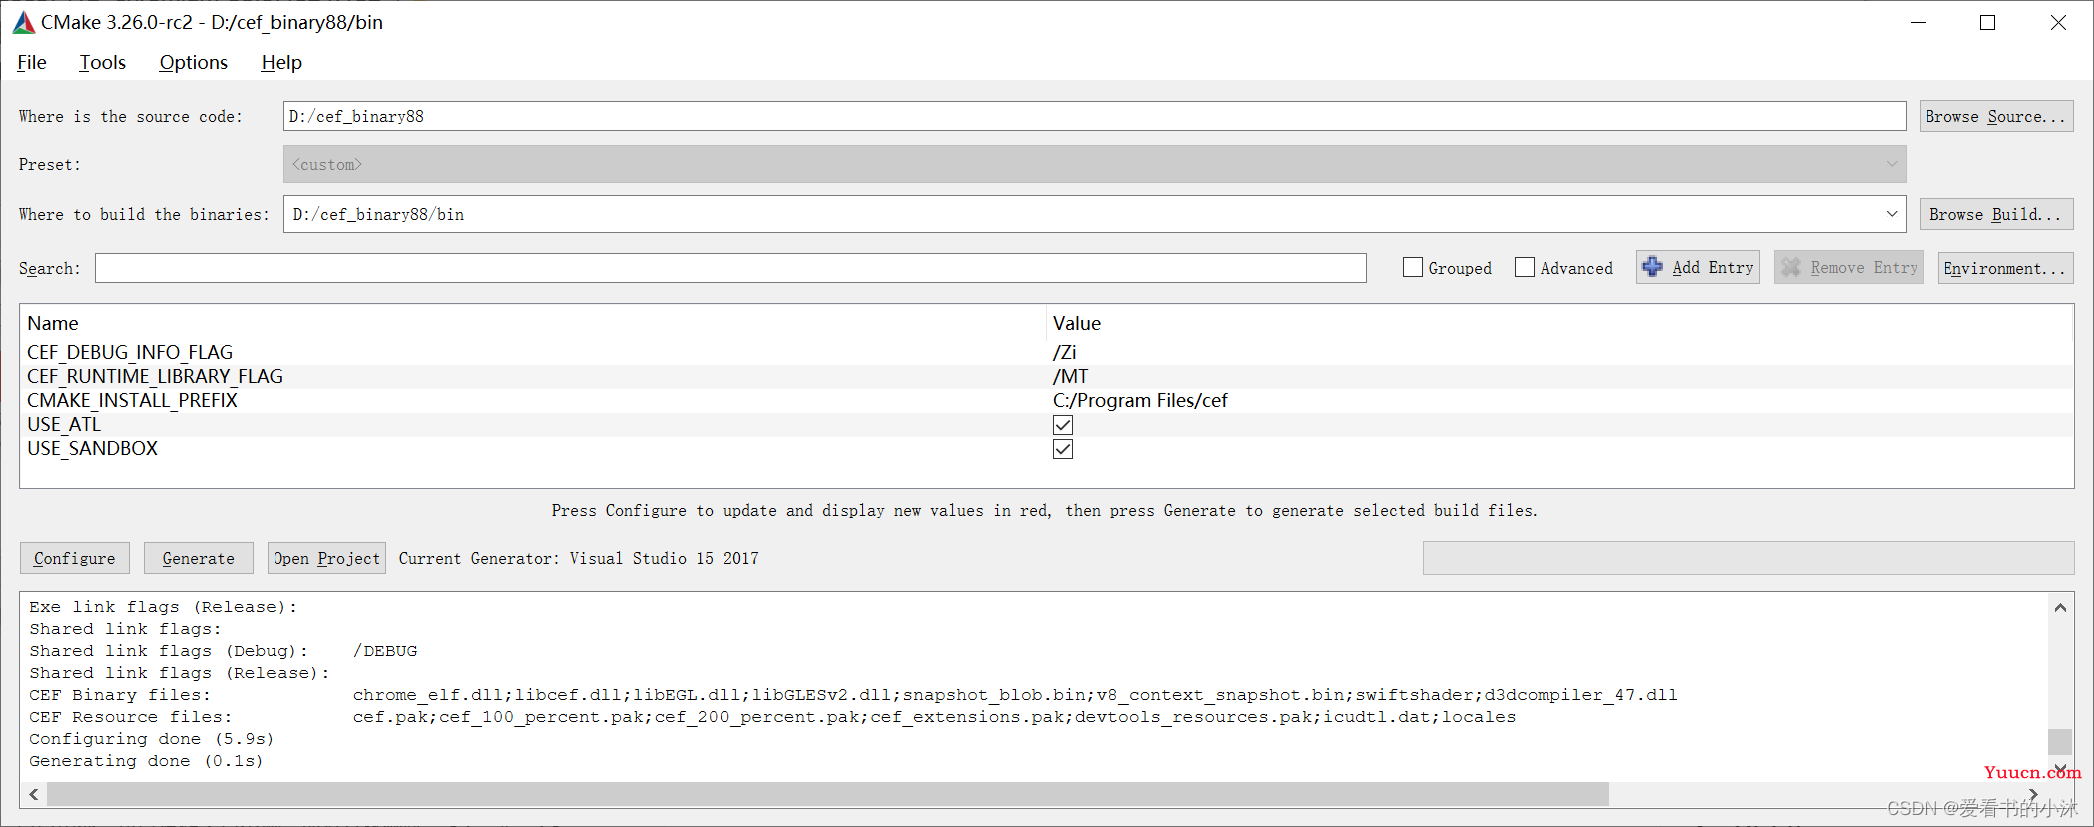
- 生成vs工程文件:
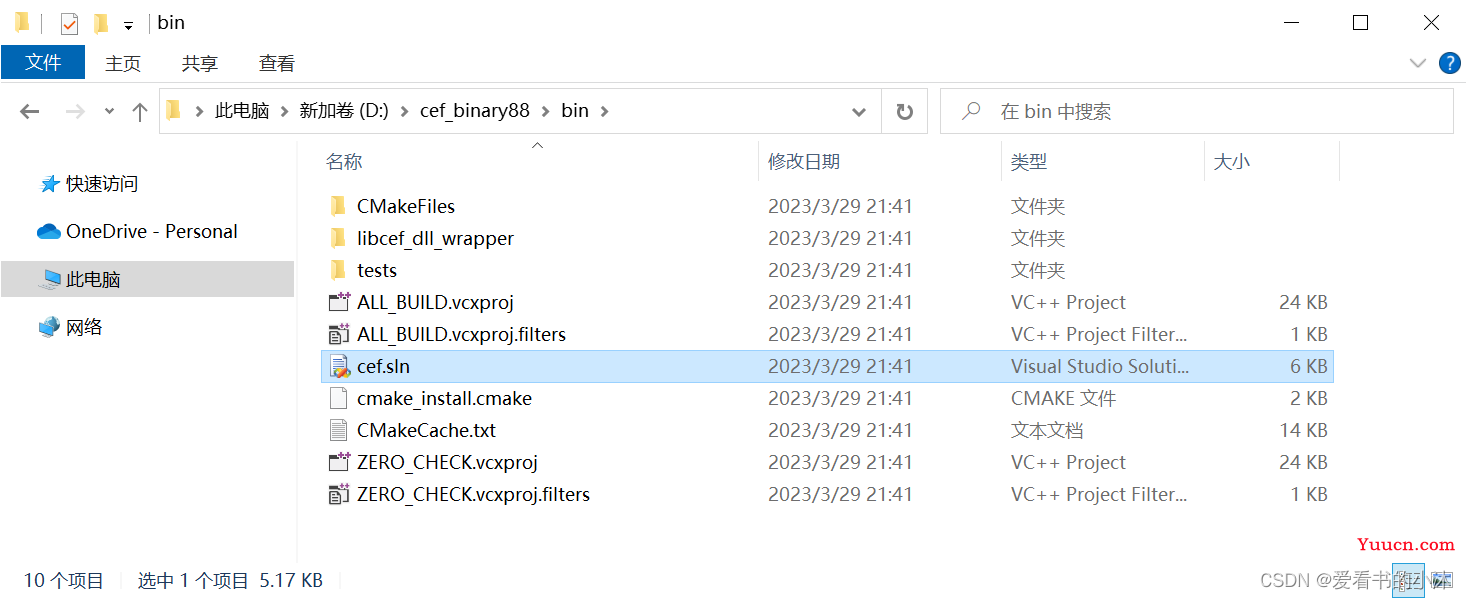
用vs2017打开解决方案文件cef.sln,如下:

其中cefsimple和cefclient是基于win32的实现cef3浏览器的简单示例代码,相对而言,cefsimple比较简单,代码量比较少,mfc中也主要是用这个工程中的文件。
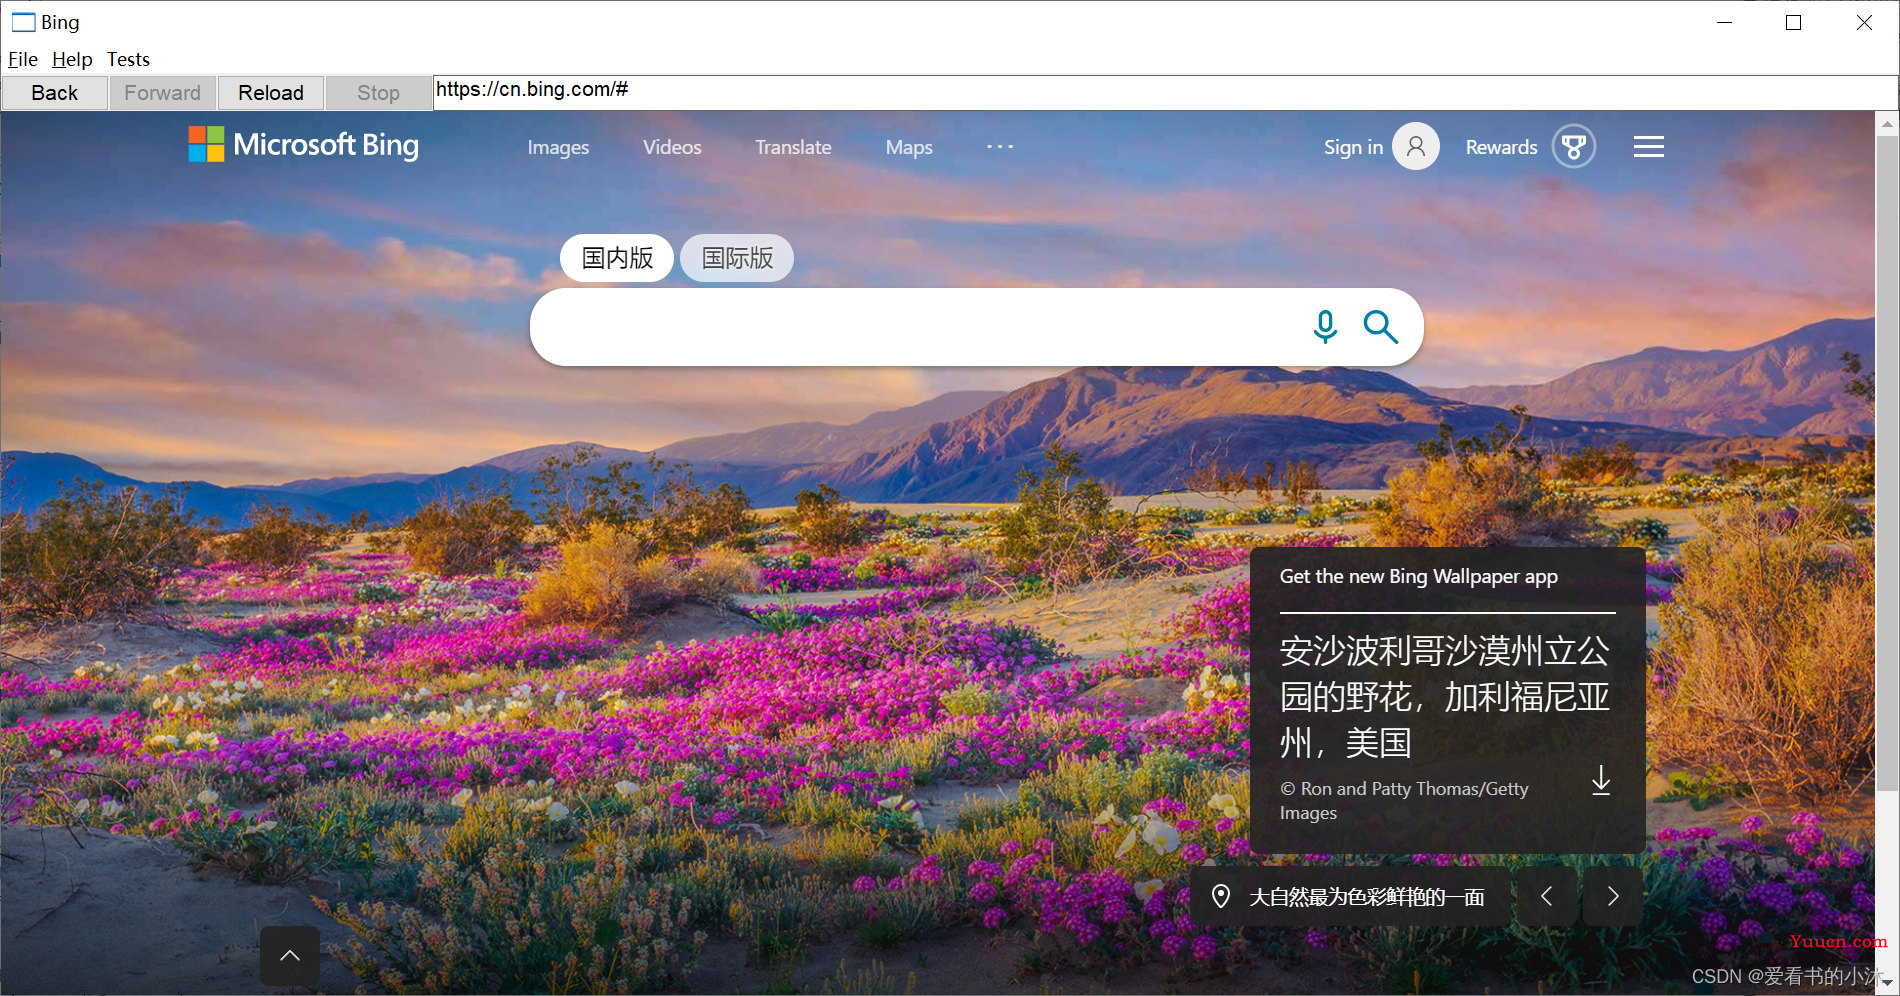
编译和运行,其中cefclient.exe运行如下:
D:\cef_binary88\Release\libcef.lib
D:\cef_binary88\Release\cef_sandbox.lib
D:\cef_binary88\Release\libcef_dll_wrapper.lib
结语
如果您觉得该方法或代码有一点点用处,可以给作者点个赞,或打赏杯咖啡;╮( ̄▽ ̄)╭
如果您感觉方法或代码不咋地//(ㄒoㄒ)//,就在评论处留言,作者继续改进;o_O???
如果您需要相关功能的代码定制化开发,可以留言私信作者;(✿◡‿◡)
感谢各位大佬童鞋们的支持!( ´ ▽´ )ノ ( ´ ▽´)っ!!!
