GitHub Demo 地址
在线预览
Lodash 官网
参考:
Vue 防抖节流 详细介绍
vue 优雅的实现防抖和节流
防抖、节流的介绍
js防抖和节流的实现原理及应用场景
js防抖节流应用场景及写法
JS中的防抖
什么是防抖和节流?
函数节流(throttle)与 函数防抖(debounce)都是为了限制函数的执行频次,以优化函数触发频率过高导致的响应速度跟不上触发频率,出现延迟,假死或卡顿的现象
是应对频繁触发事件的优化方案。
防抖(debounce)
防抖就是防止抖动,避免事件的重复触发。
防抖可以概括为触发高频事件后n秒内函数只会执行一次,如果n秒内高频事件再次被触发,则重新计算时间。
n 秒后执行该事件,若在n秒后被重复触发,则重新计时
简单的说,如果某一事件被连续快速地触发多次,只会执行最后那一次。
- 实现方式:每次触发事件时设置一个延迟调用方法,并且取消之前的延时调用方法
- 如果事件在规定的时间间隔内被不断的触发,则调用方法会被不断的延迟
使用场景
- input 搜索录入,用户不断录入值
- window触发resize事件
- mousemove 鼠标滑动事件
- scroll滚动条滑动请求、上拉触底加载更多
- 表单验证,按钮的提交事件
节流(throttle)
节流就是减少流量,将频繁触发的事件减少,并每隔一段时间执行。会控制事件触发的频率。所以节流会稀释函数的执行频率。
n 秒内只运行一次,若在n秒内重复触发,只有一次生效。
如果连续快速地触发多次,在规定的时间内,只触发一次。如限制1s,则1s内只执行一次,无论怎样,都在会1s内执行相应的操作。
- 实现方式:每次触发事件时,如果当前有等待执行的延时函数,则直接return
- 如果事件在规定的时间间隔内被不断的触发,则调用方法在规定时间内都会执行一次
使用场景
- 获取验证码
- 鼠标不断点击触发,mousedown(规定时间内只触发一次)
- mousemove 鼠标滑动事件
- 滚动条滑动请求、上拉触底加载更多
- 搜索、提交等按钮功能
防抖和节流之间的差别:
相同点:
- 都可以通过使用 setTimeout 实现
- 目的都是,降低回调函数的执行频率,节省计算资源
不同点:
-
防抖,是在一段连续操作结束之后,处理回调,利用 clearTimout 和 setTimeout 实现。
-
节流,是在一段连续操作中,每一段时间只执行一次,在频率较高的事件中使用来提高性能。
-
防抖用于无法预知的用户主动行为,如用户输入内容去服务端动态搜索结果。用户打字的速度等是无法预知的,具有非规律性。
-
节流可用于一些非用户主动行为或者可预知的用户主动行为,如用户滑动商品橱窗时发送埋点请求、滑动固定的高度是已知的逻辑,具有规律性。
-
防抖是关注于最后一次的事件触发,而节流则是在规定的时间里只执行一次。
-
防抖是将多次执行变为最后一次执行,节流是将多次执行变成每隔一段时间执行
防抖和节流 utils
/**
 * 防抖  (传入所要防抖的方法/回调与延迟时间)
 * @param {Function} func
 * @param {number} delay
 * @return {*}
 */
export function debounce2(func, delay) {
  let timer = null
  // 借助闭包,使得变量timer不被回收
  return function() {
    // 保存当前环境下的实例对象,this即为引入该方法的那个组件实例对象
    const th = this
    // 保存传入参数
    const args = arguments
    // 第一次timer为null,跳过该判断,执行setTimeout()
    if (timer) {
      // 之后如果timer存在,则把上一次的销毁,也就是setTimeout(),则里面的函数执行也会抛弃
      clearTimeout(timer)
    }
    timer = setTimeout(() => {
      // apply(),改变this指向,指向正在操作的组件实例,传入参数
      func.apply(th, args)
      timer = null
    }, delay)
  }
}
/*
  由于使用闭包,使得timer不被回收,在A组件中每次调用该方法时会去判断timer是否存在,如果存在,
  表示上一次输入在等待执行fn(),期间如果继续输入,且在1s内,则会把上一次未执行的(setTimeout中的)fn()销毁,
  重新定时1s,以此来达到输入结束过1s才执行fn(),即触发事件或者发送请求。
*/
/**
 * 节流  (传入所要节流的方法/回调与延迟时间)
 * @param {Function} func
 * @param {number} delay
 * @return {*}
 */
export function throttle(func, delay) {
  let flag = true
  return function() {
    const th = this
    const args = arguments
    if (!flag) {
      // 未超过时间间隔,flag无效,不执行fn
      return false
    }
    func.apply(th, args)
    flag = false // 在时间间隔内把状态位flag设为无效(false)
    setTimeout(() => {
      flag = true // 超过时间间隔把状态位flag设为有效(true)
    }, delay)
  }
}
Lodash 安装
浏览器环境:
<script src="lodash.js"></script>
通过 npm:
$ npm i -g npm
$ npm i --save lodash
Lodash 防抖函数debounced 文档
Lodash 节流函数throttle 文档
使用Lodash实现防抖和节流
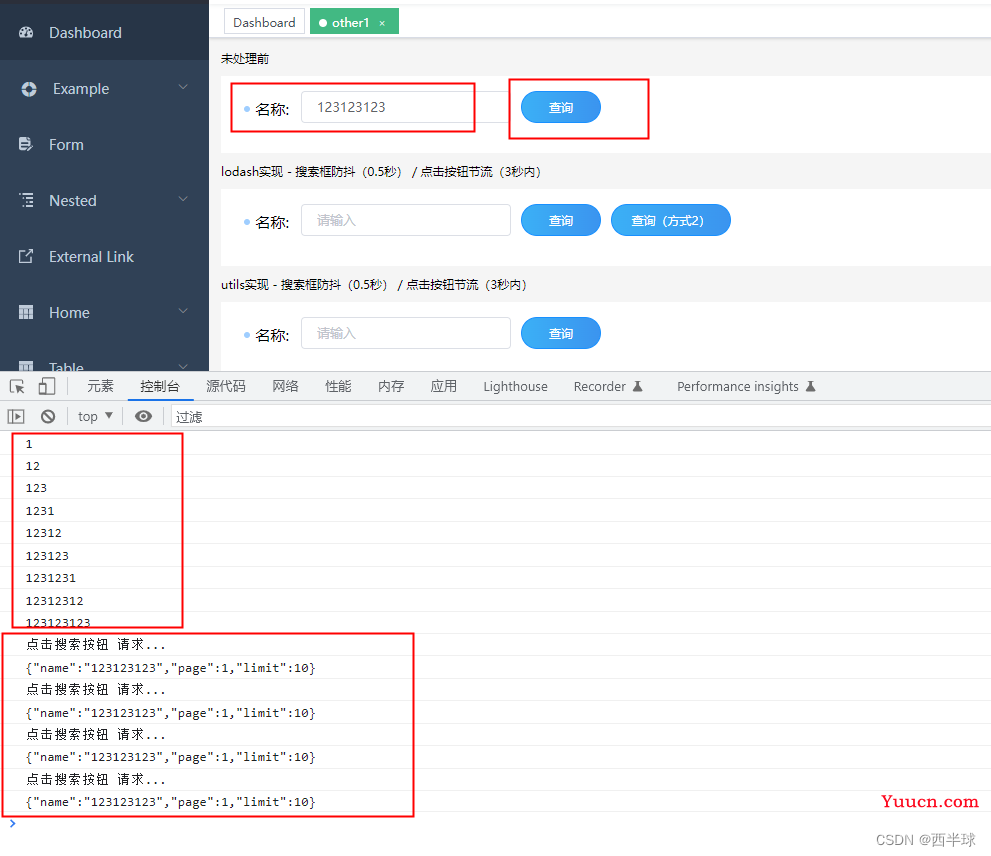
未处理时,录入文字改变就会触发一次事件,或者点击一次就会触发一次事件

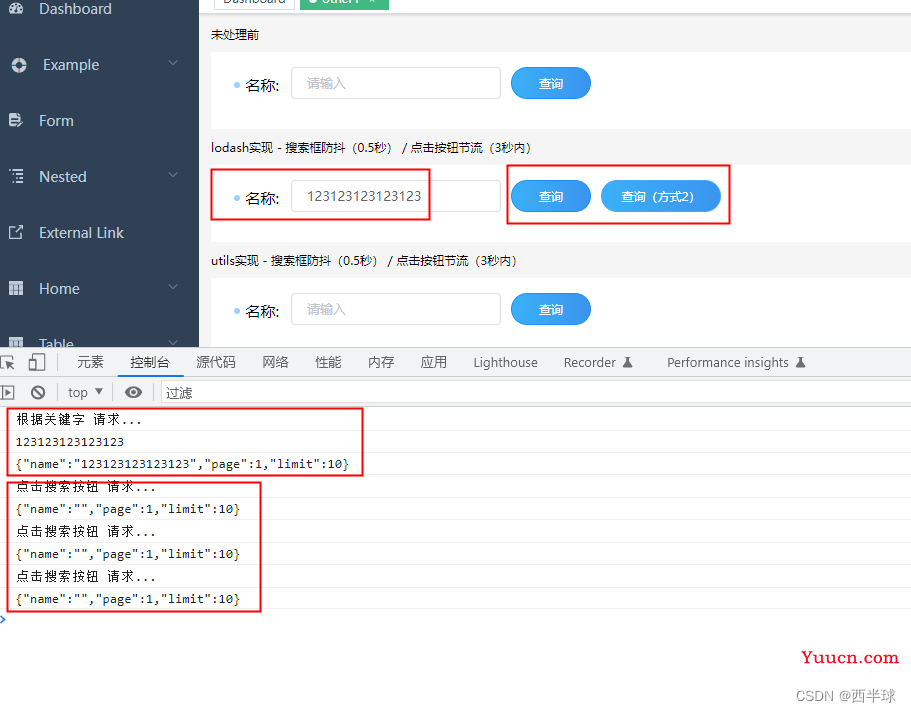
处理后
录入文字使用的防抖,设置的0.5秒间隔,点击多次只在最后一次触发
点击查询按钮使用的节流,设置的3秒间隔,点击多次3秒内只会触发一次

防抖关键代码
 <el-input v-model="queryParams2.name" maxlength="20" placeholder="请输入"
 clearable @input="onChange2" @keyup.enter.native="onSearch2" />
// lodash文档: https://www.lodashjs.com/
//
// 搜索框防抖 - lodash实现
// 不要在debounce里写箭头函数,否则this的指向就是undefined,而不是Vue实例对象。
// 注意这里若是使用箭头函数的话, this为 undefined https://github.com/vue-styleguidist/vue-docgen-api/issues/23
onChange2: lodash.debounce(function() {
  // Do some things
  this.getListByKeyword()
}, 500),
getListByKeyword() {
  // 请求...
  console.log('根据关键字 请求...')
  console.log(this.queryParams2.name)
  console.log(JSON.stringify(this.queryParams2))
},
节流关键代码 - 方式1
<el-button class="spp-form-btn" size="small" type="primary" @click="onSearch2()">查询</el-button>
 // 按钮节流 - lodash实现 - 方式1
 onSearch2: lodash.throttle(function() {
   // Do some things
   this.requestList()
 }, 3000),
 requestList() {
   // 请求...
   console.log('点击搜索按钮 请求...')
   console.log(JSON.stringify(this.queryParams2))
 },
节流关键代码 - 方式2
 <el-button class="spp-form-btn" size="small" type="primary" style="width: 120px;"
 @click="onSearch22()">查询(方式2)</el-button>
created() {
  // 按钮节流 - lodash实现 - 方式2
  this.onSearch22 = lodash.throttle(this.onSearch22, 3000)
},
requestList() {
  // 请求...
  console.log('点击搜索按钮 请求...')
  console.log(JSON.stringify(this.queryParams2))
},
// 按钮节流 - lodash实现 - 方式2
onSearch22() {
  // Do some things
  this.requestList3()
},
全部代码
<template>
  <div class="spp-theme-body spp-theme-pad">
    <h1 style="margin:10px 0px 30px;">防抖与节流</h1>
    <div> 未处理前 </div>
    <el-form :inline="true" size="small" :model="queryParams" class="spp-form-search spp-theme-top">
      <el-form-item>
        <span class="spp-form-label" style="width:80px">
          <i class="icon" /><i class="label">名称:</i>
        </span>
        <el-input v-model="queryParams.name" maxlength="20" placeholder="请输入" clearable @input="onChange" @keyup.enter.native="onSearch" />
      </el-form-item>
      <el-form-item>
        <el-button class="spp-form-btn" size="small" type="primary" @click="onSearch()">查询</el-button>
      </el-form-item>
    </el-form>
    <div class="spp-theme-top"> lodash实现 - 搜索框防抖(0.5秒) / 点击按钮节流(3秒内) </div>
    <el-form :inline="true" size="small" :model="queryParams2" class="spp-form-search spp-theme-top">
      <el-form-item>
        <span class="spp-form-label" style="width:80px">
          <i class="icon" /><i class="label">名称:</i>
        </span>
        <el-input v-model="queryParams2.name" maxlength="20" placeholder="请输入" clearable @input="onChange2" @keyup.enter.native="onSearch2" />
      </el-form-item>
      <el-form-item>
        <el-button class="spp-form-btn" size="small" type="primary" @click="onSearch2()">查询</el-button>
      </el-form-item>
      <el-form-item>
        <el-button class="spp-form-btn" size="small" type="primary" style="width: 120px;" @click="onSearch22()">查询(方式2)</el-button>
      </el-form-item>
    </el-form>
    <div class="spp-theme-top"> utils实现 - 搜索框防抖(0.5秒) / 点击按钮节流(3秒内) </div>
    <el-form :inline="true" size="small" :model="queryParams2" class="spp-form-search spp-theme-top">
      <el-form-item>
        <span class="spp-form-label" style="width:80px">
          <i class="icon" /><i class="label">名称:</i>
        </span>
        <el-input v-model="queryParams3.name" maxlength="20" placeholder="请输入" clearable @input="onChange3" @keyup.enter.native="onSearch3" />
      </el-form-item>
      <el-form-item>
        <el-button class="spp-form-btn" size="small" type="primary" @click="onSearch3()">查询</el-button>
      </el-form-item>
    </el-form>
  </div>
</template>
<script>
import lodash from 'lodash'
import { debounce2, throttle } from '@/utils/index'
export default {
  components: {},
  data() {
    return {
      tableHeight: 170,
      tableLoading: false,
      tableData: [],
      queryParams: {
        name: '',
        page: 1,
        limit: this.pageGroup.size
      },
      queryParams2: {
        name: '',
        page: 1,
        limit: this.pageGroup.size
      },
      queryParams3: {
        name: '',
        page: 1,
        limit: this.pageGroup.size
      }
    }
  },
  created() {
    // 按钮节流 - lodash实现 - 方式2
    this.onSearch22 = lodash.throttle(this.onSearch22, 3000)
  },
  mounted() {},
  methods: {
    onChange(val) {
      console.log(val)
    },
    onSearch() {
      console.log('点击搜索按钮 请求...')
      console.log(JSON.stringify(this.queryParams))
    },
    // lodash文档: https://www.lodashjs.com/
    //
    // 搜索框防抖 - lodash实现
    // 不要在debounce里写箭头函数,否则this的指向就是undefined,而不是Vue实例对象。
    // 注意这里若是使用箭头函数的话, this为 undefined https://github.com/vue-styleguidist/vue-docgen-api/issues/23
    onChange2: lodash.debounce(function() {
      // Do some things
      this.getListByKeyword()
    }, 500),
    getListByKeyword() {
      // 请求...
      console.log('根据关键字 请求...')
      console.log(this.queryParams2.name)
      console.log(JSON.stringify(this.queryParams2))
    },
    // 按钮节流 - lodash实现 - 方式1
    onSearch2: lodash.throttle(function() {
      // Do some things
      this.requestList()
    }, 3000),
    requestList() {
      // 请求...
      console.log('点击搜索按钮 请求...')
      console.log(JSON.stringify(this.queryParams2))
    },
    // 按钮节流 - lodash实现 - 方式2
    onSearch22() {
      // Do some things
      this.requestList3()
    },
    // 防抖
    // 项目工具类
    // 如果需要加参数,则在function空的形参列表里加入
    onChange3: debounce2(function(val) {
      console.log('录入的文字', val)
      // Do some things
      this.getListByKeyword3()
    }, 500),
    getListByKeyword3() {
      // 请求...
      console.log('根据关键字 请求...')
      console.log(this.queryParams3.name)
      console.log(JSON.stringify(this.queryParams3))
    },
    onSearch3: throttle(function() {
      // Do some things
      this.requestList3()
    }, 3000),
    requestList3() {
      // 请求...
      console.log('点击搜索按钮 请求...')
      console.log(JSON.stringify(this.queryParams3))
    }
  }
}
</script>
<style lang="scss" scoped>
::v-deep .el-input__icon:after {
  height: auto;
}
</style>