效果
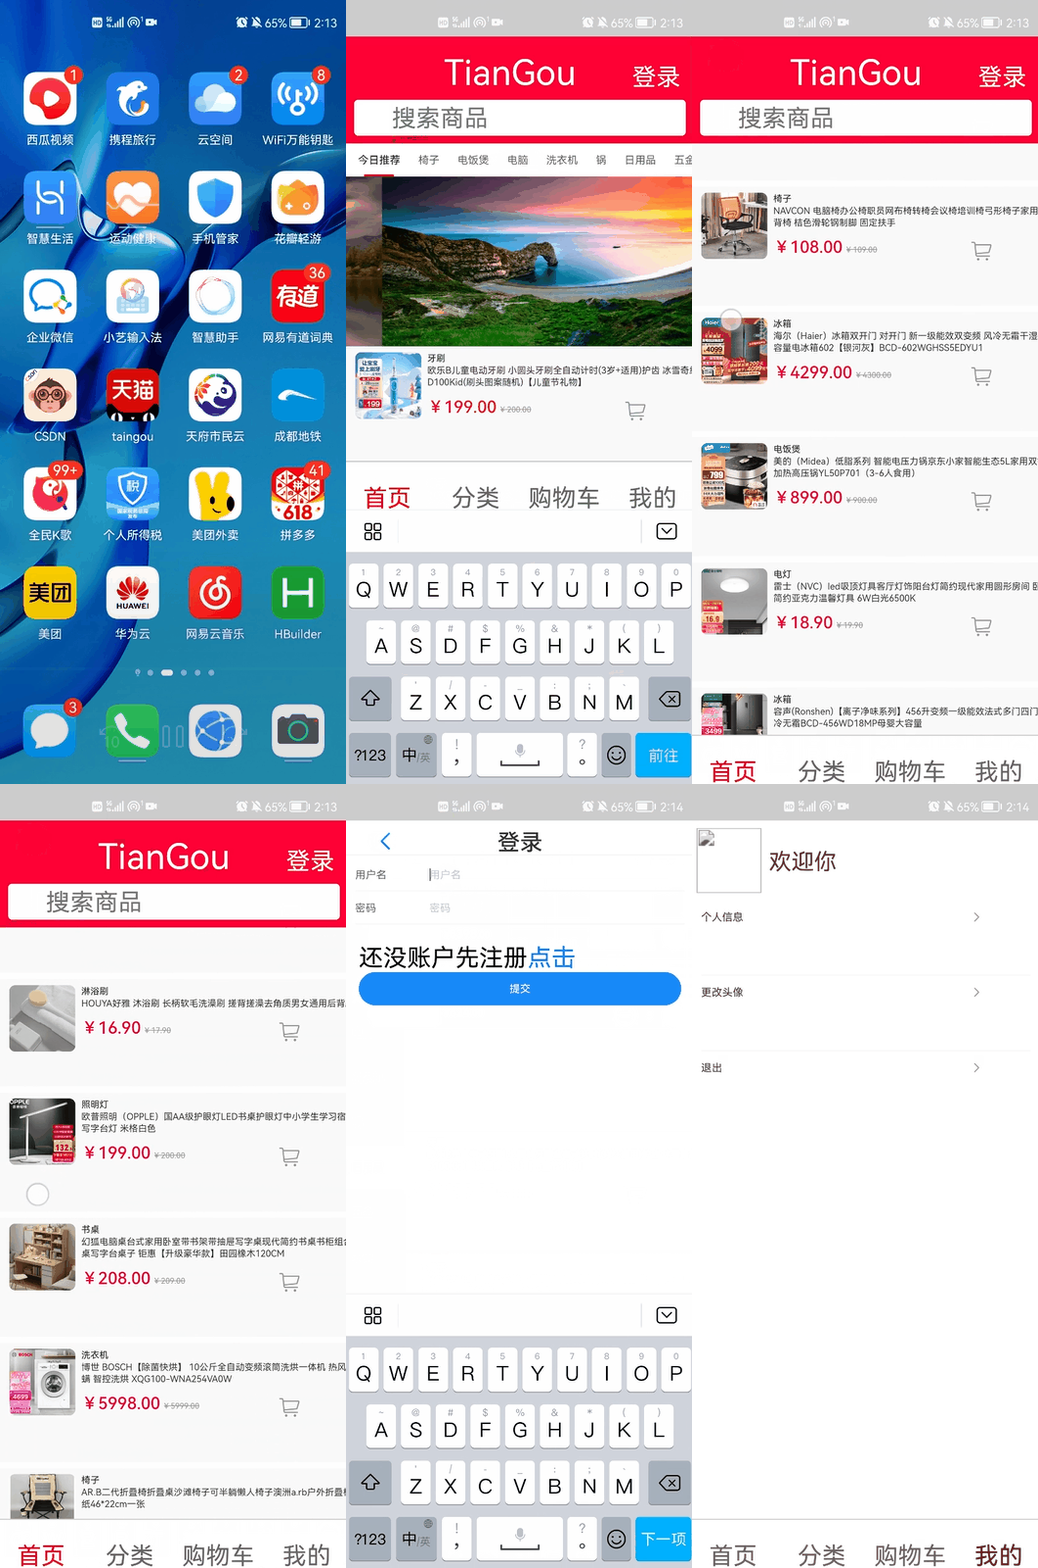
源码
源码太多,放github上了点击
遇到的问题
连接mongodb数据库多个集合(model文件)
- mongodb与mysql数据库连接不同,sql在定义查询语句时可以连接不同的表
- mongodb需要在开始定义好连接要用到的表
module.exports = {
    dbProduct: mongoose.model('runoob',mongoSchema,'product'),
    dbRotation: mongoose.model('runoob',mongoSchema,'rotation'),
    dbUsers:mongoose.model('runoob',mongoSchema,'users'),
  };
发送验证码需要开启QQ邮箱SMTP(email文件)
- 登录QQ邮箱
- 点击左上角设置
- 选择账户栏往下翻
- 有一个POP3/IMAP/SMTP/Exchange/CardDAV/CalDAV服务栏,选择IMAP/SMTP服务开启选项,如图.记得记录给你的授权码,填入pass
// 创建发送邮件对象
let transporter=nodemailer.createTransport({
    service:'qq',
    secure: true,
    auth:{
        user:'XXX@qq.com',  // QQ邮箱
        pass:'XXXXXXX',  // 授权码
    },
})
在通用返回组件通过获取当前激活路由信息来改变界面标题(components文件夹)
this.$route.meta.title;
在底部通用导航中,通过获取路由携带的信息来渲染底部组件(components文件夹)
<template>
  <div class="my-tabbar">
   <my-tabbar :list="list" selectedColor="#f00"></my-tabbar>
  </div>
</template>
<script>
/***************************/
/* 应用中各页面复用的tabbar */
/***************************/
import routes from '@/router/router' // 从router中获取信息
export default {
    name: 'app-tab-bar',
    computed:{
      list(){
        return routes.filter(route=>route.meta?.inTabbar).map(item=>({ // 循环遍历拿到信息
          pagePath: item.path,
          text: item.meta.title,
          icon: item.meta.icon,
        }))
      },
    },
}
</script>
<style lang="less">
</style>
根据路由激活后isActive来确定是否选中(components文件夹)
:class="['tab-bar-item', isActive && 'router-link-active', isExactActive && 'router-link-exact-active']"
只有isActive,isExactActive为真才会有属性router-link-active,router-link-exact-active也就是渲染样式
放置全局前置守卫来判定是否登录(router文件夹)
// 全局前置路由守卫,实现页面拦截
router.beforeEach((to,from,next)=>{
  if(to.meta?.permission){ // 在登录后才能访问的路由中有meta={permission:true}
    if(store.state.shoppingCart.token){
      next()
    }else{
      next('/login')
    }
  }else{
    next()
  }
})
- to要到达的路由
- from从那个路由来
- next下一步(无论哪种状态都必须执行下一步操作,不然会阻止程序继续执行)
store仓库,仓库中的数据在启用命名空间后只能在store中进行更改,并且调用时要加上仓库名称
- 启用命名空间
namespaced: true, // 命名空间(名字空间)
- 配置文件也有相应配置
export default new Vuex.Store({
  strict: process.env.NODE_ENV !== 'production', // 启用严格模式,保证在mutation中更改数据
  modules: {
    shoppingCart, //shoppingCart 是这个模块命名空间
  },
  plugins: [createPersistedState({
    storage: sessionStorage, // 默认是向 localStorage 中保存数据
    paths:[
      'shoppingCart.token',
      'shoppingCart.name',
    ],
  })],
})
- 调用store时要加上名字
import { mapActions,mapGetters } from 'vuex' // 引入映射
export default {
  name:'cart',
  computed:{
    carts(){
      return this.$store.state.shoppingCart.carts
    },
    ...mapGetters('shoppingCart',['allChecked','allMoney']), // 前面加入模块名shoppingCart
  },
  methods:{
    ...mapActions('shoppingCart',['removeCart','changNumCart','changCheckedSingle','changCheckedAll']),
    // 前面加入模块名shoppingCart
    onSubmit(){
      console.log("提交订单");
    },
    onClickEditAddress(){
      console.log('修改地址');
    },
  },
}
分类页面刚进入就显示商品信息
 created(){
    this.$router.push({
      name:'sub',
      params:{
        name:this.navList[0],
      },
    })
  },
也就是在分类页面加载好后即向子路由发送网络请求拿到第一个分类商品中的数据
项目结构
- BE(back-end后端)
- bin 后端启动目录
- www
- email
- email.js(发送验证码)
- model
- index.js(配置连接数据库)
- public(默认的一些样式)
- routes
- index.js(公共的获取商品数据和轮播图)
- private.js(私有的需要登录后获取用户信息)
- user.js(登录与注册模块)
- views(默认配置视图)
- app.js(入口文件)
- config.js(密钥存放文件)
- package-lock.json(配置文件)
- package.json(三方包资源)
- bin 后端启动目录
- dist(打包文件存放)
- public (前端启动目录)
- favicon.ico(图标存放)
- index.html(前端主界面)
- src(前端资源存放)
- api(网络资源统一适配)
- constants.js(前端放送网络请求用到的接口)
- rotation.js(获取轮播图与商品模块)
- search.js(搜索模块)
- user.js(处理与用户信息相关模块)
- assets(存放静态资源)
- components (存放组件)
- app-nav-bar(同步返回通用组件)
- index.vue
- app-tab-bar(拿到路由中信息并处理)
- index.vue
- tab-bar (其他一些组件)
- index.vue(自定义插件)
- search.vue(搜索功能,除主界面使用)
- search-box.vue(搜索功能,主界面使用)
- tab-bar.vue (底部导航)
- app-nav-bar(同步返回通用组件)
- router(路由)
- index.js(路由模块)
- router.js(路由分配)
- store(仓库)
- modules
- shopping-cart.js(购物车逻辑处理模块)
- index.js(仓库配置)
- modules
- utils(工具模块)
- request.js(封装axios)
- vant-import.js(引入vant组件)
- views(视图模块)
- cart
- index.vue(购物车视图)
- category
- index.vue(商品分类左边)
- sub-category.vue(商品分类右边)
- detail
- index.vue(商品详情)
- home
- index.vue(主界面)
- login
- index.vue(登录与注册)
- mine
- changAvatar.vue(更改用户头像)
- index.vue(我的页面)
- not-found
- index.vue(路径错误是404界面)
- searchResult
- searchResult.vue(搜索结果页面)
- cart
- app.vue(主界面)
- main.js(入口配置文件)
- api(网络资源统一适配)
- babel.config.js(配置文件)
- jsconfig.json(JS配置文件)
- package-lock.json(配置文件)
- package.json(三方包资源)
- vue.config.js(vue配置文件)
移动端适配
直接通过PC端写的代码在移动端不同的设备上,布局会出现问题
让不同设备的视口取得最佳CSS像素
<meta name="viewport" content="width=device-width, initial-scale=1, maximum-scale=1, minimum-scale=1, user-scalable=no">
安装 postcss,postcss-pxtorem,postcss-loader,postcss-import,postcss-url一系列插件
npm install postcss@8.2.6 --save
npm install postcss-import@14.0.0 --save
npm install postcss-loader@5.0.0 --save
npm install postcss-pxtorem@5.1.1 --save
npm install postcss-url@10.1.1 --save
在项目根目录下添加 .postcssrc.js 文件
module.exports = {
  plugins: {
    'postcss-pxtorem': {
      rootValue: 32, //根目录的字体大小设为32px
      propList: ['*'], //proplist:是那些属性需要转换成rem,全部
      minPixelValue: 2 //最小转换单位.2px
    }
  }
};
在项目中index.html的头部添加下面这段js代码:
<script>(function () {
    function autoRootFontSize() {
      document.documentElement.style.fontSize = Math.min(screen.width, document.documentElement
        .getBoundingClientRect().width) / 470 * 32 + 'px';
      // 取screen.width和document.documentElement.getBoundingClientRect().width的最小值;
      // 除以470,乘以32;意思就是相对于470大小的32px;
    }
    window.addEventListener('resize', autoRootFontSize);
    autoRootFontSize();
  })();</script>
注:设计师制作的效果图常为750px,为了方便直接读取UI标好的像素大小,根目录的字体大小就设置为32px;
打包
HBuilder X
新建项目
- 文件 => 新建 => 项目
- 选择模板
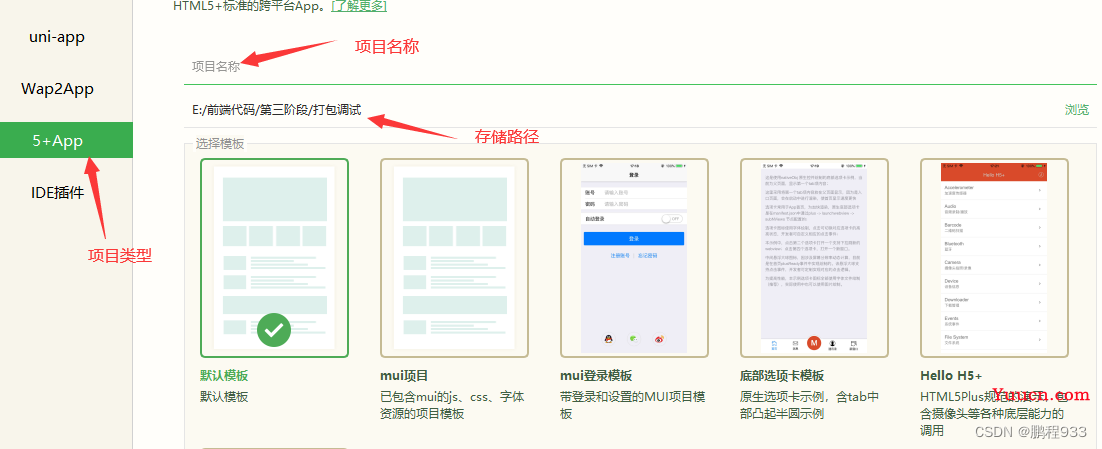
- 将打包好的dist里面的文件放入到项目里
调试
- 可以先连接手机,打开手机开发者模式,打开usb调试
- HBuilder X 运行 => 运行到手机或模拟器 => 运行到Android App基座
- 会在手机上安装一个调试工具,安装后点击运行就能在手机上看到效果
打包
- 配置manifest.json
- 配置应用标识(一般自带)
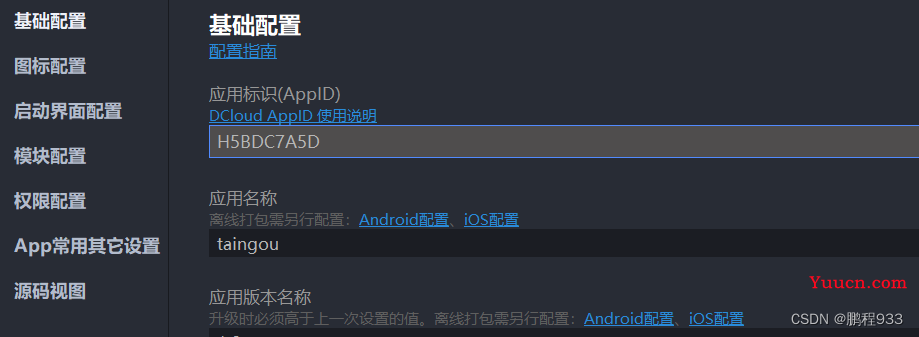
-
配置应用图标

-
点击 发行 => 原生App-云打包
-
如果没有账号的话,需要先注册个账号(邮箱和电话必须验证)
-
打包配置
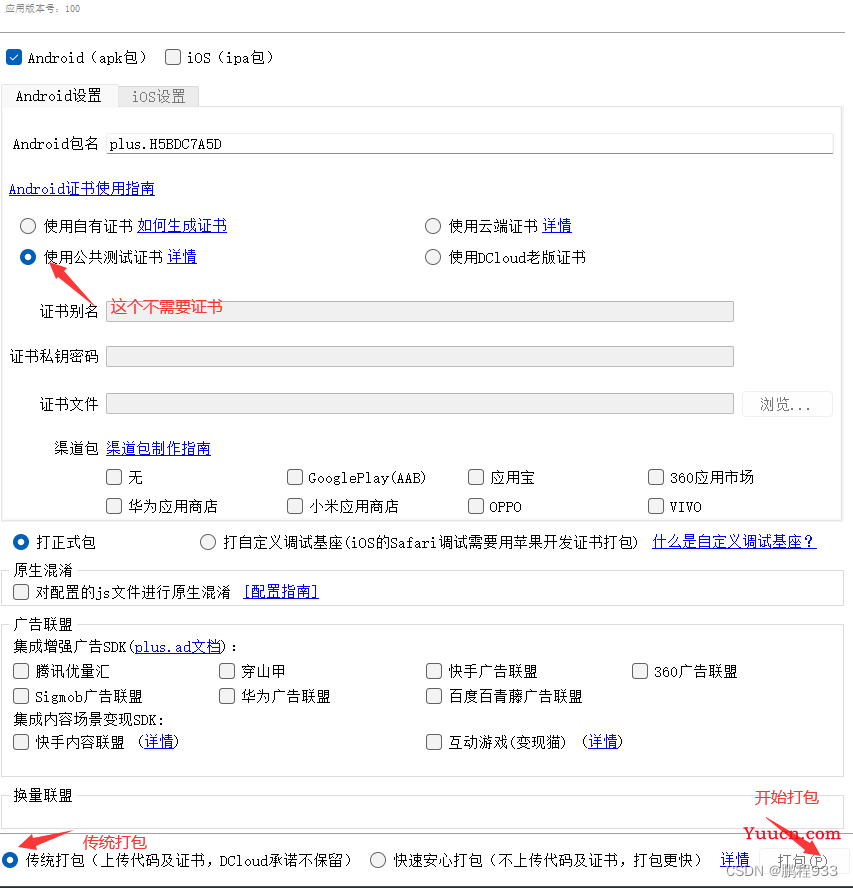
-
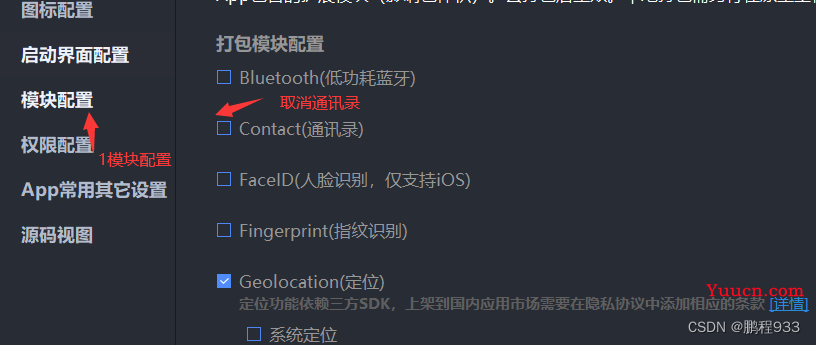
如果打包出现要实名认证可以取消通讯录
-
打包成功

-
点击地址下载