1. 协议的作用
TCP/IP 中消息传输基于流的方式,没有边界
协议的目的就是划定消息的边界,制定通信双方要共同遵守的通信规则
2. Redis 协议
如果我们要向 Redis 服务器发送一条 set name Nyima 的指令,需要遵守如下协议
// 该指令一共有3部分,每条指令之后都要添加回车与换行符
*3\r\n
// 第一个指令的长度是3
$3\r\n
// 第一个指令是set指令
set\r\n
// 下面的指令以此类推
$4\r\n
name\r\n
$5\r\n
Nyima\r\n
客户端代码如下
public class RedisClient {
    static final Logger log = LoggerFactory.getLogger(StudyServer.class);
    public static void main(String[] args) {
        NioEventLoopGroup group =  new NioEventLoopGroup();
        try {
            ChannelFuture channelFuture = new Bootstrap()
                    .group(group)
                    .channel(NioSocketChannel.class)
                    .handler(new ChannelInitializer<SocketChannel>() {
                        @Override
                        protected void initChannel(SocketChannel ch) {
                            // 打印日志
                            ch.pipeline().addLast(new LoggingHandler(LogLevel.DEBUG));
                            ch.pipeline().addLast(new ChannelInboundHandlerAdapter() {
                                @Override
                                public void channelActive(ChannelHandlerContext ctx) throws Exception {
                                    // 回车与换行符
                                    final byte[] LINE = {'\r','\n'};
                                    // 获得ByteBuf
                                    ByteBuf buffer = ctx.alloc().buffer();
                                    // 连接建立后,向Redis中发送一条指令,注意添加回车与换行
                                    // set name Nyima
                                    buffer.writeBytes("*3".getBytes());
                                    buffer.writeBytes(LINE);
                                    buffer.writeBytes("$3".getBytes());
                                    buffer.writeBytes(LINE);
                                    buffer.writeBytes("set".getBytes());
                                    buffer.writeBytes(LINE);
                                    buffer.writeBytes("$4".getBytes());
                                    buffer.writeBytes(LINE);
                                    buffer.writeBytes("name".getBytes());
                                    buffer.writeBytes(LINE);
                                    buffer.writeBytes("$5".getBytes());
                                    buffer.writeBytes(LINE);
                                    buffer.writeBytes("Nyima".getBytes());
                                    buffer.writeBytes(LINE);
                                    ctx.writeAndFlush(buffer);
                                }
                            });
                        }
                    })
                    .connect(new InetSocketAddress("localhost", 6379));
            channelFuture.sync();
            // 关闭channel
            channelFuture.channel().close().sync();
        } catch (InterruptedException e) {
            e.printStackTrace();
        } finally {
            // 关闭group
            group.shutdownGracefully();
        }
    }
}
控制台打印结果
1600 [nioEventLoopGroup-2-1] DEBUG io.netty.handler.logging.LoggingHandler  - [id: 0x28c994f1, L:/127.0.0.1:60792 - R:localhost/127.0.0.1:6379] WRITE: 34B
         +-------------------------------------------------+
         |  0  1  2  3  4  5  6  7  8  9  a  b  c  d  e  f |
+--------+-------------------------------------------------+----------------+
|00000000| 2a 33 0d 0a 24 33 0d 0a 73 65 74 0d 0a 24 34 0d |*3..$3..set..$4.|
|00000010| 0a 6e 61 6d 65 0d 0a 24 35 0d 0a 4e 79 69 6d 61 |.name..$5..Nyima|
|00000020| 0d 0a                                           |..              |
+--------+-------------------------------------------------+----------------+
Redis 中查询执行结果

3. HTTP 协议
HTTP 协议在请求行请求头中都有很多的内容,自己实现较为困难,可以使用 HttpServerCodec 作为服务器端的解码器与编码器,来处理 HTTP 请求
// HttpServerCodec 中既有请求的解码器 HttpRequestDecoder 又有响应的编码器 HttpResponseEncoder
// Codec(CodeCombine) 一般代表该类既作为 编码器 又作为 解码器
public final class HttpServerCodec extends CombinedChannelDuplexHandler<HttpRequestDecoder, HttpResponseEncoder>
        implements HttpServerUpgradeHandler.SourceCodec
服务器代码
public class HttpServer {
    static final Logger log = LoggerFactory.getLogger(StudyServer.class);
    public static void main(String[] args) {
        NioEventLoopGroup group = new NioEventLoopGroup();
        new ServerBootstrap()
                .group(group)
                .channel(NioServerSocketChannel.class)
                .childHandler(new ChannelInitializer<SocketChannel>() {
                    @Override
                    protected void initChannel(SocketChannel ch) {
                        ch.pipeline().addLast(new LoggingHandler(LogLevel.DEBUG));
                        // 作为服务器,使用 HttpServerCodec 作为编码器与解码器
                        ch.pipeline().addLast(new HttpServerCodec());
                        // 服务器只处理HTTPRequest
                        ch.pipeline().addLast(new SimpleChannelInboundHandler<HttpRequest>() {
                            @Override
                            protected void channelRead0(ChannelHandlerContext ctx, HttpRequest msg) {
                                // 获得请求uri
                                log.debug(msg.uri());
                                // 获得完整响应,设置版本号与状态码
                                DefaultFullHttpResponse response = new DefaultFullHttpResponse(msg.protocolVersion(), HttpResponseStatus.OK);
                                // 设置响应内容
                                byte[] bytes = "<h1>Hello, World!</h1>".getBytes(StandardCharsets.UTF_8);
                                // 设置响应体长度,避免浏览器一直接收响应内容
                                response.headers().setInt(CONTENT_LENGTH, bytes.length);
                                // 设置响应体
                                response.content().writeBytes(bytes);
                                // 写回响应
                                ctx.writeAndFlush(response);
                            }
                        });
                    }
                })
                .bind(8080);
    }
}
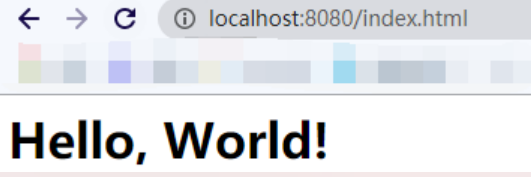
服务器负责处理请求并响应浏览器。所以只需要处理 HTTP 请求即可
// 服务器只处理HTTPRequest
ch.pipeline().addLast(new SimpleChannelInboundHandler<HttpRequest>()
获得请求后,需要返回响应给浏览器。需要创建响应对象 DefaultFullHttpResponse,设置 HTTP 版本号及状态码,为避免浏览器获得响应后,因为获得 CONTENT_LENGTH 而一直空转,需要添加 CONTENT_LENGTH 字段,表明响应体中数据的具体长度
// 获得完整响应,设置版本号与状态码
DefaultFullHttpResponse response = new DefaultFullHttpResponse(msg.protocolVersion(), HttpResponseStatus.OK);
// 设置响应内容
byte[] bytes = "<h1>Hello, World!</h1>".getBytes(StandardCharsets.UTF_8);
// 设置响应体长度,避免浏览器一直接收响应内容
response.headers().setInt(CONTENT_LENGTH, bytes.length);
// 设置响应体
response.content().writeBytes(bytes);
运行结果
浏览器

控制台
// 请求内容
1714 [nioEventLoopGroup-2-2] DEBUG io.netty.handler.logging.LoggingHandler  - [id: 0x72630ef7, L:/0:0:0:0:0:0:0:1:8080 - R:/0:0:0:0:0:0:0:1:55503] READ: 688B
         +-------------------------------------------------+
         |  0  1  2  3  4  5  6  7  8  9  a  b  c  d  e  f |
+--------+-------------------------------------------------+----------------+
|00000000| 47 45 54 20 2f 66 61 76 69 63 6f 6e 2e 69 63 6f |GET /favicon.ico|
|00000010| 20 48 54 54 50 2f 31 2e 31 0d 0a 48 6f 73 74 3a | HTTP/1.1..Host:|
|00000020| 20 6c 6f 63 61 6c 68 6f 73 74 3a 38 30 38 30 0d | localhost:8080.|
|00000030| 0a 43 6f 6e 6e 65 63 74 69 6f 6e 3a 20 6b 65 65 |.Connection: kee|
|00000040| 70 2d 61 6c 69 76 65 0d 0a 50 72 61 67 6d 61 3a |p-alive..Pragma:|
....
// 响应内容
1716 [nioEventLoopGroup-2-2] DEBUG io.netty.handler.logging.LoggingHandler  - [id: 0x72630ef7, L:/0:0:0:0:0:0:0:1:8080 - R:/0:0:0:0:0:0:0:1:55503] WRITE: 61B
         +-------------------------------------------------+
         |  0  1  2  3  4  5  6  7  8  9  a  b  c  d  e  f |
+--------+-------------------------------------------------+----------------+
|00000000| 48 54 54 50 2f 31 2e 31 20 32 30 30 20 4f 4b 0d |HTTP/1.1 200 OK.|
|00000010| 0a 43 6f 6e 74 65 6e 74 2d 4c 65 6e 67 74 68 3a |.Content-Length:|
|00000020| 20 32 32 0d 0a 0d 0a 3c 68 31 3e 48 65 6c 6c 6f | 22....<h1>Hello|
|00000030| 2c 20 57 6f 72 6c 64 21 3c 2f 68 31 3e          |, World!</h1>   |
+--------+-------------------------------------------------+----------------+
4. 自定义协议
组成要素
-
魔数:用来在第一时间判定接收的数据是否为无效数据包
-
版本号:可以支持协议的升级
-
序列化算法
:消息正文到底采用哪种序列化反序列化方式
- 如:json、protobuf、hessian、jdk
-
指令类型:是登录、注册、单聊、群聊… 跟业务相关
-
请求序号:为了双工通信,提供异步能力
-
正文长度
-
消息正文
编码器与解码器
public class MessageCodec extends ByteToMessageCodec<Message> {
    @Override
    protected void encode(ChannelHandlerContext ctx, Message msg, ByteBuf out) throws Exception {
        // 设置魔数 4个字节
        out.writeBytes(new byte[]{'N','Y','I','M'});
        // 设置版本号 1个字节
        out.writeByte(1);
        // 设置序列化方式 1个字节
        out.writeByte(1);
        // 设置指令类型 1个字节
        out.writeByte(msg.getMessageType());
        // 设置请求序号 4个字节
        out.writeInt(msg.getSequenceId());
        // 为了补齐为16个字节,填充1个字节的数据
        out.writeByte(0xff);
        // 获得序列化后的msg
        ByteArrayOutputStream bos = new ByteArrayOutputStream();
        ObjectOutputStream oos = new ObjectOutputStream(bos);
        oos.writeObject(msg);
        byte[] bytes = bos.toByteArray();
        // 获得并设置正文长度 长度用4个字节标识
        out.writeInt(bytes.length);
        // 设置消息正文
        out.writeBytes(bytes);
    }
    @Override
    protected void decode(ChannelHandlerContext ctx, ByteBuf in, List<Object> out) throws Exception {
        // 获取魔数
        int magic = in.readInt();
        // 获取版本号
        byte version = in.readByte();
        // 获得序列化方式
        byte seqType = in.readByte();
        // 获得指令类型
        byte messageType = in.readByte();
        // 获得请求序号
        int sequenceId = in.readInt();
        // 移除补齐字节
        in.readByte();
        // 获得正文长度
        int length = in.readInt();
        // 获得正文
        byte[] bytes = new byte[length];
        in.readBytes(bytes, 0, length);
        ObjectInputStream ois = new ObjectInputStream(new ByteArrayInputStream(bytes));
        Message message = (Message) ois.readObject();
		// 将信息放入List中,传递给下一个handler
        out.add(message);
        // 打印获得的信息正文
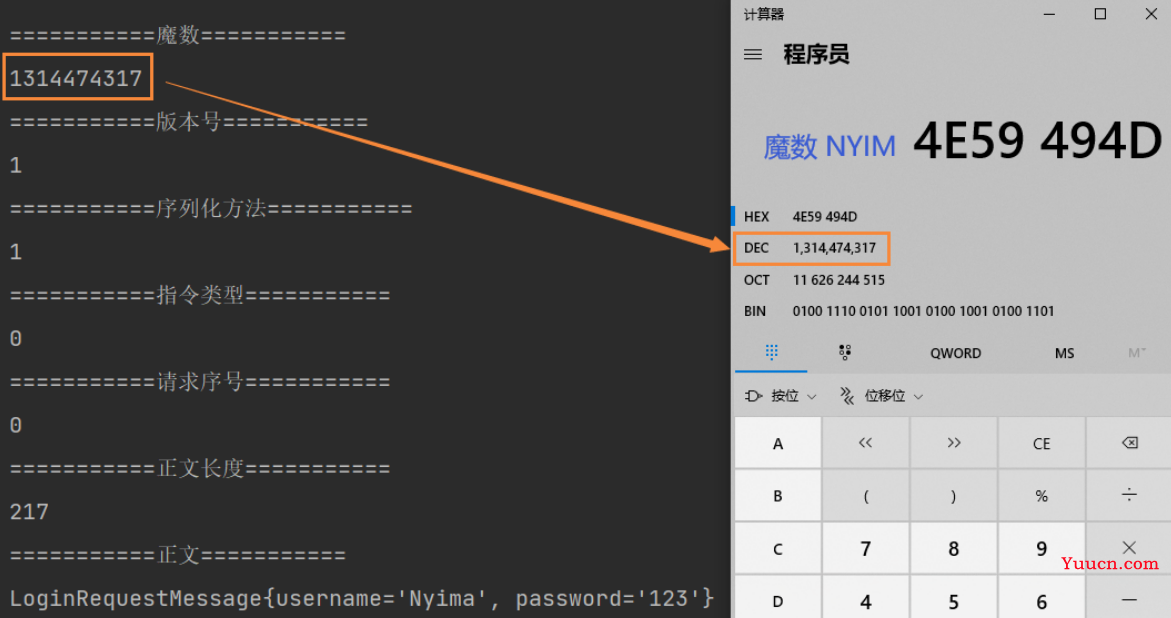
        System.out.println("===========魔数===========");
        System.out.println(magic);
        System.out.println("===========版本号===========");
        System.out.println(version);
        System.out.println("===========序列化方法===========");
        System.out.println(seqType);
        System.out.println("===========指令类型===========");
        System.out.println(messageType);
        System.out.println("===========请求序号===========");
        System.out.println(sequenceId);
        System.out.println("===========正文长度===========");
        System.out.println(length);
        System.out.println("===========正文===========");
        System.out.println(message);
    }
}
- 编码器与解码器方法源于父类 ByteToMessageCodec,通过该类可以自定义编码器与解码器, 泛型类型为被编码与被解码的类。此处使用了自定义类 Message,代表消息
public class MessageCodec extends ByteToMessageCodec<Message>
-
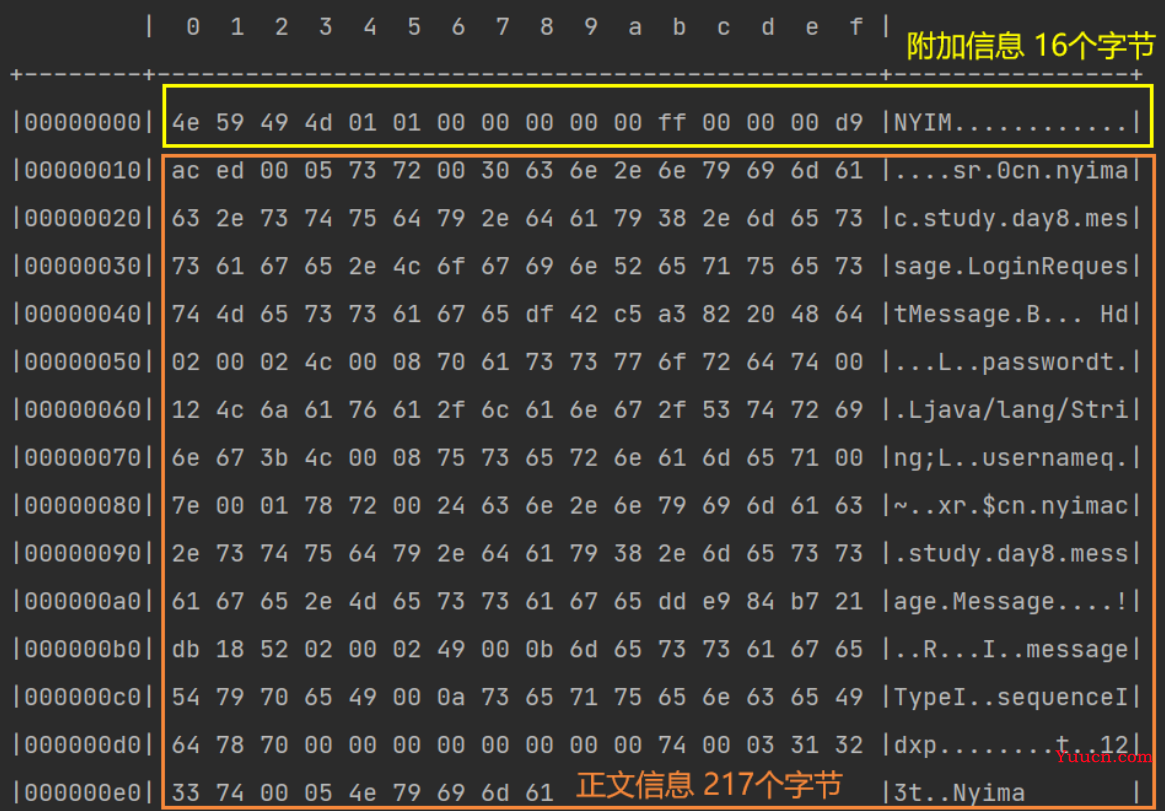
编码器负责将附加信息与正文信息写入到 ByteBuf 中,其中附加信息总字节数最好为 2n,不足需要补齐。正文内容如果为对象,需要通过序列化将其放入到 ByteBuf 中
-
解码器负责将 ByteBuf 中的信息取出,并放入 List 中,该 List 用于将信息传递给下一个 handler
编写测试类
public class TestCodec {
    static final org.slf4j.Logger log = LoggerFactory.getLogger(StudyServer.class);
    public static void main(String[] args) throws Exception {
        EmbeddedChannel channel = new EmbeddedChannel();
        // 添加解码器,避免粘包半包问题
        channel.pipeline().addLast(new LengthFieldBasedFrameDecoder(1024, 12, 4, 0, 0));
        channel.pipeline().addLast(new LoggingHandler(LogLevel.DEBUG));
        channel.pipeline().addLast(new MessageCodec());
        LoginRequestMessage user = new LoginRequestMessage("Nyima", "123");
        // 测试编码与解码
        ByteBuf byteBuf = ByteBufAllocator.DEFAULT.buffer();
        new MessageCodec().encode(null, user, byteBuf);
        channel.writeInbound(byteBuf);
    }
}
- 测试类中用到了 LengthFieldBasedFrameDecoder,避免粘包半包问题
- 通过 MessageCodec 的 encode 方法将附加信息与正文写入到 ByteBuf 中,通过 channel 执行入站操作。入站时会调用 decode 方法进行解码
运行结果


@Sharable 注解
为了提高 handler 的复用率,可以将 handler 创建为 handler 对象,然后在不同的 channel 中使用该 handler 对象进行处理操作
LoggingHandler loggingHandler = new LoggingHandler(LogLevel.DEBUG);
// 不同的channel中使用同一个handler对象,提高复用率
channel1.pipeline().addLast(loggingHandler);
channel2.pipeline().addLast(loggingHandler);
但是并不是所有的 handler 都能通过这种方法来提高复用率的,例如 LengthFieldBasedFrameDecoder。如果多个 channel 中使用同一个 LengthFieldBasedFrameDecoder 对象,则可能发生如下问题
-
channel1 中收到了一个半包,LengthFieldBasedFrameDecoder 发现不是一条完整的数据,则没有继续向下传播
-
此时 channel2 中也收到了一个半包,因为两个 channel 使用了同一个 LengthFieldBasedFrameDecoder,存入其中的数据刚好拼凑成了一个完整的数据包。LengthFieldBasedFrameDecoder 让该数据包继续向下传播,最终引发错误
为了提高 handler 的复用率,同时又避免出现一些并发问题,Netty 中原生的 handler 中用 @Sharable 注解来标明,该 handler 能否在多个 channel 中共享。
只有带有该注解,才能通过对象的方式被共享,否则无法被共享
自定义编解码器能否使用 @Sharable 注解
这需要根据自定义的 handler 的处理逻辑进行分析
我们的 MessageCodec 本身接收的是 LengthFieldBasedFrameDecoder 处理之后的数据,那么数据肯定是完整的,按分析来说是可以添加 @Sharable 注解的
但是实际情况我们并不能添加该注解,会抛出异常信息 ChannelHandler cn.nyimac.study.day8.protocol.MessageCodec is not allowed to be shared
-
因为 MessageCodec 继承自 ByteToMessageCodec,ByteToMessageCodec 类的注解如下

这就意味着 ByteToMessageCodec 不能被多个 channel 所共享的
- 原因:因为该类的目标是:将 ByteBuf 转化为 Message,意味着传进该 handler 的数据还未被处理过。所以传过来的 ByteBuf 可能并不是完整的数据,如果共享则会出现问题
如果想要共享,需要怎么办呢?
继承 MessageToMessageDecoder 即可。 该类的目标是:将已经被处理的完整数据再次被处理。传过来的 Message 如果是被处理过的完整数据,那么被共享也就不会出现问题了,也就可以使用 @Sharable 注解了。实现方式与 ByteToMessageCodec 类似
@ChannelHandler.Sharable
public class MessageSharableCodec extends MessageToMessageCodec<ByteBuf, Message> {
    @Override
    protected void encode(ChannelHandlerContext ctx, Message msg, List<Object> out) throws Exception {
        ...
    }
    @Override
    protected void decode(ChannelHandlerContext ctx, ByteBuf msg, List<Object> out) throws Exception {
		...
    }
}
本文由
传智教育博学谷教研团队发布。如果本文对您有帮助,欢迎
关注和点赞;如果您有任何建议也可留言评论或私信,您的支持是我坚持创作的动力。转载请注明出处!