1.安装axios
npm i axios
2.在合适路径下新建request.ts(名称可随意),例如可以在项目的src下创建utils文件夹创建request.ts
![]()
3.导入axios并创建axios实例
//引入axios
import axios from 'axios'
//使用指定配置创建axios实例
const instance = axios.create({
// 基础路径
baseURL: 'http://pcapi-xiaotuxian-front-devtest.itheima.net/',
// 请求超时时间
timeout: 5000,
// ....其他配置
})
4.封装请求函数
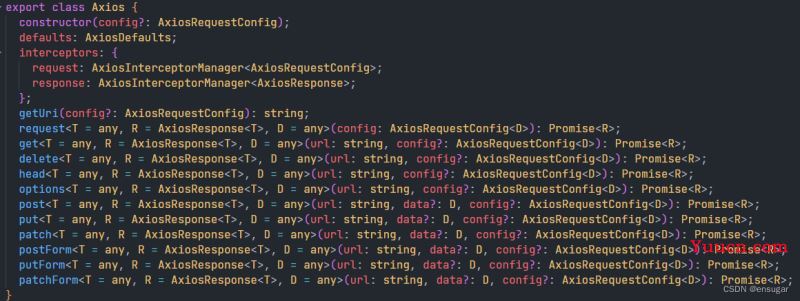
① 查看axios的类型声明文件

② 请求配置对象的类型

从图中可知AxiosRequestConfig是axios请求配置对象的接口,例如下面的代码,axios函数的第一个参数就是AxiosRequestConfig接口的实例。而泛型D则是请求配置对象(axios函数的第一个参数)中data的类型,默认类型为any,因为AxiosRequestConfig接口内容太多就不列出来了。
axios({
url: 'http://',
method: 'post',
data: {}
// ....
})
③ 响应对象的类型

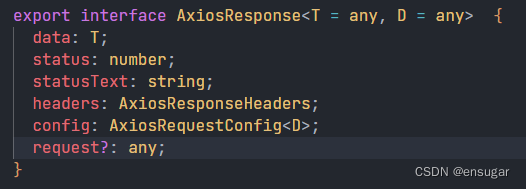
axios发送数据请求后会返回的promise实例,AxiosResponse就是这个promise实例成功后回调函数的第一个参数的类型,例如下面的代码,代码中的response的类型就是AxiosResponse。
axios({
url: 'http://',
method: 'post',
data: {}
}).then((response) => {
console.log(response.data)
})
从下图可知,AxiosResponse接口第一个泛型参数T,泛型T就是AxiosResponse接口中data的数据类型,默认类型为any,也就是上图response.data的类型。第二个泛型参数和请求配置对象一样,是AxiosRequestConfig接口中data的类型,默认类型为any。

④ axios.request函数
从axios的声明文件中可以看出直接使用axios()发送网络请求是不能指定泛型参数的,而axios.request()对泛型的支持非常友好,请看下图

request函数的第一个泛型T指定了第二个泛型AxiosResponse接口中data的类型。第二个泛型R默认为AxiosResponse,指定了request函数返回的promise实例成功的回调函数的第一个参数的类型。第三个泛型D指定了请求配置对象中data的数据类型。(看不懂的话,请再结合第②③点再看一次)
⑤ 开始封装
// 后台给我们的数据类型如下
// 泛型T指定了Response类型中result的类型,默认为any
type Response<T = any> = {
// 描述
msg: string
// 返回的数据
result: T
}
// AxiosRequestConfig从axios中导出的,将config声明为AxiosRequestConfig,这样我们调用函数时就可以获得TS带来的类型提示
// 泛型T用来指定Reponse类型中result的类型
export default <T> (config: AxiosRequestConfig) => {
// 指定promise实例成功之后的回调函数的第一个参数的类型为Response<T>
return new Promise<Response<T>>((resolve, reject) => {
// instance是我们在上面创建的axios的实例
// 我们指定instance.request函数的第一个泛型为Response,并把Response的泛型指定为函数的泛型T
// 第二个泛型AxiosResponse的data类型就被自动指定为Response<T>
// AxiosResponse从axios中导出的,也可以不指定,TS会自动类型推断
instance.request<Response<T>>(config).then((response: AxiosResponse<Response<T>>) => {
// response类型就是AxiosResponse<Response<T>>,而data类型就是我们指定的Response<T>
// 请求成功后就我们的数据从response取出并使返回的promise实例的状态变为成功的
resolve(response.data)
}).catch((error :any) => {
// 请求失败的处理
reject(error)
})
})
}
⑥ 使用
import request from "@/utils/request";
// 商品分类
export interface Category {
id: string;
name: string;
picture: string;
children: Category[];
goods: CategoryGoods[];
}
// 商品分类下的商品
export interface CategoryGoods {
id: string;
name: string;
desc: string;
price: string;
picture: string;
}
/**
* 获取首页商品分类
* @returns 首页商品分类数组
*/
export const reqGetCategory = () => {
// 指定我们封装的request函数的第一个泛型的类型为Category[],也就是指定 Response<T> 中T的类型
return request<Category[]>({
url: '/home/category/head',
method: 'get'
})
}
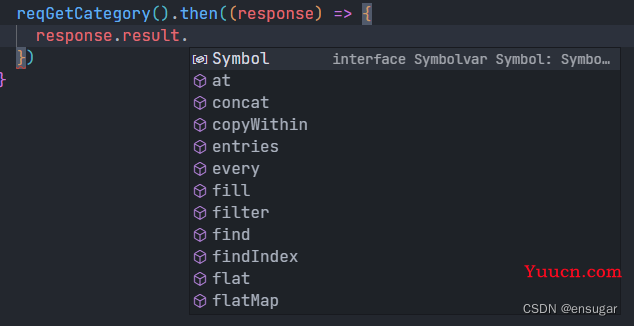
这样我就可以得到类型提示了
下图resonse的类型是Response

下图response.result的类型是Category[]

下图是response.result数组中元素的类型是Category

从下图我们可以看出response的类型

还可以在拦截器里添加更多功能,这里就不再赘述了。如有错误,请多包涵。
总结
到此这篇关于如何使用TS对axios的进行简单封装的文章就介绍到这了,更多相关TS对axios简单封装内容请搜索本站以前的文章或继续浏览下面的相关文章希望大家以后多多支持本站!