一、http 模块
http 模块是 Node.js 官方提供的、用来创建 web 服务器的模块。
通过 http 模块提供的 http.createServer() 方法,就能方便的把一台普通的电脑,变成一台 web 服务器,从而对外提供 web 资源服务。
1、创建 web 服务器
- 导入 http 模块
- 创建 web 服务器实例
- 为服务器实例绑定 request 事件,监听客户端的请求
- 启动服务器
示例:监听 8080 服务
// 导入 http 模块
const http = require('http')
// 创建 web 服务器实例
const server = http.createServer()
// 为服务器实例绑定 request 事件 监听客户端的请求
server.on('request', function (req, res) {
console.log('请求中...')
})
// 启动服务
server.listen(8080, function () {
console.log('http://127.0.0.1:8080')
})

2、req 请求对象
只要服务器接收到了客户端的请求,就会调用通过 server.on() 为服务器绑定的 request 事件处理函数
示例:在事件处理函数中,访问与客户端相关的数据或属性
// 导入 http 模块
const http = require('http')
// 创建 web 服务器实例
const server = http.createServer()
// req 是请求对象 包含了与客户端相关的数据和属性
server.on('request', (req) => {
// req.url 客户端请求的 url 地址
const url = req.url
// req.method 是客户端请求的 method 类型
const method = req.method
const str = `Your request url is ${url} and request method is ${method}`
console.log(str)
})
// 启动服务
server.listen(8080, function () {
console.log('http://127.0.0.1:8080')
})

3、res 响应对象
在服务器的 request 事件处理函数中,如果想访问与服务器相关的数据或属性,需要使用 response
示例:请求响应
// 导入 http 模块
const http = require('http')
// 创建 web 服务器实例
const server = http.createServer()
// req 是请求对象 包含了与客户端相关的数据和属性
server.on('request', (req, res) => {
// req.url 客户端请求的 url 地址
const url = req.url
// req.method 是客户端请求的 method 类型
const method = req.method
const str = `Your request url is ${url} and request method is ${method}`
console.log(str)
// 调用 res.end() 方法 向客户端响应一些内容
res.end(str)
})
// 启动服务
server.listen(8080, function () {
console.log('http://127.0.0.1:8080')
})


4、解决中文乱码问题
当调用 res.end() 方法,向客户端发送中文内容时,会出现乱码问题,需要手动设置内容的编码格式
示例:解决中文乱码
// 导入 http 模块
const http = require('http')
// 创建 web 服务器实例
const server = http.createServer()
// req 是请求对象 包含了与客户端相关的数据和属性
server.on('request', (req, res) => {
// req.url 客户端请求的 url 地址
const url = req.url
// req.method 是客户端请求的 method 类型
const method = req.method
const str = `请求地址是 ${url} 请求方法是 ${method}`
console.log(str)
// 设置 Content-Type 响应头 解决中文乱码问题
res.setHeader('Content-Type', 'text/html; charset=utf-8')
// 调用 res.end() 方法 向客户端响应一些内容
res.end(str)
})
// 启动服务
server.listen(8080, function () {
console.log('http://127.0.0.1:8080')
})


5、根据不同的 url 响应不同的 html 内容
示例:步骤如下
- 获取请求的 url 地址
- 设置默认的响应内容为 404 Not found
- 判断用户请求的是否为 / 或 /index.html 首页
- 判断用户请求的是否为 /about.html 关于页面
- 设置 Content-Type 响应头,防止中文乱码
- 使用 res.end() 把内容响应给客户端
// 导入 http 模块
const http = require('http')
// 创建 web 服务器实例
const server = http.createServer()
// req 是请求对象 包含了与客户端相关的数据和属性
server.on('request', (req, res) => {
// req.url 客户端请求的 url 地址
const url = req.url
// 设置默认的内容为 404 Not Found
let content = '<h1>404 Not Found!</h1>'
// 用户请求页是首页
if(url === '/' || url === '/index.html') {
content = '<h1>首页</h1>'
} else if (url === '/about.html') {
content = '<h1>关于页面</h1>'
}
// 设置 Content-Type 响应头 防止中文乱码
res.setHeader('Content-Type', 'text/html; charset=utf-8')
// 调用 res.end() 方法 向客户端响应一些内容
res.end(content)
})
// 启动服务
server.listen(8080, function () {
console.log('http://127.0.0.1:8080')
})


二、Node.js 中的模块分类
1、三大模块分类
- 内置模块:由 node.js 官方提供的,如 fs、path、http 等
- 自定义模块:用户创建的每个 .js 文件,都是自定义模块
- 第三方模块:由第三方开发出来的模块,使用前要先下载
2、模块作用域
防止了全局变量污染的问题
示例:
index.js 文件
const username = '张三'
function say() {
console.log(username);
}
test.js 文件
const custom = require('./index')
console.log(custom)

3、module.exports 对象
在自定义模块中,可以使用 module.exports 对象,将模块内的成员共享出去,供外界使用。
外界 require() 方法导入自定义模块时,得到的就是 module.exports 所指向的对象
示例:
index.js 文件
const blog = '前端杂货铺'
// 向 module.exports 对象上挂载属性
module.exports.username = '李四'
// 向 module.exports 对象上挂载方法
module.exports.sayHello = function () {
console.log('Hello!')
}
module.exports.blog = blog
test.js 文件
const m = require('./index')
console.log(m)

4、共享成员时的注意点
使用 require() 方法导入模块时,导入的结果,永远以 module.exports 指向的对象为准
示例:
index.js 文件
module.exports.username = '李四'
module.exports.sayHello = function () {
console.log('Hello!')
}
// 让 module.exports 指向一个新对象
module.exports = {
nickname: '张三',
sayHi() {
console.log('Hi!')
}
}
test.js 文件
const m = require('./index')
console.log(m)

5、exports 和 module.exports
默认情况下,exports 和 module.exports 指向同一个对象。
最终共享的结果,还是以 module.exports 指向的对象为准。
示例:
index1.js 文件
exports.username = '杂货铺'
module.exports = {
name: '前端杂货铺',
age: 21
}

index2.js 文件
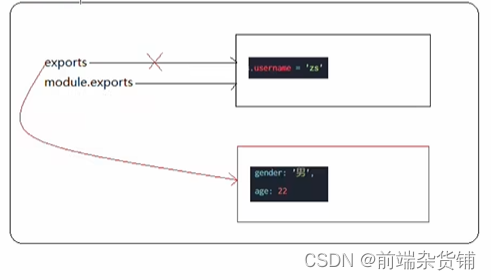
module.exports.username = 'zs'
exports = {
gender: '男',
age: 22
}

index3.js 文件
exports.username = '杂货铺'
module.exports.age = 21
![]()
index4.js 文件
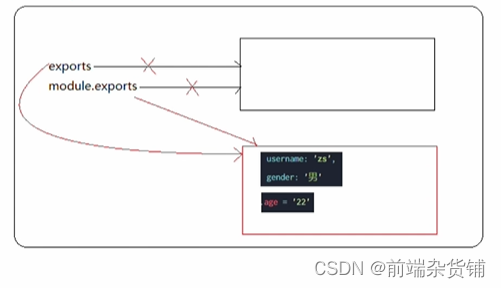
exports = {
gender: '男',
age: 21
}
module.exports = exports
module.exports.username = 'zs'

对 index2.js 文件结果的解析如下:

对 index4.js 文件结果的解析如下:

注意:为防止混乱,尽量不要在同一个模块中同时使用 exports 和 module.exports
到此这篇关于Node.js中http模块和导出共享的文章就介绍到这了,更多相关node.jshttp模块内容请搜索本站以前的文章或继续浏览下面的相关文章希望大家以后多多支持本站!